
Lewis&Clark
New member
So it's been the longest, darkest cold/flu season I can remember. Since November 5th, I've been plagued with 9 separate colds and flus; bronchitis; and since being sick so often doesn't give you much of a chance to fully recover, I ended up with pneumonia to top it all off. Good times. Needless-to-say, it's kept me away from getting done any of the mods I had planned until recently.
So it wasn't until today that I could finally buckle down and get done the hard-wiring of my new ProClip phone mount that I had asked about recently. As an added bonus, I was able to re-run the wires for my aux cable behind the dash.
In case anyone else is interested, I've run up the instructions on how I did the hard-wiring. Turned out to be a lot easier than I had originally imagined. Actually was more of an engineering task in terms of figuring how and where to run the wires than it was a technical challenge of actually doing the wiring job itself.
From that original post of mine asking where and how to wire it up, you can see the parts that the ProClip mount came with. I decided to skip the cheap ass made-in-China crap they gave me for a splicer, and did it the old-fashioned, delicate, but far more reliable way: stripping the cover of the original factory power wire, and soldering the ProClip wires into it. I decided it wasn't worth running all the way through the firewall into the engine compartment, and figured the easiest way to get a reliable connection was to run it to the power source on the bottom of the OEM cigarette/12V assembly next to the shifter. I had replaced the original assembly with the cig lighter version recently, and figured that was the easiest existing power line to tap into.
Step-by-step below.
Step 1
Remove the plastic cover surrounding the transmission shifter. It literally lifts out. Pop up the center console, and lift up from the rear corners of the plastic covering and it should come right out. Use a flathead screwdriver if you need a little leverage, but it should be pretty easy even with fingers.
Detach all the power cords from the bottom of the 12V/cig assembly, so you can fully remove the plastic cover.


Step 2
Follow the instructions on this website to begin disassembling the dash.
I gotta hand it to Toyota. I thought disassembling and reassembling the dash would be a nightmare. It's really not hard. And this coming from someone who's historic automotive expertise (until as recently as last summer) was limited to filling the gas tank. Seriously. It took a little while to make sure I was doing things the right way, but they designed these parts quite well. There's a bunch of size 10 nuts to take out here and there, but there are a ton of parts that literally snap on and snap off. Do it a couple times and I can see how it would take at most 5 or 10 minutes to remove all the pieces.
Anyway, follow the instructions on that site. They're very clear, and have pretty pictures for the mechanically and engineering illiterate like myself to know what the heck to do.
Stop with step 5 on that site though. You don't need to go all the way for this mod. In fact, I didn't even actually remove the entire instrument cluster finish panel/face plate (the gray trim in my photos). I removed the nuts to loosen it, but realized I could fit my hand in the back with it loose to run the wires, so I never actually took it off.
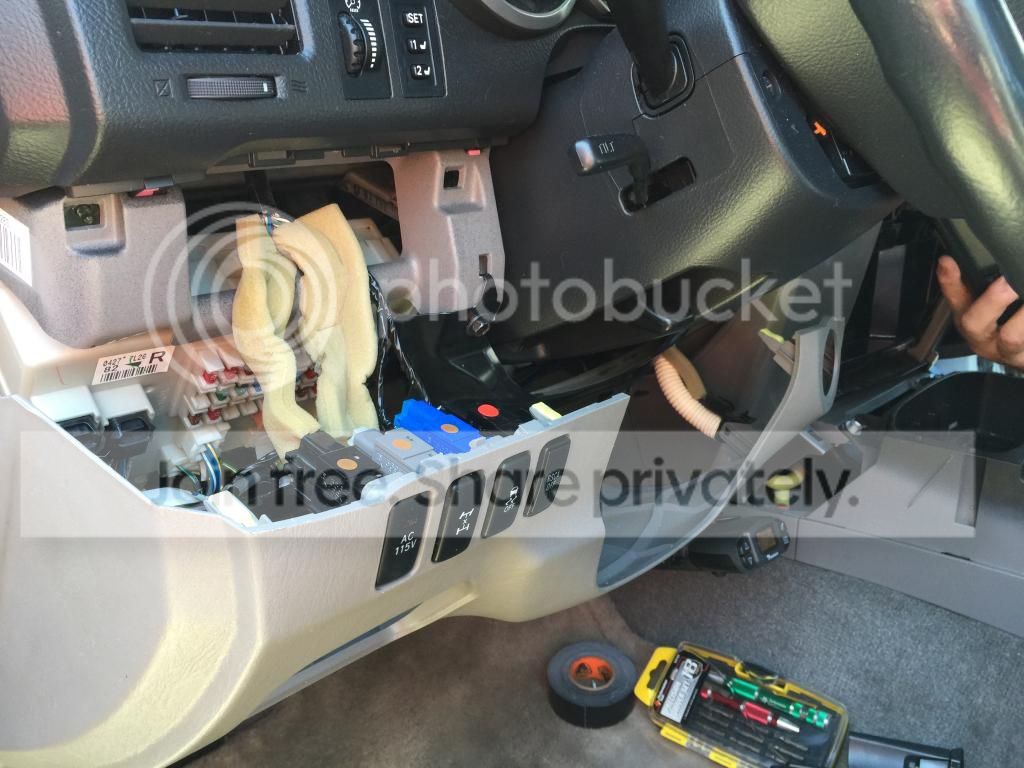

Step 3
This was actually the hardest part, and it's a design/engineering task, not a technical one: deciding where to run the wires to get it from the mount on the dash to the power source by the tranny shifter, and then actually feeding it there without having to literally take out the entire console.
The challenge was that Apple's specs for lighting cables only authorize companies to make a lightning connector on one end, and a USB on the other. Since they presumably can't put an open power line on the end opposite the lightning connector under Apple's licensing terms, ProClip put a USB, which connects to a black box that screws the USB in place, and out the other end of the black box is a long wire that you can run to a car's power source. Smart design, but it meant that my original solution of drilling a hole in the gray trim/face plate to feed the power line through wasn't going to work. It would have had to be a hole big enough to fit the black box through, or even if I unscrewed the USB connector, it'd have to be big enough to fit THAT. Either way, it's a pretty obnoxiously sized hole and I wanted this to look as nicely done as possible.
I looked at running the cord into the area where the AC assembly was removed from, but there's no breathing room to fit a cord through there.
So what I ended up doing was making a small notch in the back-right side of the gray trim assembly, close to where the left edge of the glove box runs up against the side of the dash. I looked closely to make sure there would be space for the power cord behind there when the face plate was put back in place, as I didn't want it to be crushed flush up against the hard plastic frame of the dash behind it all. Plenty of space!
Used a drill bit to drill a reasonably close to the edge of the gray trim assembly, and then a pocket knife saw to cut out the remaining bit of plastic from the drilled hole to the edge. Worried that the vibration of the car as I drive on or off road over time may rub up against the power cord feeding back through this notch, I decided to wrap the part of the cord that goes through there with electrical tape. So then I had to make the hole just a teensy bit bigger.

Once the power cord was fed through that notch, I could pull it behind the electronics area, down below, and then out into the transmission console area where it would be wired.
In an earlier mod, I drilled a hole in the center console storage compartment so I could feed an audio aux cable from the aux outlet in the storage area, down under the center console area, and out the side of the console to hide the wires. While I was in here with the dash pieces off, I figured I'd do it one better. I drilled a hole on the face of the gray trim assembly so I could feed the audio aux cable all the way up the center area, up behind the dash electronics, and through that hole right next to the bottom of the phone. It looks awesome, and it's cleaner than having the cable loose down by the floor when not in use as I had it before.

This was the hardest part. Figuring out where to feed the wires, and actually feeding it -- it's not that it's a tight space, there just aren't a lot of places to get your hands in there to feed it unless you remove the entire center console assembly. I didn't want to do that, so I made do, and it took maybe an extra 10-15 minutes to feed it carefully by hand. Fortunately, the wires were relatively stiff so I could push them through the hardest areas.
Step 4
Connecting the power lines. As I mentioned, the ProClip came with a crappy splicer. I wasn't willing to use it; worried about corrosion and permanent damage to the OEM power source that would be expensive to replace. Thought about getting a better quality splicer, but ultimately decided to go the old fashioned but very reliable method of soldering them together. Part of the reason I preferred this is that soldering is done in part with tin, which is entirely conductive--more-so than copper--so the electrical connection if done properly can be even stronger than it was before I went and messed with it.
First step was to figure out which of the many wires that attach to the bottom of the 12V/cig assembly were the power source wires. On the back end of the assembly, there's a small white connector with a black/white and reddish-brown wire running into it. This is the power source I decided to tap into.
Step 2--delicate! Carefully...oh so carefully...stripping part of the power wire casing to expose the copper lines underneath, on the black/white and red wires. This is where it was extremely helpful to have the help of someone who's done this for years: this is a live wire and I didn't much feel like replacing the $128+ assembly if I happened to cut into the copper too much and sever the connection. I am NOT skilled with this, so I enlisted the help of my father-in-law who's been doing this kind of stuff for decades.
Each half of the ProClip power wire got wrapped around the appropriate Toyota power source wire, and got soldered into place. Not hard actually--just something that requires some experience/practice.


The cardboard you see in the photos was only to catch any "drip" from the soldering gun, should there be any.
Once it was soldered in place and the connection tested, I discovered that my father-in-law had accidentally shorted the fuse when he touched some medal to an exposed wire. So I made a run to the nearest automotive store and bought a bunch of fuses, and replaced the one for the power source in the panel on the left side under the dash.
When all was said and done, I tested the connections, tested the power, and ensured the individual wires were wrapped securely in electrical tape where it was soldered, and then wrapped all the wires together in another layer of electrical tape.
Worked beautifully! And coupled with the constant 12V mod, I now have a beautiful, custom-designed for the 4Runner iPhone 6+ mount hard-wired, and it'll charge whether the engine is on or off. And no more cords strewn all over my dash, console, and seats. YEAH!

Step 5
That's it! Reassemble the dash in the reverse order you took things apart. A few bolts to screw in and a few pieces of plastic to snap back in place, and it's done.
Can't believe I've been intimidated about doing stuff like this in the past. It's really not that hard. I'm not an electrician, so I had a lot of learning to do and relied on several experts here plus my father-in-law to learn that side of things, but the actual work of taking apart different pieces of the car, running wires, soldering, and so on really isn't that hard.
I really have mostly y'all to thank for that. For those of you who post here frequently, I'm sure a mod like this is pathetically simple. But for someone like me who never even did an oil change before, it's a giant leap. Being able to take that leap is because your posts and comments are so helpful for those learning. So THANKS!
So it wasn't until today that I could finally buckle down and get done the hard-wiring of my new ProClip phone mount that I had asked about recently. As an added bonus, I was able to re-run the wires for my aux cable behind the dash.
In case anyone else is interested, I've run up the instructions on how I did the hard-wiring. Turned out to be a lot easier than I had originally imagined. Actually was more of an engineering task in terms of figuring how and where to run the wires than it was a technical challenge of actually doing the wiring job itself.
From that original post of mine asking where and how to wire it up, you can see the parts that the ProClip mount came with. I decided to skip the cheap ass made-in-China crap they gave me for a splicer, and did it the old-fashioned, delicate, but far more reliable way: stripping the cover of the original factory power wire, and soldering the ProClip wires into it. I decided it wasn't worth running all the way through the firewall into the engine compartment, and figured the easiest way to get a reliable connection was to run it to the power source on the bottom of the OEM cigarette/12V assembly next to the shifter. I had replaced the original assembly with the cig lighter version recently, and figured that was the easiest existing power line to tap into.
Step-by-step below.
Step 1
Remove the plastic cover surrounding the transmission shifter. It literally lifts out. Pop up the center console, and lift up from the rear corners of the plastic covering and it should come right out. Use a flathead screwdriver if you need a little leverage, but it should be pretty easy even with fingers.
Detach all the power cords from the bottom of the 12V/cig assembly, so you can fully remove the plastic cover.


Step 2
Follow the instructions on this website to begin disassembling the dash.
I gotta hand it to Toyota. I thought disassembling and reassembling the dash would be a nightmare. It's really not hard. And this coming from someone who's historic automotive expertise (until as recently as last summer) was limited to filling the gas tank. Seriously. It took a little while to make sure I was doing things the right way, but they designed these parts quite well. There's a bunch of size 10 nuts to take out here and there, but there are a ton of parts that literally snap on and snap off. Do it a couple times and I can see how it would take at most 5 or 10 minutes to remove all the pieces.
Anyway, follow the instructions on that site. They're very clear, and have pretty pictures for the mechanically and engineering illiterate like myself to know what the heck to do.
Stop with step 5 on that site though. You don't need to go all the way for this mod. In fact, I didn't even actually remove the entire instrument cluster finish panel/face plate (the gray trim in my photos). I removed the nuts to loosen it, but realized I could fit my hand in the back with it loose to run the wires, so I never actually took it off.


Step 3
This was actually the hardest part, and it's a design/engineering task, not a technical one: deciding where to run the wires to get it from the mount on the dash to the power source by the tranny shifter, and then actually feeding it there without having to literally take out the entire console.
The challenge was that Apple's specs for lighting cables only authorize companies to make a lightning connector on one end, and a USB on the other. Since they presumably can't put an open power line on the end opposite the lightning connector under Apple's licensing terms, ProClip put a USB, which connects to a black box that screws the USB in place, and out the other end of the black box is a long wire that you can run to a car's power source. Smart design, but it meant that my original solution of drilling a hole in the gray trim/face plate to feed the power line through wasn't going to work. It would have had to be a hole big enough to fit the black box through, or even if I unscrewed the USB connector, it'd have to be big enough to fit THAT. Either way, it's a pretty obnoxiously sized hole and I wanted this to look as nicely done as possible.
I looked at running the cord into the area where the AC assembly was removed from, but there's no breathing room to fit a cord through there.
So what I ended up doing was making a small notch in the back-right side of the gray trim assembly, close to where the left edge of the glove box runs up against the side of the dash. I looked closely to make sure there would be space for the power cord behind there when the face plate was put back in place, as I didn't want it to be crushed flush up against the hard plastic frame of the dash behind it all. Plenty of space!
Used a drill bit to drill a reasonably close to the edge of the gray trim assembly, and then a pocket knife saw to cut out the remaining bit of plastic from the drilled hole to the edge. Worried that the vibration of the car as I drive on or off road over time may rub up against the power cord feeding back through this notch, I decided to wrap the part of the cord that goes through there with electrical tape. So then I had to make the hole just a teensy bit bigger.

Once the power cord was fed through that notch, I could pull it behind the electronics area, down below, and then out into the transmission console area where it would be wired.
In an earlier mod, I drilled a hole in the center console storage compartment so I could feed an audio aux cable from the aux outlet in the storage area, down under the center console area, and out the side of the console to hide the wires. While I was in here with the dash pieces off, I figured I'd do it one better. I drilled a hole on the face of the gray trim assembly so I could feed the audio aux cable all the way up the center area, up behind the dash electronics, and through that hole right next to the bottom of the phone. It looks awesome, and it's cleaner than having the cable loose down by the floor when not in use as I had it before.

This was the hardest part. Figuring out where to feed the wires, and actually feeding it -- it's not that it's a tight space, there just aren't a lot of places to get your hands in there to feed it unless you remove the entire center console assembly. I didn't want to do that, so I made do, and it took maybe an extra 10-15 minutes to feed it carefully by hand. Fortunately, the wires were relatively stiff so I could push them through the hardest areas.
Step 4
Connecting the power lines. As I mentioned, the ProClip came with a crappy splicer. I wasn't willing to use it; worried about corrosion and permanent damage to the OEM power source that would be expensive to replace. Thought about getting a better quality splicer, but ultimately decided to go the old fashioned but very reliable method of soldering them together. Part of the reason I preferred this is that soldering is done in part with tin, which is entirely conductive--more-so than copper--so the electrical connection if done properly can be even stronger than it was before I went and messed with it.
First step was to figure out which of the many wires that attach to the bottom of the 12V/cig assembly were the power source wires. On the back end of the assembly, there's a small white connector with a black/white and reddish-brown wire running into it. This is the power source I decided to tap into.
Step 2--delicate! Carefully...oh so carefully...stripping part of the power wire casing to expose the copper lines underneath, on the black/white and red wires. This is where it was extremely helpful to have the help of someone who's done this for years: this is a live wire and I didn't much feel like replacing the $128+ assembly if I happened to cut into the copper too much and sever the connection. I am NOT skilled with this, so I enlisted the help of my father-in-law who's been doing this kind of stuff for decades.
Each half of the ProClip power wire got wrapped around the appropriate Toyota power source wire, and got soldered into place. Not hard actually--just something that requires some experience/practice.


The cardboard you see in the photos was only to catch any "drip" from the soldering gun, should there be any.
Once it was soldered in place and the connection tested, I discovered that my father-in-law had accidentally shorted the fuse when he touched some medal to an exposed wire. So I made a run to the nearest automotive store and bought a bunch of fuses, and replaced the one for the power source in the panel on the left side under the dash.
When all was said and done, I tested the connections, tested the power, and ensured the individual wires were wrapped securely in electrical tape where it was soldered, and then wrapped all the wires together in another layer of electrical tape.
Worked beautifully! And coupled with the constant 12V mod, I now have a beautiful, custom-designed for the 4Runner iPhone 6+ mount hard-wired, and it'll charge whether the engine is on or off. And no more cords strewn all over my dash, console, and seats. YEAH!

Step 5
That's it! Reassemble the dash in the reverse order you took things apart. A few bolts to screw in and a few pieces of plastic to snap back in place, and it's done.
Can't believe I've been intimidated about doing stuff like this in the past. It's really not that hard. I'm not an electrician, so I had a lot of learning to do and relied on several experts here plus my father-in-law to learn that side of things, but the actual work of taking apart different pieces of the car, running wires, soldering, and so on really isn't that hard.
I really have mostly y'all to thank for that. For those of you who post here frequently, I'm sure a mod like this is pathetically simple. But for someone like me who never even did an oil change before, it's a giant leap. Being able to take that leap is because your posts and comments are so helpful for those learning. So THANKS!
Last edited:


