Ironman Foam Cell Pro install

Turfboy

Member
Ironman Foam Cell Pro install
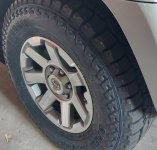
I finally wore out my original Dunlop tires. I replaced them with the Les Schwab 10 ply Open Range A/T. Little did I anticipate the heavier tire would cause me to notice that my shocks were fading on the dirt roads I travel (first half mile was fine then I would start bouncing around as they started to fade). After a ton of research (thanks tinkerer Tinkerer's Adventure - YouTube) (thanks accutune Articles - AccuTune Off-Road) (thanks shocksurplus Choosing Shocks for Your 2010-2021 Toyota 4Runner
– Shock Surplus
) and evaluation of how I drive on and off road I determined the Ironman Foam Cell Pro using stock springs would work best for me. The other shock I seriously considered was the Bilstein 5100 or 6112. To help further me along, Ironman is currently running a 25% off coupon (Black25).

I ordered the Front sku: 45710FE and Rear sku: 45682 FEC. Note the "C" denoted in FEC rear is for "Comfort". A different sku: 45682 FE(P) is for a stiffer Professional rear shock. Since these are rebuild-able I also ordered the adjustment and service tool sku: Ishocktool001. I did not order the kit as it is a 2 inch lift kit and I am height impaired and more importantly my wife may have difficulty getting in if I lift it.

Finally, I ordered Dr. Kdss (KDSS / Accessories
– Dr KDSS
) sway bar bushings and sway bar billet clamps. I have an intermittent sound/squeak coming from the front that I think is my sway bar bushings getting old/worn out. Since I am under there I plan on swapping them out.

Goals:
Install new coil over and maintain current ride height.

Disclaimer:
This write up is to document my process and thoughts. In NO way should it influence how you attempt such an install. To paraphrase another user here on the forum. "Hey! What do I know, Im a friggin Accountant! "

Plan of operations:
I will be generally following Photog's installation of his OME Install (Toyota 120 Platforms Forum)

In order to deactivate the KDSS I will follow Ironman's suggestions https://store-pusehjx.mybigcommerce.com/content/KDSS%20Instructions%20Prado_4Runner.pdf

I will be using Dr. Kdss 'instructions regarding the sway bar billet clamps. https://drkdss.com/products/kdss-front-sway-bar-billet-clamps-pair


That's it for now as I wait for the parts to come in.
 

Attachments

  • LS AT tire.jpg
    LS AT tire.jpg
    100.7 KB · Views: 1,245
Register to hide this ad
I'll be interested in your thoughts on the Ironman shocks, I kind of like the "no nitrogen pressure" design and interested in the ride quality.
 
nice! I eliminated an intermittent clunk and squeak when i installed the KDSS brackets and collars. more importantly it feels like the suspension is working together now instead of fighting the sway bar
 
I've been very happy with mine. I compared with other shock/strut options out there and came to the conclusion that the Foam Cell would fit my needs nicely. I like that it is not nitrogren charged, provides great cooling with a large diameter body, and they're also already armored which is nice to protect against sand blasting and other debris damage.
 
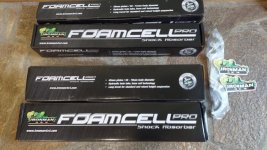
Well I got the shocks today.

20221118_121455.jpg

20221118_121947.jpg


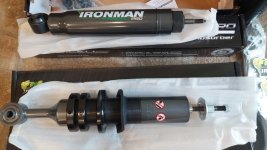
When I first pulled them out of the shipping box I noted two things. First the rear seemed heavier than the front and the diameter of the rear appeared to be larger than the front per the marketing on the box.

When I measured it .... Yep the body of the rear was roughly 2 3/4 where the front was 2 1/2.

Now I get to go into the garage and make some measurements (30 degrees now but hey there it is).

Front Driver (top of center cap to fender well) is 17 inches
Front Passenger (top of center cap to fender well) is 17 inches
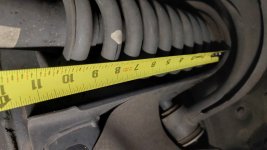
Front Spring (wheels on ground) is 10 inches.

20221118_130746.jpg

Rear Driver (top of center cap to fender well) is 19 5/8
Rear Passenger (top of center cap to fender well) is 19 3/4.

First up for changing is the rear because from what I see it will be easier than the front and the KDSS parts are not here. I have not figured out how to statically adjust the Front rings to keep the ride height the same.
:noidea:
 

Attachments

  • 20221118_121455.jpg
    20221118_121455.jpg
    76.1 KB · Views: 1,149
  • 20221118_121947.jpg
    20221118_121947.jpg
    120.2 KB · Views: 1,142
  • 20221118_130746.jpg
    20221118_130746.jpg
    116.3 KB · Views: 1,125
Got some sunshine today..... Attempted to install rear shocks.

Rear shock driver side came out ok. Terrible clearance around top bolt and the shock body spun independently of the piston rod. :mad: But hey, it is a DIY project.

Now on to the install.....FAILED.

Written instructions are very poor. Well there is a youtube channel for that eh?

Not really.. Found something re a tacoma that showed the stack build. OK got the stack built. Dang, the built stack has no bolt showing.

I removed the cover and found a bump stop under the mud guard. I see it leaves quite abit of residue on the main shaft but it will move around. Should I remove it? Tried to call Ironman USA on the weekend..... Nope tech closed, retail open.

I made an executive decision to leave the bump stop on, I pushed it down the piston rod to provide MAX area for the stack. IT Worked! sorta.

20221119_140812.jpg

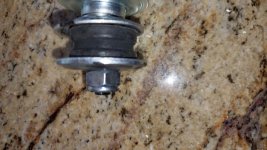
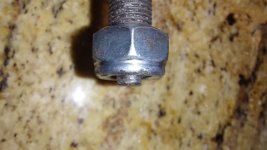
In Ironman USA videos they say to vicegrip this black nubbin and tighten down the nut. Yah about that... It just ain't gonna happen even if you grind/pound significant body work away from that top bolt. Please note the stack in the picture is loose. The problem is the nylock nut engages so early that the shaft begins to spin before there is enough area to grab/engage the shaft. As it sits on the kitchen table I can partially get a 15/64 ignition wrench on it. On the car? There is gonna be a whole lot of :mad2: :flame: :noidea:

Items to note: That protective cover is a PITA. Since the shock has no gas pressure you must lift the shock body up or extend the piston rod. If you grab the cover to do this it pushes the stack off the rod. You must hold it by the very bottom of the shock. If you can get the top installed then it will extend down to the lower mount.

Speaking of the lower mount. The mount is not centered and out of alignment (on purpose) Make sure you put a sharpie to the side you want facing out (when dry fitting) cause it is tough to see when you are outside on the ground looking at it.

I plan on calling Ironman USA on Monday to see if the short nubbin/long nut is a defect or they say to grid down the nylock nut. I will be sure to document it if they say to grid down the nylock. :boxing:
 

Attachments

  • 20221119_140812.jpg
    20221119_140812.jpg
    115.9 KB · Views: 1,172
You might have to put a jack under the bottom of the shock and apply pressure until enough of the stem comes through the top to get the nut started and a small wrench on the top end of shaft to hold it from spinning, or someone else to push up on the shock rather than a jack.
 
You might have to put a jack under the bottom of the shock and apply pressure until enough of the stem comes through the top to get the nut started and a small wrench on the top end of shaft to hold it from spinning, or someone else to push up on the shock rather than a jack.


Thanks but the problem is not one of clearance. It is that there is too little landing at the top of the piston. Here is another picture. The bolt is nylocked and is turning the shaft at this point.

20221119_173536.jpg

This angle is generous as the photo is taken above the nut. Access on the car is from below. While contemplating various fixes one that comes to mind is a set of pliers for rubber pipe. I may be able to clamp a bushing tight enough to overcome the nylock bushing friction and get the landing on the piston shaft exposed. It is still a design flaw though.
 

Attachments

  • 20221119_173536.jpg
    20221119_173536.jpg
    123 KB · Views: 1,041
Hmmm...maybe they sent you the wrong nut? I did not have this issue when I did my install a few months ago. I was able to use a 1/4" wrench to hold on to the flat. It was easy enough that I let my 8 year old daughter help me with that part (not making fun, just pointing out that it was not difficult). I used this video: https://youtu.be/5x6DHYZBnQc

And this one: https://youtu.be/lcA5z4YPUTk

Would it be possible to head to a hardware store and temporarily find a thinner nut? Hopefully I can help some, the install could be a little fresh in my mind, lol.

Is this the same on both shocks? Did you double check part numbers? Did you double check the orientation of the spacers/bushings? Sorry just trying to think of all the random steps I had to go through too.
Sent from my SM-N975U1 using Tapatalk
 
Last edited:
Yep, I was using the second one a guide for how to tackle the KDSS, stack build and shock orientation.

There may be some manufacturing variances that create different amounts of clearance around the top perch. Today I think the weather will permit another go at it.

Thanks for posting the link :cheers:
 
Any luck?

Sent from my SM-N975U1 using Tapatalk

Rear shocks installed :party:

It took about an hour for both.

Hints:
Put a 17 mm on top bolt and pipe wrench the old body. No busted knuckles that way.
I needed to pinch the new bushings in order to overcome the nylock washer in the new nut. I was able to then use a 6mm wrench to hold the shaft flats once it was exposed.
The bottom needed help to go on with my judicious use of a 3lb mallet. You can’t premount the bottom because the shock does not self expand up into the top hole. The bottom shaft does not gently go in because the new shock has tight custom angles on the bottom. You have to push/hold the shock up to get the nut started then mount the bottom.

Observations: The body overhang on the passenger side was different than the driver side. The passenger side was waaaayyyy easier and had clearance to work in.
The finished height was the same as the starting height.
One of the old shocks was seeping oil under the sleeve.
The old shocks were 6 lbs.
 
Glad you got them installed. I have to say I'm surprised at the trouble they gave you. Hopefully the front goes in without issues!

Sent from my SM-N975U1 using Tapatalk
 
Here is a step by step write up for Rear Shock install: :blabla:

Block front and back of front wheels.
Loosen but don’t remove lug nuts on rear wheels.
Use floor jack under rear differential and then place jack stands under axle. Lower vehicle onto stands.
Remove rear tire of one side and place under vehicle as additional safety.
Use 17mm wrench on top bolt and pipe wrench/ channel lock pliers on top body of shock to loosen top bolt. Use top body of shock to turn shaft and remove bolt.
Remove bottom bolt and remove old shock.
Remove shroud from new shock. Pull shaft up and use rubber bushing located under shroud to lock it in place by sliding it down shaft. Replace shroud on shaft.
Mark short side of shock bottom “out”.
Place shock rough location. Build stack. Flat washer, bumper (convex up), short lip washer (lip up). On top of bumper perch place large lip washer (lip down), bumper (convex down). Guide shaft through top perch/washer/ bumper. Add top washer and nut to shaft. While supporting shock get a few turns on nut to secure stack.
If needed rotate shock body so “out” is facing front of vehicle. Mount bottom of shock to axle. (Some force may be needed) lightly secure with bolt removed earlier.
Begin to tighten top bolt down with 19mm wrench. Secure shaft from turning with 6mm wrench on flats located at top of shaft. While tightening stack make sure lipped washers are inside perch holes. Tighten until it won’t go anymore.
I torqued bottom at this time to 100 ft lb. Some say to torque after wheels mounted and car on ground.
Replace tire and put lug nuts on.
Repeat above for other side of vehicle.
Lower vehicle and torque lug nuts.
Remove tire chocks and imbibe beverage of choice. :D

Feel free to add any suggestions :typing:
 
Last edited:
I thought you weren't able to get a wrench on the shaft of shock when tightening down 19mm nylock nut, or were you able to put enough pressure upward on shock to get enough shaft through the bushings?
 
I thought you weren't able to get a wrench on the shaft of shock when tightening down 19mm nylock nut, or were you able to put enough pressure upward on shock to get enough shaft through the bushings?

I used a clamp on the rubber bushing to bind the shaft. The bind allowed me to overcome the resistance generated by the nylock washer. Once I was able to get a few more turns on the nut the flat became exposed enough to use the 6mm wrench to hold it.

In other news, I found the technical service pdf for setting the height of the lower spring seat. Sadly it does not show our T4R. Am I a Prado 120, Fortuner or FJ?

https://ironman4x4.com/wp-content/uploads/2021/06/Foam_Cell_Pro_Strut_spring_seat_Tech_Bulletin_290415.pdf
 
Last edited:
My installation of Ironman Foam Cell Pro (FCP) Front strut w/ Stock springs and KDSS Bushings.

Prep:
A)Remove front skid plates/shroud (first 2)
B)Build out shock: Stock height is 2 1/16 inches of thread showing on bottom (8.5 inches from center of bottom mount to bottom of spring). Set screws in place on both keeper rings and keeper rings should turn freely on shock threads, spring spacer ring and associated rubber bushing ring in place. Pull shock piston up and put washer and bottom rubber bushing on. Watch Ironman’s video on building strut for hints. https://www.youtube.com/watch?v=UrKvX-rHGdo Lube the strut threads with lube of choice.
C)Mark bottom of alignment cams (4 each side) with sharpie.

Steps:
1)Chock Wheels
2)Loosen Lug Nuts
3)Raise all 4 corners and use jack stands to secure vehicle in air. All tires need to be off ground.
4)Remove KDSS shield(12mm) and Mark bottom of KDSS valve bolts. Unscrew bolts 2 turns.
5)Remove 8 bolts holding KDSS sway bar in and let hang on vehicle.
6)Support Lower Control Arm with Jack (Tight is right!) Loosen/remove bottom ball joint bolts.
7)Remove center strut bolt (NOTE: the shock should NOT move down when loosening) Top flats are secured using vice grip or crescent wrench or whatever.
8)Lower jack arm that is holding Lower Control Arm slowly (strut spring pressure released)
9)Remove lower shock bolt
10)Enlist help to leverage Lower Control Arm down while you wiggle strut with or without spring out of vehicle.
11)Keep spring orientated as original (Ground Flat up). Remove old strut from spring and replace with new strut. Remember to pry old bottom bushing from stock perch. Use Ironman video on building the FCP strut for guidance. CRITICAL NOTE: The shocks are not pressurized. This creates difficulties when inserting the shock into place as ANY PRESSURE on the shock piston rod will bugger up attempts to get the shaft to properly extend through the top perch hole. It is such a PIA that I moved the spring retaining rings to the bottom of the strut in order to get the shock piston rod through the top perch with enough space to get the top bushing, washer and nut on. Screw down the top nut till it won’t turn no mo. Then adjust the spring so it is orientated correctly on top move the bottom spring retainer up against the spring and properly orientate it. Have friend put pressure down on lower LCA to get bottom of shock to line up properly, place bolt through lower shock mount along with spacing washer (if desired). Snug lower nut on bottom shock bolt. Turn the first locking ring up to hold the spring retainer in place. Have friend put pressure on LCA to generate space to raise bottom spring retainer. Continue to raise locking ring to desired height using Ironman’s dedicated tool and or Hex wrench. Bring Lower locking ring up and use friction to lock in place. Measure thread showing from bottom locking ring so you can match the other side later.
12)Place jack under LCA. Orient the bottom ball joints so the bolts will insert and engage with associated holes. Raise jack and compress strut and strut spring. Snug bolts up and torque to spec.
13)Repeat on other side.

KDSS Stabilizer bar w/ Dr. KDSS rings https://www.youtube.com/watch?v=lO7H_WqiMQU&t=8s :thanks:
1)Make note of orientation of existing tabs on bushings.
2) Remove front KDSS bar. At each bushing location, remove old bushing and replace with new in same orientation as old.
3)Use floor jack to raise bar into rough location. Wrestle one end mount into place using Hammer, screwdriver, vice grips and various effective cursing. On the end bushings there is a dedicated spot on the bushing to lever bushing hole up. Repeat on other side. Next added was the KDSS piston and finally the fixed stabilizer bar. Ample screwdriver pressure was used to align this last bushing up. Floor jack pressure was used to raise bar in place. See Dr. Kdss video for alignment of bushings on bar.
Finish work:
1)Put tires back on.
2)Safely lower vehicle and torque Lug nuts to spec.
3)Tighten KDSS valve bolts (2 turns)
4)Replace KDSS shield.
5)Check ride height and tighten available set screws.
6)Replace lower skid plates.
:trophy:
Aftermath:
Imbibe spirit of choice, asprin as needed, at least 30 min in hot tub and massage of affected body parts.
Prior front end squeak/moan is now GONE.
4 Runner now Handles like it did when new. I.e. it corners flat, no swinging back and forth etc.
Ride height is the same (no complaints from my wife).
Buy friend who loaned heated space to work in their garage a bottle of the proper liquid
Modify signature on forum and write up event. :ranger:
 
Got some sunshine today..... Attempted to install rear shocks.

Rear shock driver side came out ok. Terrible clearance around top bolt and the shock body spun independently of the piston rod. :mad: But hey, it is a DIY project.

Now on to the install.....FAILED.

Written instructions are very poor. Well there is a youtube channel for that eh?

Not really.. Found something re a tacoma that showed the stack build. OK got the stack built. Dang, the built stack has no bolt showing.

I removed the cover and found a bump stop under the mud guard. I see it leaves quite abit of residue on the main shaft but it will move around. Should I remove it? Tried to call Ironman USA on the weekend..... Nope tech closed, retail open.

I made an executive decision to leave the bump stop on, I pushed it down the piston rod to provide MAX area for the stack. IT Worked! sorta.

View attachment 401232

In Ironman USA videos they say to vicegrip this black nubbin and tighten down the nut. Yah about that... It just ain't gonna happen even if you grind/pound significant body work away from that top bolt. Please note the stack in the picture is loose. The problem is the nylock nut engages so early that the shaft begins to spin before there is enough area to grab/engage the shaft. As it sits on the kitchen table I can partially get a 15/64 ignition wrench on it. On the car? There is gonna be a whole lot of :mad2: :flame: :noidea:

Items to note: That protective cover is a PITA. Since the shock has no gas pressure you must lift the shock body up or extend the piston rod. If you grab the cover to do this it pushes the stack off the rod. You must hold it by the very bottom of the shock. If you can get the top installed then it will extend down to the lower mount.

Speaking of the lower mount. The mount is not centered and out of alignment (on purpose) Make sure you put a sharpie to the side you want facing out (when dry fitting) cause it is tough to see when you are outside on the ground looking at it.

I plan on calling Ironman USA on Monday to see if the short nubbin/long nut is a defect or they say to grid down the nylock nut. I will be sure to document it if they say to grid down the nylock. :boxing:

I'm halfway through installing the rear shocks and ran in to many of the same issues as you. you mentioned that the bottom mount is not centered on purpose-- does that mean you wont need to add the washer on the bottom to get it to not hit the axle hub when articulating? I have already torqued mine down with the washer that was included with the shocks that was appropriately sized to space the shock just a bit further from the wheel hub. This worked in keeping the shock body from hitting. But if I can just rotate the shock 180 that'll be much stronger.

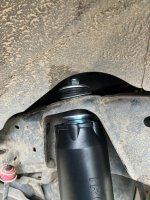
I'm also confused about the bushings... with the way you and I have it set up, there is nothing stopping the lower bushing from sliding further down the shaft towards the mud guard, and the mud guard can move freely up and down the shaft as well. Neither of the washers that hold the lower bushing have anything to catch on as you tighten the nut down. I could theoretically keep tightening the nut down until it reaches the end of the threads... See the picture I attached. Am I missing something here? The bushings are squished down a bit but I think thats just a little friction because of the angle its sitting at. With this set-up it seems like the nut is relying solely on the nylok to keep it from rattling off, and that's concerning... There is nothing mechanically compressing the bushings together at the mounting hole
 

Attachments

  • 694480823.jpg
    694480823.jpg
    138.2 KB · Views: 548
I'm halfway through installing the rear shocks and ran in to many of the same issues as you. you mentioned that the bottom mount is not centered on purpose-- does that mean you wont need to add the washer on the bottom to get it to not hit the axle hub when articulating? I have already torqued mine down with the washer that was included with the shocks that was appropriately sized to space the shock just a bit further from the wheel hub. This worked in keeping the shock body from hitting. But if I can just rotate the shock 180 that'll be much stronger.

I'm also confused about the bushings... with the way you and I have it set up, there is nothing stopping the lower bushing from sliding further down the shaft towards the mud guard, and the mud guard can move freely up and down the shaft as well. Neither of the washers that hold the lower bushing have anything to catch on as you tighten the nut down. I could theoretically keep tightening the nut down until it reaches the end of the threads... See the picture I attached. Am I missing something here? The bushings are squished down a bit but I think thats just a little friction because of the angle its sitting at. With this set-up it seems like the nut is relying solely on the nylok to keep it from rattling off, and that's concerning... There is nothing mechanically compressing the bushings together at the mounting hole

Just to follow up, I got everything installed with no issues. Love the way these are riding so far. Thanks for your install tips OP.
 
Congratulations!

To add, I am very impressed with the shocks. At my kids housing complex there are some serious speed bumps and uneven pavement. Prior to the replacement I felt like I needed to engage 4WD low so the KDSS system would work.

Post shock change... PFFFT there was a speed bump? This is with 10 ply tires :eyebrows: I still will have someone else rebuild them as I am getting too old to wrestle beefy shocks around under the car. :rofl:
 

Members online

Forum statistics

Threads
278,309
Messages
3,554,075
Members
248,016
Latest member
Advally Service

Trending content

Back
Top