I'm certainly not the first to have one of these installed, or even post about it, but I figured I would add to the current information regarding it on the forum (because if it's on the internet, it's true!). There will be some rambling and some unrelated interjections, so sorry for that.
As a bit of backstory, I've looked at bumper options since basically the day I bought the truck (Sept. '18), but nothing really checked all the "want/need" boxes (these boxes are absolutely different for different people). Sometime in 2019 I saw LFD Off Road's rear bumper and while it happened to be open on my monitor, my girlfriend came in the office, looked at it and immediately said "oh, I really like that bumper!". Let's be real, if it checks all the boxes that's wonderful, but if it checks all the boxes and get's the approval of the other half, that basically makes it a done deal.
I ordered the bumper right around Black Friday with an initial lead time of about 4-6 weeks. Since LFD Off Road is about 7 hours South of me (and I drove ~6hrs South to have Apex Overland do the suspension/skids/snorkel last year), I told Jay@LFD to just hold on to the bumper instead of shipping and that I would come down to grab it. It should be said that I also ordered a gas tank skid at the same time, also for pickup (although, they were in stock when I ordered). Despite the holidays slowing down the process my bumper was completed right around the 6 week mark, and the following week (last week) we made the trek down to grab it. Jay's instructions were simply "arrive with no rear bumper and the exhaust pre-cut"... Easy enough to do, and we were off!

About 7 hours and a great lunch later (if you find yourself in Burlington, NC, try Danny's Cafe) we arrived at the headquarters (a substantial establishment that it is) of LFD Off-Road. To be greeted by a handful of decked out 5th Gen 4Runners (that's all we care about here, right?). If you're looking for other stuff, there's also a not-too-shabby 80 series, a Tundra, and a GX. We were also lucky enough to arrive just in time to see the first of the LFD Bed Rack's being installed on a 3rd gen Tacoma. We had met Jay at the T4R Experience in Kentucky last year, but were finally able to meet Phil & Mike. After a few minutes of chit-chat and a quick look around, it was time to make the back end look (kind of) complete again. Just a few days prior to my appointment @ LFD I had helped a buddy install a rear dual-swing bumper made by another company, and to be honest, had some concerns about starting on the truck in the late afternoon. Those fears were quickly quelled as in what seemed like just a few moments of conversation over 200lbs of steel had been added to the back of the truck.

Not long after that photo was taken the final touches were done, latches adjusted and time to back out into the real world. OH! That's right, there's a tire carrier blocking the back up camera! This is a shot of what you can see through the OEM back up camera (obviously, without any relocation). You'll note that the tire is not on it, with the tire on it it blocks basically all view. More on this later.

Driving home through the night seemed less than ideal, so we ended up staying locally. Based on Jay's recommendation we indulged in a few alcoholic beverages from King Canary Brewing in Mooresville, NC before calling it a night. The drive home was just like the drive down, having an extra 230-ish pounds on the back end (and a ~50lb gas tank skid in the back seat/cargo area) made almost no change to how the truck drives, although, even with my Dobinsons 327 rear springs, I definitely noticed some sag in the rear (enough that reaiming the headlights while I wait on my new springs would be a kind gesture). After arriving home, I had no option but to throw the spare and Hi-Lift jack on (trimming the plastic bumper could wait though!).
I have a ARB 50qt fridge on top of a shelf system in my cargo area, so part of my driver's side rear vision is obstructed already. The LFD Off-Road bumper allows you to mount the spare tire at a variety of heights, if I recall correctly, mine is two spots down from the highest position. Excuse the horrible photo, but it shows that the tire is barely visible. Popping both of these on were a breeze. Tire is self explanatory, and the hi-lift has a lock washer/nut combo to make sure it doesn't come loose driving down the road (as well as the same easy-off mounting included on the roof rack Hi-Lift mount for trail usage). With the "standard" hi-lift jack, the top of it becomes the tallest part of the truck, with Dobby 327 springs and 255/80s, that's right around 6'10".

Over the weekend I took the required measurements and did a (less than professional) job of cutting the plastic rear bumper to fit, it's trimmed with some door trim. I think if it hadn't been in the low 40s, and we had a better blade, we could have taken more time and been more exacting with our cuts. However, it gets the job done, and from 10 ft the cuts look fine. Also excuse the horrible looking license plate light wiring, that was a quick solution I whipped up while LFD was installing the bumper, it will be re-run (appropriately) this week!
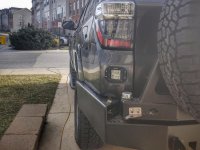
Now for what everyone wants to see, the up close pictures of the bumper! These were (obviously) taken in my driveway, not on some cool trail with picturesque backdrops. For amazing photos of this bumper like that you'll have to go see [MENTION=73851]007Tacoma[/MENTION]


Final (ehh?) thoughts/observations/etc -- The fit and finish of this bumper is only surpassed by the team behind it and all the other LFD Off Road products. It sounds sappy and like a pitched line, but it is absolutely the truth. Every interaction with everyone at LFD has been stellar. Thorough and clear communication, every step of the way, even when it isn't the best news (like "it's not going to be ready for when we initially hoped"). These guys will legitimately bend over backwards to make sure everything is right.
The thoughtful touches of the bumper just keep making themselves known; to list a few:
The weight of the bumper is substantial (as with any other steel dual swing arm bumper), and subsequently I've ordered a set of Dobinsons 329 springs to replace my current 327s. The 327s would have been fine if I was a little lower in the front (currently have 314 springs on 574 ET struts), but I miss the rake look.
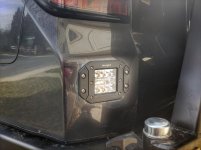
Additionally, I'm not "done" with the bumper yet. I've still got to cut a pair of holes in the plastic OE bumper for additional reverse lights (they were in the lower part of the bumper that is now in a trash pile), as well as adding a bit more lighting to the bumper. With some luck that should get completed by the weekend.
Bottom line, if you're in the market for a rear bumper, want short lead times, and a well designed, thoroughly optioned bumper; get in touch with [MENTION=444815]LFD_Off_Road[/MENTION]
As a bit of backstory, I've looked at bumper options since basically the day I bought the truck (Sept. '18), but nothing really checked all the "want/need" boxes (these boxes are absolutely different for different people). Sometime in 2019 I saw LFD Off Road's rear bumper and while it happened to be open on my monitor, my girlfriend came in the office, looked at it and immediately said "oh, I really like that bumper!". Let's be real, if it checks all the boxes that's wonderful, but if it checks all the boxes and get's the approval of the other half, that basically makes it a done deal.
I ordered the bumper right around Black Friday with an initial lead time of about 4-6 weeks. Since LFD Off Road is about 7 hours South of me (and I drove ~6hrs South to have Apex Overland do the suspension/skids/snorkel last year), I told Jay@LFD to just hold on to the bumper instead of shipping and that I would come down to grab it. It should be said that I also ordered a gas tank skid at the same time, also for pickup (although, they were in stock when I ordered). Despite the holidays slowing down the process my bumper was completed right around the 6 week mark, and the following week (last week) we made the trek down to grab it. Jay's instructions were simply "arrive with no rear bumper and the exhaust pre-cut"... Easy enough to do, and we were off!
About 7 hours and a great lunch later (if you find yourself in Burlington, NC, try Danny's Cafe) we arrived at the headquarters (a substantial establishment that it is) of LFD Off-Road. To be greeted by a handful of decked out 5th Gen 4Runners (that's all we care about here, right?). If you're looking for other stuff, there's also a not-too-shabby 80 series, a Tundra, and a GX. We were also lucky enough to arrive just in time to see the first of the LFD Bed Rack's being installed on a 3rd gen Tacoma. We had met Jay at the T4R Experience in Kentucky last year, but were finally able to meet Phil & Mike. After a few minutes of chit-chat and a quick look around, it was time to make the back end look (kind of) complete again. Just a few days prior to my appointment @ LFD I had helped a buddy install a rear dual-swing bumper made by another company, and to be honest, had some concerns about starting on the truck in the late afternoon. Those fears were quickly quelled as in what seemed like just a few moments of conversation over 200lbs of steel had been added to the back of the truck.
Not long after that photo was taken the final touches were done, latches adjusted and time to back out into the real world. OH! That's right, there's a tire carrier blocking the back up camera! This is a shot of what you can see through the OEM back up camera (obviously, without any relocation). You'll note that the tire is not on it, with the tire on it it blocks basically all view. More on this later.
Driving home through the night seemed less than ideal, so we ended up staying locally. Based on Jay's recommendation we indulged in a few alcoholic beverages from King Canary Brewing in Mooresville, NC before calling it a night. The drive home was just like the drive down, having an extra 230-ish pounds on the back end (and a ~50lb gas tank skid in the back seat/cargo area) made almost no change to how the truck drives, although, even with my Dobinsons 327 rear springs, I definitely noticed some sag in the rear (enough that reaiming the headlights while I wait on my new springs would be a kind gesture). After arriving home, I had no option but to throw the spare and Hi-Lift jack on (trimming the plastic bumper could wait though!).
I have a ARB 50qt fridge on top of a shelf system in my cargo area, so part of my driver's side rear vision is obstructed already. The LFD Off-Road bumper allows you to mount the spare tire at a variety of heights, if I recall correctly, mine is two spots down from the highest position. Excuse the horrible photo, but it shows that the tire is barely visible. Popping both of these on were a breeze. Tire is self explanatory, and the hi-lift has a lock washer/nut combo to make sure it doesn't come loose driving down the road (as well as the same easy-off mounting included on the roof rack Hi-Lift mount for trail usage). With the "standard" hi-lift jack, the top of it becomes the tallest part of the truck, with Dobby 327 springs and 255/80s, that's right around 6'10".
Over the weekend I took the required measurements and did a (less than professional) job of cutting the plastic rear bumper to fit, it's trimmed with some door trim. I think if it hadn't been in the low 40s, and we had a better blade, we could have taken more time and been more exacting with our cuts. However, it gets the job done, and from 10 ft the cuts look fine. Also excuse the horrible looking license plate light wiring, that was a quick solution I whipped up while LFD was installing the bumper, it will be re-run (appropriately) this week!
Now for what everyone wants to see, the up close pictures of the bumper! These were (obviously) taken in my driveway, not on some cool trail with picturesque backdrops. For amazing photos of this bumper like that you'll have to go see [MENTION=73851]007Tacoma[/MENTION]
Final (ehh?) thoughts/observations/etc -- The fit and finish of this bumper is only surpassed by the team behind it and all the other LFD Off Road products. It sounds sappy and like a pitched line, but it is absolutely the truth. Every interaction with everyone at LFD has been stellar. Thorough and clear communication, every step of the way, even when it isn't the best news (like "it's not going to be ready for when we initially hoped"). These guys will legitimately bend over backwards to make sure everything is right.
The thoughtful touches of the bumper just keep making themselves known; to list a few:
- Stainless steel latches, so you don't have to worry about powder coat wearing off after hundreds of times of opening/closing the arms
- Swing arms that are removable in minutes, to make daily life easier
- Zip tie holes to hold wiring to the swing arms out of the way
- Welded studs on the spare tire carrier so you don't have to fumble with lining studs up or holding a wrench on the backside while putting a tire on/off
- Integrated Hi-Lift Jack lifting locations
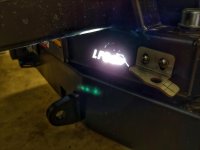
- Ridiculously strong rear recovery points (see this photo
- Super quick install of all pieces/components
The weight of the bumper is substantial (as with any other steel dual swing arm bumper), and subsequently I've ordered a set of Dobinsons 329 springs to replace my current 327s. The 327s would have been fine if I was a little lower in the front (currently have 314 springs on 574 ET struts), but I miss the rake look.
Additionally, I'm not "done" with the bumper yet. I've still got to cut a pair of holes in the plastic OE bumper for additional reverse lights (they were in the lower part of the bumper that is now in a trash pile), as well as adding a bit more lighting to the bumper. With some luck that should get completed by the weekend.
Bottom line, if you're in the market for a rear bumper, want short lead times, and a well designed, thoroughly optioned bumper; get in touch with [MENTION=444815]LFD_Off_Road[/MENTION]