Light Bar wiring

  • Thread starter Thread starter Carolina Roscoe
  • Start date Start date
C

Carolina Roscoe

Guest
(FifthGen TR4) Being new to this, how do you wire the LED light bar without the wiring showing? Also, what I interior switches look/work the best?:usa2::help::help::shrug::shrug:
 
Register to hide this ad
(FifthGen TR4) Being new to this, how do you wire the LED light bar without the wiring showing? Also, what I interior switches look/work the best?:usa2::help::help::shrug::shrug:

Hi Carolina'

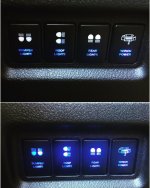
The wiring involved in running new lighting is pretty simple; provided you understand (basic) electrical systems... Just recently I installed an LED light-bar in my 4Runner limited so maybe you can use/borrow a few ideas from there; here's that link: http://www.toyota-4runner.org/5th-gen-t4rs/178040-opt7-leds.html. The switches that I use are from "Slee off-road and A.O.B."; here's what they look like...


If you have any questions, hit me back Rgds! rigtec
 
Last edited:
For wiring to the light o the roof, I used a stiff black wire and ran it from the engine compartment behind the plastic between the hood and windshield and up the channel in the trim around the windshield, then though the rubber channel along the roof till I got to the rack. I notched the front edge of the roof runner trim and at the point that the wire came out at the front leg of the roof rack.
 
I think I have some pictures in my Sig Link ->> LED LIGHT BAR INSTALL on a 2014 T4R <<- as well....wires are easy to hide!
 
On Top of Windshield Channel Trim?

For wiring to the light o the roof, I used a stiff black wire and ran it from the engine compartment behind the plastic between the hood and windshield and up the channel in the trim around the windshield, then though the rubber channel along the roof till I got to the rack. I notched the front edge of the roof runner trim and at the point that the wire came out at the front leg of the roof rack.

Do you happen to have a photo of your wiring around the windshield trim? Can you clarify whether you ran the wiring on top of the windshield trim or underneath the rubber trim?

Unfortunately, my windshield was cracked soon after I got my Runner, so I have an aftermarket windshield. It doesn't look like there is room to run the 12 gauge wiring underneath the trim like I've seen some other guys do, but it seems like I can run both 12 gauge wires with black flexible wiring loom on top of the windshield channel and still keep it fairly discrete. I may just tack it down in a couple of places with some RTV so it behaves.

Thanks!
 
I wouldn't run wiring on the outside of the trim, even in a small loom seems tacky and seems like it would be to easy to get snagged on a branch brushing across the windshield (not exactly something we expect to happen).

I know others have fit 2 wires inside the trim, I was not able to do so and get the trim to fit snuggly back in place, I expect I would have lost it going down the road had I left it with both wires in. Again I know its been done on here, I have also seen running 1 wire on each side of the windshield (under the trim) then there is always going through the back hatch grommet if you don't mind the extra wiring run or drilling a hole in the roof

 
Last edited:
Good call

I wouldn't run wiring on the outside of the trim, even in a small loom seems tacky and seems like it would be to easy to get snagged on a branch brushing across the windshield (not exactly something we expect to happen).

I know others have fit 2 wires inside the trim, myself was not able to do so and get the trim to fit snuggly back in place, I expect I would have lost it going down the road had I left it with both wires in. Again I know its been done on here, I have also seen running 1 wire on each side of the windshield (under the trim) then there is always going through the back hatch grommet if you don't mind the extra wiring run or drilling a hole in the roof

You're right, getting the wires snagged would be a bad time. I think I will run 1 up each side as you suggested. It would be nice to have one run for both wires (front light bar and rear camping lights), but better to do it right and do it safely.
 
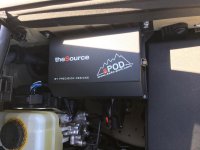
I used A.O.B. Switches and the SPOD to make the wiring easier.
 

Attachments

  • IMG_3943.jpg
    IMG_3943.jpg
    131.7 KB · Views: 5,088
  • IMG_3999.jpg
    IMG_3999.jpg
    137.9 KB · Views: 5,069
Subscribed,

I bought brackets for a LED light and i'm going to need to buy a light and do an install at some point.

I'm truly ignorant regarding electrical. :fear:
 
I used A.O.B. Switches and the SPOD to make the wiring easier.

Was it difficult to switch out the switches that came with the sPOD to the AOB ones? What did you do with the two extras? Also do you know which sPOD you got? Thanks!
 
Was it difficult to switch out the switches that came with the sPOD to the AOB ones? What did you do with the two extras? Also do you know which sPOD you got? Thanks!

It wasn't hard to switch them out. They just come in a bag ... lol the wiring was a different story! I called SPOD and we worked it out. Great people there! The spod I got to as the one for the Taco.
 

Members online

Forum statistics

Threads
278,306
Messages
3,554,045
Members
248,016
Latest member
Advally Service

Trending content

Back
Top