I replied to this question in your other thread, but here it is again: the amp for the optional "JBL nav system", is located in the R/R cargo area kick panel. The amp for the "standard XM nav system" is built-in to the Head Unit, as part of it's circuitry.
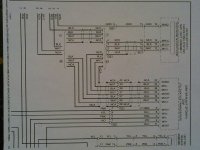
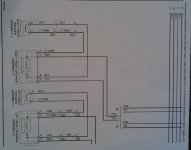
I attempted to upload the schematic wiring diagram that you requested. Unfortunatly, "Mitchell Manuals" was smart enough to prevent their manuals from being shared over the internet via URL address (copy/paste).
What I was able to do is take a "snap-shot", of the nav system wiring that pertains to your particular vehical; so I hope that you can see it well enough to trace. If not, maybe you can print the pg's and blow them up (zoom, zoom, zoom)!!! Good luck, rig.
^^^^^Believe it or not, every part of the wiring diagram actually posted; with the exception of another overview page^^^^. Just match the two pages up visually, or print the page, cut it in two, and then tape them together; the speakers belong on the bottom.
Please let us know how you made out! rigtec, best regards!
Thanks for the post, Rigtec!
Am I seeing this right, are the front speakers connected in parallel? I don't see the rear speaker wiring. Do you know if the rear door and the trunk lift-gate speakers area also in parallel?
If they are, I may just need one powerful 4-channel amp rather than 2 of them. The speakers that I ordered are 2 ohms anyway, so this may work well.
I see you've gotten things under control, glad it's working out okay. And yes, you are seeing correctly. The dash speakers, and the front door speakers are connected in parallel; as are the rear door speakers and the tailgate. One 4 channel amp is enough, unless you're planning to have a separate sub, then you can use an extra "Mono-block" amp just for the sub.
NOTE: Keep in mind that the rear speakers (door and tailgate), are wired through the "Party Mode" button, which when engaged, disconnects the rear door speakers, and (I believe), "sums" the signal of the left and right channels (at the head unit), and combines them for the appearance of more bass through only the rear tailgate.
**I think you'll be okay since your new rear tailgate speakers are 4 ohms**
I see you've gotten things under control, glad it's working out okay. And yes, you are seeing correctly. The dash speakers, and the front door speakers are connected in parallel; as are the rear door speakers and the tailgate.
CORRECTION: After carefully studying the wiring prints of the 5th gen 4Runner "Radio speaker circuitry", I found another page in the manual that shows the complete schematic operation of the whole system.
It shows how the left and right rear door, and tailgate speakers are wired through the "party mode" button "in series"; not in parallel as I had previously believed. The party mode button breaks the ground circuit to the rear door speakers through a pair of left and right "spdt" speaker relays, located in the passenger side dash. The front dash and door speakers are wired in parallel as I have stated in my previous post.
FYI: The speakers in the dash are set up with built-in passive crossovers (capacitors), to filter and prevent low frequency damage.
Sorry to resurrect, but I'm not yet able to post NEW threads as a new-ish user. I promise I have tried to use the search tool but am struggling to find a thread that fits my scenario. I am also a relative newbie so please forgive me if I'm missing something obvious.
5th Gen 4runner (2011) Limited with JBL with NAV with third row seats
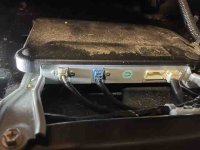
I'm wanting to gain access to the amp to check the amp as part of troubleshooting speakers (dash speakers go in/out in tandem). Most things I have read about 5th gen JBL systems with amp say the amp is in the right rear cargo area adjacent to the sub.
I've found threads on how to remove the third row seats to access the JBL cavity (but I think it was for a 4th gen and it was for a non-JBL system).
Do I really have to take ALL OF THOSE STEPS in order to just lay eyes on the amp?
Other threads (generally on 4th gen?) say that the amp is under the front passenger seat.
Only number I could find without disassembling the whole setup was apparently not the part number, but googling for XM receiver gave adequate visual confirmation of a match. Thanks!
Do I really have to take ALL OF THOSE STEPS in order to just lay eyes on the amp?
Other threads (generally on 4th gen?) say that the amp is under the front passenger seat.
Yes, the only way to get back there is to remove the seat belt bolts, third row seats if you have them and the entire rear panel that covers the subwoofer the amp is next to the subwoofer. The 4th gen was in the back by the subwoofer as well
Yes, the only way to get back there is to remove the seat belt bolts, third row seats if you have them and the entire rear panel that covers the subwoofer the amp is next to the subwoofer. The 4th gen was in the back by the subwoofer as well
Yes, that's the one. It has been my Bible LOL. Initially it scared me off ("I can't do that!") but my dash speakers are getting flakier by the day which is giving me high levels of motivation. Hurrah, I've done everything to get the panel off but I'm stuck ATM on disconnecting the power socket assembly and neither Google nor forum search is turning much up (besides things like "use trim tool at the top (no bottom)" LOL. I'm going to go take another look but I had to come in to cool off for a minute, it's hot outside ugh.
*Can I also say THANK YOU for the photo thread because that's also going to be really helpful in re-assembling everything too. Sometimes I get a little trigger happy on disassembly and don't document what I did very well and reassembly takes WAY longer. DOH!
Yes, that's the one. It has been my Bible LOL. Initially it scared me off ("I can't do that!") but my dash speakers are getting flakier by the day which is giving me high levels of motivation. Hurrah, I've done everything to get the panel off but I'm stuck ATM on disconnecting the power socket assembly and neither Google nor forum search is turning much up (besides things like "use trim tool at the top (no bottom)" LOL. I'm going to go take another look but I had to come in to cool off for a minute, it's hot outside ugh.
*Can I also say THANK YOU for the photo thread because that's also going to be really helpful in re-assembling everything too. Sometimes I get a little trigger happy on disassembly and don't document what I did very well and reassembly takes WAY longer. DOH!
I understand your frustration, glad to hear the pics help. For the outlets, it's literally just little push in clips, but they are a pain especially if you have big hands like me. A small flathead screw driver is your best bet if they're being difficult
I understand your frustration, glad to hear the pics help. For the outlets, it's literally just little push in clips, but they are a pain especially if you have big hands like me. A small flathead screw driver is your best bet if they're being difficult
Once again, your photo thread saved the day. Taking a look at the photo where they are pictured already detached (and use of a flashlight and another set of hands) was the trick!!! Thank you again!
I didn't get any obvious (to me) answers on what exactly my problem is, with the visual inspection of the amp and wiring. I'm going to do a little more fiddling and testing and then see if I have a high enough post count to start a new thread because this discussion probably doesn't apply in this thread any more XD.