Lower Ball Joint Torque and Failure Question

jmansfield

New member
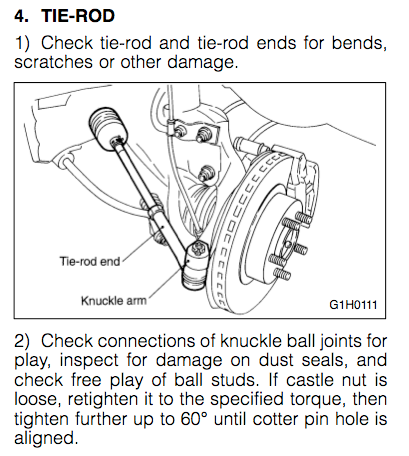
Replaced LBJs the other day but couldn't get castle nut to line up with cotter pin hole in bolt. Torqued to 112 ft-lb per FSM, rule of thumb is to keep tightening until they line up, so I did. For fun I kept using the torque wrench and ended up at 180 ft-lbs before the nut and bolt to lined up. That seems pretty damn high. For reference, the CV axle nut is 35mm (LBJ nut is 24mm) and torqued to 174 ft-lbs.


Anybody else have a similar experience? If so, am I better off backing off and trying again or leaving as is?


Do we know how these LBJs are failing? Is it the bolt failing, the nut failing, or the ball in the housing? Or, is it the 4 mount bolts failing?
 
Register to hide this ad
Replaced LBJs the other day but couldn't get castle nut to line up with cotter pin hole in bolt. Torqued to 112 ft-lb per FSM, rule of thumb is to keep tightening until they line up, so I did. For fun I kept using the torque wrench and ended up at 180 ft-lbs before the nut and bolt to lined up. That seems pretty damn high. For reference, the CV axle nut is 35mm (LBJ nut is 24mm) and torqued to 174 ft-lbs.


Anybody else have a similar experience? If so, am I better off backing off and trying again or leaving as is?


Do we know how these LBJs are failing? Is it the bolt failing, the nut failing, or the ball in the housing? Or, is it the 4 mount bolts failing?

I had the same problem when I did my lower ball joints. Torquing to spec was getting me basically dead center between two of the notches on the castle nut and I wasn't comfortable over-torquing as much as was necessary to get it rotated around to the next opening, and backing it down to the previous opening the nut was loose. I was lucky because I over bought on fasteners for the project, so I went through a couple of different castle nuts and eventually found one that torqued at a spot I could get the cotter pin through.
 
My recollection, having read this forum since 2013, is that most involve the cup around the ball fracturing, and a few involve the bolts shearing off. Others here may come up with a different impression of the data, such as it is.
 
Was in the same situation just gave it another turn and called it. I replace mine every 90k when i do the timing belt, so don't worry about em too much.
 
Replaced LBJs the other day but couldn't get castle nut to line up with cotter pin hole in bolt. Torqued to 112 ft-lb per FSM, rule of thumb is to keep tightening until they line up, so I did. For fun I kept using the torque wrench and ended up at 180 ft-lbs before the nut and bolt to lined up. That seems pretty damn high. For reference, the CV axle nut is 35mm (LBJ nut is 24mm) and torqued to 174 ft-lbs.


Anybody else have a similar experience? If so, am I better off backing off and trying again or leaving as is?


Do we know how these LBJs are failing? Is it the bolt failing, the nut failing, or the ball in the housing? Or, is it the 4 mount bolts failing?
Mostly ball joint separating from the cup with several having the lower ball joint to control arm bolts failing.
 
From my recollection, the torque spec for the castle nut of the LBJ is 105 ft-lbs. It's pretty common that you need to tighten a little more to get the castle nut to line up with the cotter pin hole. The same thing happens with the outer tie rods but the tie rods have two holes to choose from instead of one with the LBJs so there's a better chance it will line up when you hit the torque spec. I've never rechecked the torque value like you have but you don't hear of a a failure at the shaft of the balljoint. The ball comes out of the socket or sometimes the bolts that hold the balljoint to the steering knuckle fail. You are correct that you don't want to go looser. You always want to go tighter. If all you did is the minimal tightening to get the hole to line up with the castle nut, you did it right. But, if you weren't paying close enough attention and passed up the first opportunity for the hole to line up, I would say you did over-tighten it. We're usually only talking about 1/32 of a turn, 1/16 tops to get the hole to line up.
 
Most shop manuals I've seen tell you to keep tightening (up to about 60 deg) until the holes line up. That's for tapered studs like the LBJs, not if you're preloading a bearing.

1kgjR.png
 
Last edited:
My recollection, having read this forum since 2013, is that most involve the cup around the ball fracturing, and a few involve the bolts shearing off. Others here may come up with a different impression of the data, such as it is.
(for OEM ball joints) My impression is that age-related failures are at the ball/seat interface. Pre-mature problems can come from:

-Under torquing: Bolt comes loose, then shock loading breaks the fastener
-Over torquing: Too much pre-load means there isn't enough strength left to hold the load and the fastener breaks

When the ball shank breaks, it likely means the lower nut came loose and the stud was flopping around in the lower arm. If the upper bolts break, they came loose or were over torqued.

In the case of the lower nut, it should max out around 60* over. You might have also just been able to run the nut up and down a couple times to wear-in the threads a bit for a reduced final torque value with the same nut.

-Charlie
 
Keep in mind that when you torque a fastener to "spec", the intent is really to introduce the intended amount of tension (or preload) that the designer thought would be right for the application.

In real life, the relationship between torque and preload can vary 30-50% from one bolt to the next.

So 60 ft-lbs can give you 7,000 lbs on one truck, and 10,000 on another.

If you end up with a misaligned castle nut at the right torque, there is little risk of damage if you tighten it a bit more. I would not go beyond 30-40% more torque than spec, but you're unlikely to ever need to go that high to line up the holes.

The ball joint is a bit complicated because of the taper. Once you torque the nut, you generate tremendous friction/wedging in the taper (which is why it takes so much energy to undo the joint). That means all shock loads you see during driving and wheeling are almost completely absorbed by the preloaded tapered joint. The nut sees almost no loading beyond the initial preload. That is why you don't see these ball joints fail at the threaded portion of the stud.
 
I had the same problem when I did my lower ball joints. Torquing to spec was getting me basically dead center between two of the notches on the castle nut and I wasn't comfortable over-torquing as much as was necessary to get it rotated around to the next opening, and backing it down to the previous opening the nut was loose. I was lucky because I over bought on fasteners for the project, so I went through a couple of different castle nuts and eventually found one that torqued at a spot I could get the cotter pin through.

Was in the same situation just gave it another turn and called it. I replace mine every 90k when i do the timing belt, so don't worry about em too much.

These are good tips. Easy enough to buy a few castle nuts and find the one that lines up.

Keep in mind that when you torque a fastener to "spec", the intent is really to introduce the intended amount of tension (or preload) that the designer thought would be right for the application.

In real life, the relationship between torque and preload can vary 30-50% from one bolt to the next.

So 60 ft-lbs can give you 7,000 lbs on one truck, and 10,000 on another.

If you end up with a misaligned castle nut at the right torque, there is little risk of damage if you tighten it a bit more. I would not go beyond 30-40% more torque than spec, but you're unlikely to ever need to go that high to line up the holes.

The ball joint is a bit complicated because of the taper. Once you torque the nut, you generate tremendous friction/wedging in the taper (which is why it takes so much energy to undo the joint). That means all shock loads you see during driving and wheeling are almost completely absorbed by the preloaded tapered joint. The nut sees almost no loading beyond the initial preload. That is why you don't see these ball joints fail at the threaded portion of the stud.
Yes, that is my understanding as well.
 
Last edited:
From my recollection, the torque spec for the castle nut of the LBJ is 105 ft-lbs. It's pretty common that you need to tighten a little more to get the castle nut to line up with the cotter pin hole. The same thing happens with the outer tie rods but the tie rods have two holes to choose from instead of one with the LBJs so there's a better chance it will line up when you hit the torque spec. I've never rechecked the torque value like you have but you don't hear of a a failure at the shaft of the balljoint. The ball comes out of the socket or sometimes the bolts that hold the balljoint to the steering knuckle fail. You are correct that you don't want to go looser. You always want to go tighter. If all you did is the minimal tightening to get the hole to line up with the castle nut, you did it right. But, if you weren't paying close enough attention and passed up the first opportunity for the hole to line up, I would say you did over-tighten it. We're usually only talking about 1/32 of a turn, 1/16 tops to get the hole to line up.

The man, the myth! Did my upper and lower control arm bushings and ball joints, inner/outer tie rods, and steering rack + sway bar bushings last week with you videos. Thanks for the videos, Tim.

Semi off topic but any plan on doing head gasket/head replacement video?
 
Anybody else have a similar experience? If so, am I better off backing off and trying again or leaving as is?

I had the same thing last week when replacing my LBJ and I had the same concerns about over tightening. I ended up removing the castle nut, popped the tapered bolt out of the arm again with my puller, twisted the ball join slightly - about what I thought I needed to get the hole to line up. That helped and only had to over torque a small amount to get cotter pin installed - kind of a pain but I didn't like how much extra torque I was going to need.
 
The man, the myth! Did my upper and lower control arm bushings and ball joints, inner/outer tie rods, and steering rack + sway bar bushings last week with you videos. Thanks for the videos, Tim.

Semi off topic but any plan on doing head gasket/head replacement video?

I just saw your post. No plan on doing a head gasket job but I assume we will do it one day. There is a guy that did a nice job documenting this job though. Here's a link to Part 1:Cylinder Head & Gasket DIY Procedure - Toyota 5VZ-FE - Part 1 - YouTube
 
The ball joint is a bit complicated because of the taper............
Like the explanation !!

Complicated in theory simplistic by design comes to mind.
Change two surface angles look what you get.

I'll do a test fit, slam LCA by hand onto taper, run the nut, close, torque it.
Not, hitting LCA with a deadblow hammer seat taper usually makes it right.
 

Members online

Forum statistics

Threads
278,310
Messages
3,554,078
Members
248,016
Latest member
Advally Service

Trending content

Back
Top