Microphone mount

3wbdriver

New member
I just participated in a group buy for a Midland GMRS radio (MXT275). It's a nice little setup that hopefully will allow us to get a little more range between club members on the trails. One of my main pains with the CB has been not being able to find a suitable location to hang the microphone where I could both hear it and reach it easily. Both of my radios have all the controls and speaker built into the microphone, so you may see my dilemma.

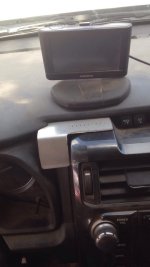
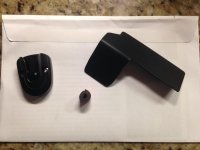
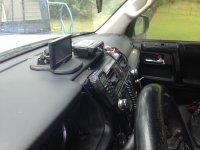
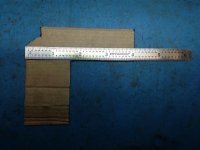
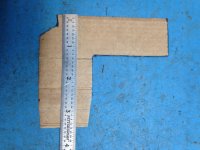
While driving to work this morning I noticed an open space next to the center dash that looked perfect if a mount could be made. So I took some measurements and made a cardboard template and showed it to my boss (sheet metal guy) describing to him what I was trying to do. He took the template and disappeared for about 40 minutes and came back with what is in the above picture. I took it out to the Da Whale and tested the fit, but wasn't completely happy with it. I snuck into the shop while he was at lunch and made a couple modifications which ended up as what is in the bottom picture. I slightly tapered each side of the lower 3/4" for more clearance after taking that picture. It's currently with my powder coat guy and I'll pick it up from him on Sunday. I'm going to mount the right side tab onto the dash with some 3M double sided tape and mount a mic holder on the front tab which is at roughly a 45 degree angle. I'll post more pictures as I get everything installed later next week. If anyone is interested I can post up measurements and a template so you can have one made at a sheet metal shop in your area.

I thought about doing it on the right side of the dash but was worried it might get torn loose and become a projectile if the passenger airbag deployed.

Ignore the dirt and dust. I haven't detail cleaned the interior after several off roading weekends this summer.
 

Attachments

  • mic mount prototype copy.jpg
    mic mount prototype copy.jpg
    118.9 KB · Views: 1,643
  • mic mount.jpg
    mic mount.jpg
    72.8 KB · Views: 1,156
Register to hide this ad
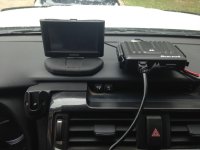
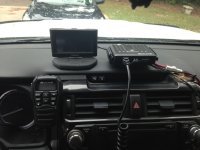
Well, perceived interest seems to be lower for a CB or radio mic mount than I had initially thought. Live and learn. But I figure I should at least post pics of the final installation. I picked up the mount from my powder coat guy today, and got everything installed this afternoon. The mount went in without any fuss and I'll just have to wait and see if the 3M tape is strong enough to hold the mic up over the long term.
 

Attachments

  • mic mount pc.jpg
    mic mount pc.jpg
    119.5 KB · Views: 962
  • mic mount inst1.jpg
    mic mount inst1.jpg
    120.2 KB · Views: 1,089
  • radio setup.jpg
    radio setup.jpg
    120.1 KB · Views: 1,267
  • radio setup side.jpg
    radio setup side.jpg
    121.8 KB · Views: 1,099
Last edited:
Very cleaver design with the bracket. Please post measurements and template, that would work great for a cell phone mount.
 
Last edited:
what does the mic cable connect with, can you add an extension cable and remote mount the radio?

My CB is that way (Cobra75). I could have done the same underseat mount for this one but I decided to try something different. Besides this mic connector is a CAT-5 network type and I had a concern with pulling on it too hard. This keeps it mostly slack for me. I really couldn't believe it took me 4 years to think of this use of that dead space.
 
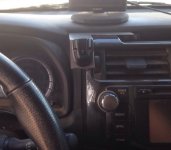
I liked that and thought about doing something similar to the rear of the overhead console. I don't have a moonroof like you have pictured but the same clip method should work on the overhead. I just wasn't comfortable with the mic being that close to my head or shoulder while trail riding.

It will work for sure. The binder clip is an almost free mod.
 
Well, perceived interest seems to be lower for a CB or radio mic mount than I had initially thought. Live and learn. But I figure I should at least post pics of the final installation. I picked up the mount from my powder coat guy today, and got everything installed this afternoon. The mount went in without any fuss and I'll just have to wait and see if the 3M tape is strong enough to hold the mic up over the long term.

You're wrong. That is slicker n slot. Please post a template.
 
It's a really clean mount, would be good for phones too, I think you'll have lots of interest

Sent from my SM-G930V using Tapatalk
 
I'm not looking to sell. I'll post pictures up with measurements within the next day or so. You can easily have a local sheet metal shop fab one up for probably under $20. I had to make my powder coat guy take $10 because he wanted to do it for free.

I took a couple pictures of my cardboard template today with a ruler along it, but realized after I got home the template hadn't been trimmed to the final lengths. So I need to measure the actual plate and make some cuts on the template. I work a 10 hour day with an hour plus commute each way and have to do this during my breaks, then wait until I get home to post. I will try to post good pictures and measurements tomorrow night.
 
I'm not looking to sell. I'll post pictures up with measurements within the next day or so. You can easily have a local sheet metal shop fab one up for probably under $20. I had to make my powder coat guy take $10 because he wanted to do it for free.

I took a couple pictures of my cardboard template today with a ruler along it, but realized after I got home the template hadn't been trimmed to the final lengths. So I need to measure the actual plate and make some cuts on the template. I work a 10 hour day with an hour plus commute each way and have to do this during my breaks, then wait until I get home to post. I will try to post good pictures and measurements tomorrow night.

What are you talking about, there’s 24 hours in a day, plenty of time. lol
Thanks for doing that!
 
Okay, here we go.

The dimensions for the upper (flat) leg are 4 1/8" long x 1 1/4" wide.

The microphone leg measures 3 5/8" long x 1 5/8" wide.

The notch in the upper corner begins 9/16" from the left end and is 1/4 - 5/16" deep. The left part of the notch begins 5/8" down from the corner, and I used an angle grinder to make the angled cut. I tapered each side of the lower plate about 1/8" on each side running down from about 3/4" from the bottom. I did this to lessen contact between the metal and the plastic dash parts.

I made the bend at the joint between the legs and at a roughly 45 degree angle. That seemed to fit well based on the above side shot. In hindsight I think I might have made the upper leg 1 1/2" wide to allow for more tape contact surface, but it seems to be holding okay after 2 days in the 90 degree sun. So it would be your call, but I don't feel like an extra 1/4" will hurt any clearances. Here are the template pictures. Ask if you have any other questions.
 

Attachments

  • template.jpg
    template.jpg
    133.9 KB · Views: 760
  • template2.jpg
    template2.jpg
    133.9 KB · Views: 772

Members online

Forum statistics

Threads
278,304
Messages
3,554,041
Members
248,016
Latest member
Advally Service

Trending content

Back
Top