mitzenfauker
New member
<br>
CUSTOM DRAWER & SLEEPING EXTENSION BUILD for 5TH GEN
Welcome to the thread. Just finished up this build on a custom drawer system and sleeping extension for the 16' 4R Trail.
UPDATED 4/4/17
Heyo everyone!
My name is Nick and I am just another face amongst this awesome community of 4R owners.
I am pretty new to the threads here and haven't posted much but it's always fun to get lost in all the awesomeness that everyone else has going on with all their builds on this forum.
I just finished up a build on a custom drawer system & sleeping extension built for my 2016 5th Gen Trail 4R. Been getting into camping quite a bit over the last 2-3 years with the wife. Now that we have the 4R, we actually fit perfect sleeping in it. I am about 5'8" and fit exactly in it [my wife is 5'0" so she has no problem at all haha]. Typically we tent camp but occasionally it get's pretty cold out and calls for sleeping inside the 4R, especially this season with all the snow up in the mountains! My wife and I have slept a few times in the 4R but there is a weird little bump that hits directly in my lower back when you put the seats down. Because of that, I figured why not build a drawer system with a removable sleeping extension!
Got a chance to use it up in the Sequoias this past weekend with all the snow and rain and worked perfect!
Check it out below to see the [semi] final product and some of the build too!
-----------------------------
FINISHED DESIGN (CURRENTLY) WITH SEATS UP
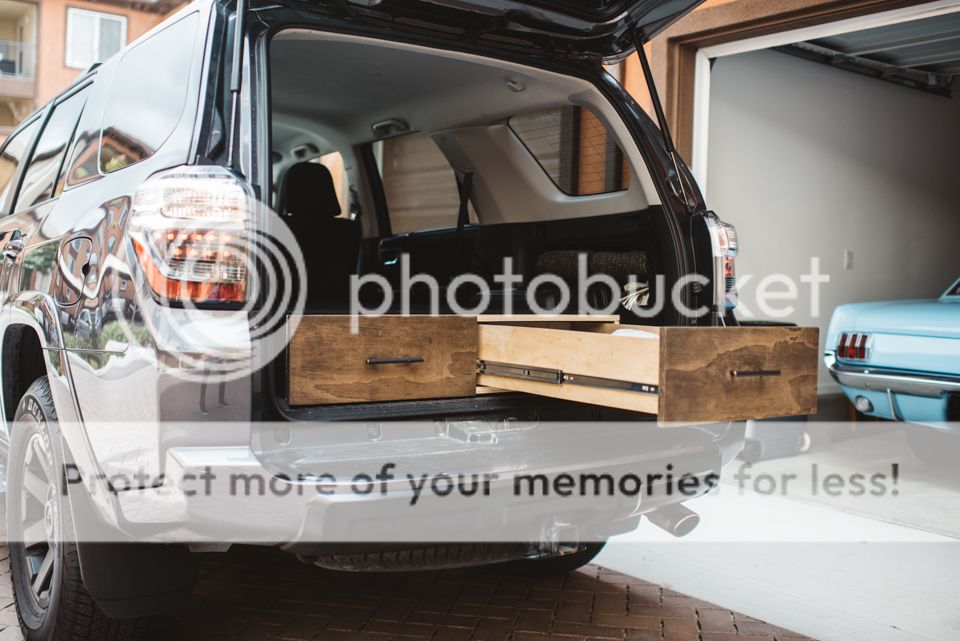
Here it is. First big project I added to my 4R. I didn't bolt anything down because I wanted the option if I ever wanted to take it out I could. The only thing I might add to this is some tie downs of some sort to attach to the tie downs already in the car near the back. 2nd photo shows the drawers fully extended which goes to 7/8 of the way out of the box. The drawer slides also hold up to 100lb.

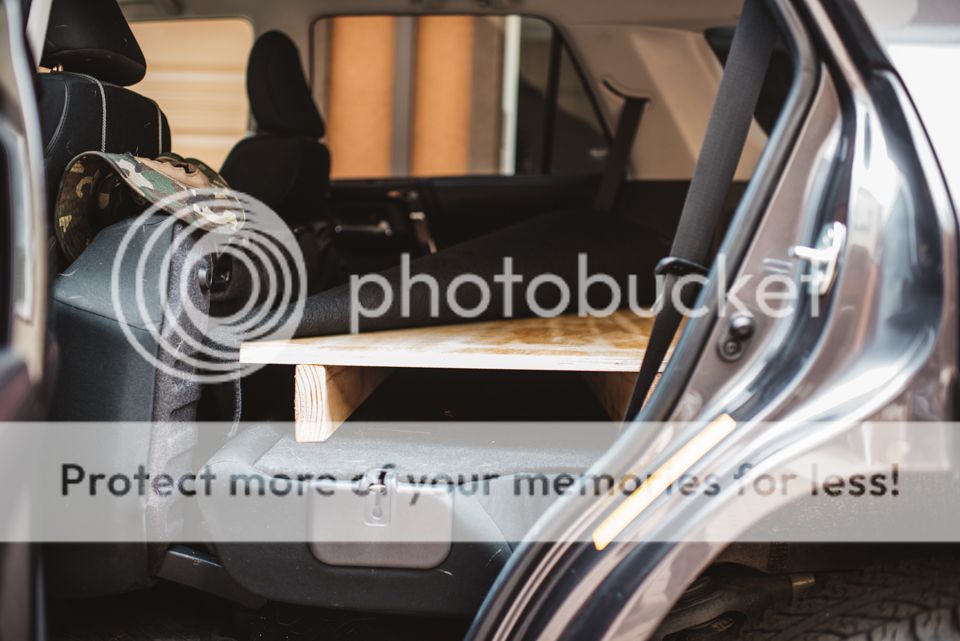
SLEEPING EXTENSION ATTACHED
Built a removable sleeping extension that sits on L shaped brackets and bolts in with a 5/16" bolt and wing nut to tighten it down. The extension sits flush with the drawer system and buts up right against the seats when they are folded down.

-----------------------------
UPDATE 4/4/17
Ended up having to add flush mounted paddle latches as the slides loosened up and smoothed out over time after being worked in. These new latches work like a charm and look great!


-----------------------------
THE BUILD
Started out with some 3/4" Pine plywood. Surprisingly Home Depot didn't have a really good selection of plywoods when I went in the 3/4" range, except for this one. It was a little bit pricier but was a solid piece of wood and was real nice!
Tools Used
- Router (plunge and fixed base)
- Jigsaw
- Straight Edge Rip Guide
- Sawhorses
- Circular Saw
Items used
- 3/4 in. Pine Plywood (drawer shell and drawers)
- 1/4 in. Birch Plywood (drawer bottoms)
- 26 in. 100lb full extension ball bearing slides
- 2" x 6" wood - legs of the sleeping extension
- 3ft x 6 ft. Kraco Replacement carpet roll (black)
- 5/16 in. Bolt and Wingnuts (to secure the sleeping extension)- 5/16 in. Bolt and Wingnuts (to secure the sleeping extension)
- L Bracket (attached to main drawer shell)
- Minwax Prestain Wood conditioner
- Minwax Wood Stain (Jacobean)
- Minwax Polyurethane Clear Satin Finish (still need to apply this)
- Wood screws
- Wood Glue


Added it into my 4R to see how it fit. The drawer box sits about 8.5" (when the bottom piece is on) from the floor and still able to sit on top and have space to sit up (slightly bent over but still comfortable). This photo shows it before I added the bottom piece of plywood in though. I wouldn't want it any taller than this though.

Glued down and added some wood screws as well for some extra durability. Slides are in on this one too. The box is upside down right now in this first photo.

Drawers cut & measured up. Threw it into the box without attaching anything yet to see if I liked the fit. I wanted to make sure to get the most depth out of the box since the drawer shell wasn't that tall. Also ended up adding in a flush faceplate to the drawer so that it looked cleaner (you can see that on the ground in this photo below).

Routed out a track for the drawer bottom on these 2 drawers and glued all together. All ready to add into the car.

Added in the car with the sleeping extension to see how everything lined up and fit. Fit like a charm in there!


I was between the looks. I originally was going to carpet the front faceplates of the drawer but instead, decided to stain it. I figured I could always carpet it later if I wanted.

And BAM! There we go, all put together. Stained drawers faces, carpeted black to match the interior of my 4R and drilled some holes in the sleeping extensions to fit on the L Brackets you will see below as well. I made sure the drawer shell worked with my seat up and I was able to remove the sleeping extension whenever I wanted so I could keep my 4R as an everyday commuter.
Built it just in time for a recent trip out to the Sequoia's too. It was snowing both nights were there and worked perfect to have everything in there in the drawers and sleep in there at night. I had 2 sleeping pads from REI that layed side by side, a double sleeping bag on top of that, and then my wife and I slept in our mummy sleeping bags on top of that. Definitely a great investment and definitely enjoyed building it!

L Brackets that the sleeping extension bolts into.

Before I tacked down the carpet with adhesive spray. Buts up right against the seats when the are folded down.
Looks and its great in there (or at least I think it looks good haha
haha

Fillin er up.

Took me awhile searching the forums here to figure out what exactly I wanted but finally just budged and went for it. There are so many good ones out there and they all serve a different purpose for how you are using it. If it was just me sleeping in there and I didn't have my wife, I probably would have went more of the overland route with the ARB fridge and a bigger setup for the back, but for having the the both of us. I think this works perfect for us.
Definitely had a great time building it and the functionality is great. I wish I would have built it sooner for camping!
If you have any questions feel free to send them over and I would happy to answer them! Always rad to help other members out that want to give it a try as well if you are looking to build this on your own.
Stoked to share the build with you all though and help where I can.
Enjoy!
CUSTOM DRAWER & SLEEPING EXTENSION BUILD for 5TH GEN
Welcome to the thread. Just finished up this build on a custom drawer system and sleeping extension for the 16' 4R Trail.
UPDATED 4/4/17
Heyo everyone!
My name is Nick and I am just another face amongst this awesome community of 4R owners.
I am pretty new to the threads here and haven't posted much but it's always fun to get lost in all the awesomeness that everyone else has going on with all their builds on this forum.
I just finished up a build on a custom drawer system & sleeping extension built for my 2016 5th Gen Trail 4R. Been getting into camping quite a bit over the last 2-3 years with the wife. Now that we have the 4R, we actually fit perfect sleeping in it. I am about 5'8" and fit exactly in it [my wife is 5'0" so she has no problem at all haha]. Typically we tent camp but occasionally it get's pretty cold out and calls for sleeping inside the 4R, especially this season with all the snow up in the mountains! My wife and I have slept a few times in the 4R but there is a weird little bump that hits directly in my lower back when you put the seats down. Because of that, I figured why not build a drawer system with a removable sleeping extension!
Got a chance to use it up in the Sequoias this past weekend with all the snow and rain and worked perfect!
Check it out below to see the [semi] final product and some of the build too!
-----------------------------
FINISHED DESIGN (CURRENTLY) WITH SEATS UP
Here it is. First big project I added to my 4R. I didn't bolt anything down because I wanted the option if I ever wanted to take it out I could. The only thing I might add to this is some tie downs of some sort to attach to the tie downs already in the car near the back. 2nd photo shows the drawers fully extended which goes to 7/8 of the way out of the box. The drawer slides also hold up to 100lb.
SLEEPING EXTENSION ATTACHED
Built a removable sleeping extension that sits on L shaped brackets and bolts in with a 5/16" bolt and wing nut to tighten it down. The extension sits flush with the drawer system and buts up right against the seats when they are folded down.
-----------------------------
UPDATE 4/4/17
Ended up having to add flush mounted paddle latches as the slides loosened up and smoothed out over time after being worked in. These new latches work like a charm and look great!
-----------------------------
THE BUILD
Started out with some 3/4" Pine plywood. Surprisingly Home Depot didn't have a really good selection of plywoods when I went in the 3/4" range, except for this one. It was a little bit pricier but was a solid piece of wood and was real nice!
Tools Used
- Router (plunge and fixed base)
- Jigsaw
- Straight Edge Rip Guide
- Sawhorses
- Circular Saw
Items used
- 3/4 in. Pine Plywood (drawer shell and drawers)
- 1/4 in. Birch Plywood (drawer bottoms)
- 26 in. 100lb full extension ball bearing slides
- 2" x 6" wood - legs of the sleeping extension
- 3ft x 6 ft. Kraco Replacement carpet roll (black)
- 5/16 in. Bolt and Wingnuts (to secure the sleeping extension)- 5/16 in. Bolt and Wingnuts (to secure the sleeping extension)
- L Bracket (attached to main drawer shell)
- Minwax Prestain Wood conditioner
- Minwax Wood Stain (Jacobean)
- Minwax Polyurethane Clear Satin Finish (still need to apply this)
- Wood screws
- Wood Glue
Added it into my 4R to see how it fit. The drawer box sits about 8.5" (when the bottom piece is on) from the floor and still able to sit on top and have space to sit up (slightly bent over but still comfortable). This photo shows it before I added the bottom piece of plywood in though. I wouldn't want it any taller than this though.
Glued down and added some wood screws as well for some extra durability. Slides are in on this one too. The box is upside down right now in this first photo.
Drawers cut & measured up. Threw it into the box without attaching anything yet to see if I liked the fit. I wanted to make sure to get the most depth out of the box since the drawer shell wasn't that tall. Also ended up adding in a flush faceplate to the drawer so that it looked cleaner (you can see that on the ground in this photo below).
Routed out a track for the drawer bottom on these 2 drawers and glued all together. All ready to add into the car.
Added in the car with the sleeping extension to see how everything lined up and fit. Fit like a charm in there!
I was between the looks. I originally was going to carpet the front faceplates of the drawer but instead, decided to stain it. I figured I could always carpet it later if I wanted.
And BAM! There we go, all put together. Stained drawers faces, carpeted black to match the interior of my 4R and drilled some holes in the sleeping extensions to fit on the L Brackets you will see below as well. I made sure the drawer shell worked with my seat up and I was able to remove the sleeping extension whenever I wanted so I could keep my 4R as an everyday commuter.
Built it just in time for a recent trip out to the Sequoia's too. It was snowing both nights were there and worked perfect to have everything in there in the drawers and sleep in there at night. I had 2 sleeping pads from REI that layed side by side, a double sleeping bag on top of that, and then my wife and I slept in our mummy sleeping bags on top of that. Definitely a great investment and definitely enjoyed building it!
L Brackets that the sleeping extension bolts into.
Before I tacked down the carpet with adhesive spray. Buts up right against the seats when the are folded down.
Looks and its great in there (or at least I think it looks good
haha
Fillin er up.
Took me awhile searching the forums here to figure out what exactly I wanted but finally just budged and went for it. There are so many good ones out there and they all serve a different purpose for how you are using it. If it was just me sleeping in there and I didn't have my wife, I probably would have went more of the overland route with the ARB fridge and a bigger setup for the back, but for having the the both of us. I think this works perfect for us.
Definitely had a great time building it and the functionality is great. I wish I would have built it sooner for camping!
If you have any questions feel free to send them over and I would happy to answer them! Always rad to help other members out that want to give it a try as well if you are looking to build this on your own.
Stoked to share the build with you all though and help where I can.
Enjoy!
Last edited: