My mod thread: 07 for towing & long distance travel

(c) If there's one thing I've learned as a married man, it's don't ask a question unless you're sure you want to know the answer. ;):

Nice teardrop, if you would like to share more information on that I would be more than interested. However, in accordance with stipulation (c),
Do these modest modifications truly warrant a "build" thread. I guess you did "build" a styrofoam cup holder, but I'm not sure that constitutes a build either...
Just one man's thoughts
 
Nice teardrop, if you would like to share more information on that I would be more than interested. However, in accordance with stipulation (c),
Do these modest modifications truly warrant a "build" thread. I guess you did "build" a styrofoam cup holder, but I'm not sure that constitutes a build either...
Just one man's thoughts

Ah. One of those I see. Would you rather have a bunch of threads or random pictures or one central located thread? Some of you guys kill me with what bothers you.
 
Ah. One of those I see. Would you rather have a bunch of threads or random pictures or one central located thread? Some of you guys kill me with what bothers you.

Build threads are nice when they include detailed write ups of work members do on their own trucks or when they include a lot of different, unique modifications that would help future users that want to do the same.

If I choose to make a thread at some point in the future, it would most likely be to save myself from having to answer countless PM's about this mod or that one. Until that time, if anyone cares to see what I've done to my 4Runner, they can get a synopsis from my signature and access my Garage for a timeline and photos. Since most people do the same old things others do, I don't see a huge reason to document them. It is simply a more organized way to catalog data to help future users find the info they are looking for, nothing personal.

But, if it is something custom, like my cargo box. I'll start a new thread so future members (like jbmccul) that are looking to collect information on that specific modification can find the data they are looking for by searching. Have you ever run across something you want to make sure to remember? But, when you go back to access that information, you can't figure out where you saw it in the first place. There are so many build threads on this site it is impossible to keep them straight. And, in my opinion, it would be more convenient for site maintenance if the build threads were left to the guys that actual build "build thread" worthy trucks. Here are just a couple that came to mind...

Javelin
Dawg4Runner
Magert54
aha2988
 
Last edited:
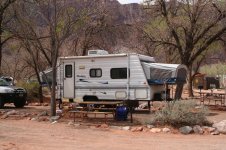
Obviously not everyone likes to read all threads regardless of what they're called. I'll read this build thread for a couple reasons. First, the trailer would have been mine if Martin didn't swoop in the day before I was going to buy it. Second, I haven't seen a mention of PlastiDip or LED yet. :cool:
 
Nice ride.

I enjoy watching a more subtle 'build'. It may not be the Josh'sbuild but most of us don't need and won't have (spend our $$) on something so built up.

Not every build has to be a contender for T4r of the month.

Better than a thread asking which tires to get... ;)
 
I also like some of these smaller threads. I like to see and compare the little things people do. Not everyone needs to read an all out super build. I like to see these type of purpose built rides

Any plans to upgrade the back of that trailer with one of those fancy kitchens?
 
Obviously not everyone likes to read all threads regardless of what they're called. I'll read this build thread for a couple reasons. First, the trailer would have been mine if Martin didn't swoop in the day before I was going to buy it. Second, I haven't seen a mention of PlastiDip or LED yet. :cool:

I also like some of these smaller threads. I like to see and compare the little things people do. Not everyone needs to read an all out super build. I like to see these type of purpose built rides

Any plans to upgrade the back of that trailer with one of those fancy kitchens?

Well, if you guys would like to see a "build thread" that is worthy of the name, check out the one for Bubbles:

Bubbles v. 2.0: The buildup!

New axles - new wheels, tires, new fenders, new finish, new hinges, completely gutted the galley...I think even Dusty would agree it qualifies as a true "build thread." ;):

Oh, and CXS: You should check out that thread, too. When you see how much work we've had to put into Bubbles, you might just realized you kind of dodged a bullet! :nod:
 
Looking great Martin! I did read the whole thing and am happy to be able to see your build and figure sometime we'll see it around. Dodge one bullet and just get hit with another is my experience. I will say "Who the hell buys a trailer in January!" I admit being shocked that it sold (literally) the day before I was going to buy it.

The good news on my end is that I ended up with something a bit more plush that we used for the first time a couple weeks ago. All's well that ends well and hindsight tells me us older folks now like the amenities we ended up with.

Keep up the good work, I've bookmarked it!
 

Attachments

  • IMG_0108.jpg
    IMG_0108.jpg
    141.1 KB · Views: 678
New-to-me wheels and tires (FJC Steelies)

Well, the biggest change so far to the looks of my 4runner has been completed: After a record-breaking spring snow season, I finally was confident enough that we were done with snow that I could put on my new wheels/tires.

The reason I waited so long is that my stock wheels had Cooper Discoverer M+S tires with the "extreme duty" snow rating and sipes - perfect for snowy/icy weather. I didn't want to take them off until I was sure our snow season was done.

So, this weekend, taking time out from working on our Teardrop trailer (see the link in one of the posts above) I took part of the day to finally put on my new tires and wheels.

My quest actually started three years ago when I still had my 3rd gen (1999 SR5.) I had a slow leaking tire and took it off so I could get it fixed. When I took it off, I put the spare on, and looking at it, I had to admit I kind of liked the look of the blacked out steel wheel:

2010_0402_145450AA.jpg~original


I think I even started a thread over in the 3rd gen board asking "does anybody else kind of like the steelies?" :D

Anyway, fast forward to last year, I was looking to mildly build up my new-to-me '07 and somebody else here had a post on FJC steelies. So I posted a "wanted" ad on a couple of boards. My thought at the time was I'd just get some wheels and then put AT tires on them.

Well, I got a response from someone at ExpeditionPortal.com, and he said he had a set of 5 FJC steelies with center caps and lug nuts, and they had BFG MT's in 255/75/17 with more than 50% of the tread left. Although I have never run MT tires (I prefer ATs) the price was too good to pass up (basically, the price he was asking for the wheels + tires is what I would have been happy to pay for the wheels alone!) So I hauled them home last October and they've been sitting on the side of my garage, waiting for the snow to be done (because I've heard MTs aren't good on icy or snowpacked surfaces, although I'm sure they'd do great on deep snow.)

So this weekend, I finally put them on. Bit of a PITA because I don't have a floor jack. I used the factory bottle jack so at least now I know where all 4 jacking points are! Slow going, but I liked the results:

Before:

2013_0505_090505AA_zps9010a44f.jpg~original


After:

2013_0505_111701AA_zps2ac7f364.jpg~original


2013_0505_120201AA_zpsd2598ecd.jpg~original


I definitely like the "no nonsense" look of the black rims. They are a bit oxidized except for one that the seller polished (it's on the left front.) I could polish out the rest of them but I actually think the dull/flat look is better. The shiny lug nuts don't look great, I may replace them.

Here is a final shot, with the roof rack mounted (getting ready for an off-road trip in just two weeks!)

2013_0505_165610AA_zpscdb4e237.jpg~original


I only drove a short distance on the new tires. Handling was OK but they were noticeably noisier than the M+S tires they replaced!

Oddly enough, even though these tires are not supposed to have TPMS sensors in them, my TPMS warning light did not go off. I'll post a separate thread about that, though.

Future plans are to keep the MTs until they wear out, unless they just turn out to be horrible to live with. After they wear out or I decide I don't like them, they'll be replaced with a good AT that will work in both snow and desert conditions, probably the Hankook Dynapro ATM, that's what I put on my 3rd gen and really liked it.

BTW, these blacked out wheels will look great with my new bumper, which is bing built by forum member Mtn.Runner. Looking forward to that, too.
 
Last edited:
Well, the biggest change so far to the looks of my 4runner has been completed: After a record-breaking spring snow season, I finally was confident enough that we were done with snow that I could put on my new wheels/tires.

The reason I waited so long is that my stock wheels had Cooper Discoverer M+S tires with the "extreme duty" snow rating and sipes - perfect for snowy/icy weather. I didn't want to take them off until I was sure our snow season was done.

So, this weekend, taking time out from working on our Teardrop trailer (see the link in one of the posts above) I took part of the day to finally put on my new tires and wheels.

My quest actually started three years ago when I still had my 3rd gen (1999 SR5.) I had a slow leaking tire and took it off so I could get it fixed. When I took it off, I put the spare on, and looking at it, I had to admit I kind of liked the look of the blacked out steel wheel:

2010_0402_145450AA.jpg~original


I think I even started a thread over in the 3rd gen board asking "does anybody else kind of like the steelies?" :D

Anyway, fast forward to last year, I was looking to mildly build up my new-to-me '07 and somebody else here had a post on FJC steelies. So I posted a "wanted" ad on a couple of boards. My thought at the time was I'd just get some wheels and then put AT tires on them.

Well, I got a response from someone at ExpeditionPortal.com, and he said he had a set of 5 FJC steelies with center caps and lug nuts, and they had BFG MT's in 255/75/17 with more than 50% of the tread left. Although I have never run MT tires (I prefer ATs) the price was too good to pass up (basically, the price he was asking for the wheels + tires is what I would have been happy to pay for the wheels alone!) So I hauled them home last October and they've been sitting on the side of my garage, waiting for the snow to be done (because I've heard MTs aren't good on icy or snowpacked surfaces, although I'm sure they'd do great on deep snow.)

So this weekend, I finally put them on. Bit of a PITA because I don't have a floor jack. I used the factory bottle jack so at least now I know where all 4 jacking points are! Slow going, but I liked the results:

Before:

2013_0505_090505AA_zps9010a44f.jpg~original


After:

2013_0505_111701AA_zps2ac7f364.jpg~original


2013_0505_120201AA_zpsd2598ecd.jpg~original


I definitely like the "no nonsense" look of the black rims. They are a bit oxidized except for one that the seller polished (it's on the left front.) I could polish out the rest of them but I actually think the dull/flat look is better. The shiny lug nuts don't look great, I may replace them.

Here is a final shot, with the roof rack mounted (getting ready for an off-road trip in just two weeks!)

2013_0505_165610AA_zpscdb4e237.jpg~original


I only drove a short distance on the new tires. Handling was OK but they were noticeably noisier than the M+S tires they replaced!

Oddly enough, even though these tires are not supposed to have TPMS sensors in them, my TPMS warning light did not go off. I'll post a separate thread about that, though.

Future plans are to keep the MTs until they wear out, unless they just turn out to be horrible to live with. After they wear out or I decide I don't like them, they'll be replaced with a good AT that will work in both snow and desert conditions, probably the Hankook Dynapro ATM, that's what I put on my 3rd gen and really liked it.

BTW, these blacked out wheels will look great with my new bumper, which is bing built by forum member Mtn.Runner. Looking forward to that, too.

+1 for the dynapros. Also the Hankook mud terrains are a decently quiet M/T and handle very well.
 
New bumper is on!!

Already posted in a separate thread but wanted to "document" it here:

New bumper from forum member Mtn.Runner is on:

2013_0528_143017AA_zpsb5c2d0ce.jpg~original


2013_0528_143028AA_zpsb17cf581.jpg~original


2013_0528_143044AA_zpsa242fe47.jpg~original


That's the builder, Jesse (MTN.Runner) just finishing up (zip-tying the trimmed fender liners so they won't flap.)

Here's the glamour shot:


2013_0528_153625AA_zps3855cd82.jpg~original


As you can see the bumper includes a set of LED driving lights that were sourced from (I believe) Gaterose. They're extrememly bright and wired in to the fog light switch. Now I just need to do the independent-fog-light-mod so I can use them with the high beams.

Great looking bumper, great price and Jesse is a good guy to work with. :thumb:
 
Last edited:
As you can see the bumper includes a set of LED driving lights that were sourced from (I believe) Gaterose. They're extrememly bright and wired in to the fog light switch.

I was wondering where those came from lol.. I actually looked through my order notes yesterday because I couldn't remember you ordering them but haven't seen em for sale anywhere else.

edit - oh, and I think I already said this in the other thread, the bumper looks great!
 
Sound system upgrade...

Whoops! Almost forgot to include this in here.

I was never really happy with the factory stereo in my '07. Not that it was bad, but there were better ones out there. And while the factory (non-JBL) stereo did have an aux input in the center console, it did not have iPod controls, nor did it have a USB input, both of which I had really come to like in my '99.

So I shopped around. Initially I had wanted to get a touch-screen unit with an integrated backup camera, but I finally settled on a less fancy Kenwood DPX-500BT. My main requirements were:

1. Accepts USB
2. iPod controls
3. Bluetooth hands free for phone
4. RDS (Radio Data System) - the thing that most FM stations have now where they will actually broadcast the name of the song and artist (I didn't even know this existed until the wife got a new car last year and her factory stereo had this!)

Anyway, I considered having it professionally installed but some of the folks on another board convinced me that I could do it myself if I bought from Crutchfield so that's what I did. And while I did have to call Tech Support 3 times (the last time after I had already installed the stereo!) they were very helpful and professional at all times and the stereo works great (except for a minor AM radio issue which I'll post about in a different area of the board.)

So here it is installed in the dash:

2013_0510_192601AA_zpsfb4952ec.jpg~original


Pros: Sound is GREAT! I can really crank it up without losing sound quality.
USB works well and it has a number of other options (Pandora, IheartRadio etc.)

Cons: Display is a little difficult to see in bright light. I've set the color scheme to what seems to be the brightest available but it still washes out when it's very sunny.

For the cost ($200) I'm very happy and I feel good about installing it myself. I was also able to route the BT microphone so it sits to the right of my Scangauge and therefore it's out of the way.

I would definitely buy from Crutchfield again. They include all the parts neccessary for installation and their tech support crew was very helpful.
 
Do you have any additional information about microphone placement, or is there another guide you used? That is the only thing that is stopping me from installing my own head unit.

I am also really interested in this particular head unit, but display brightness seems to be the main concern. Is it even visible during the day? It seems like a major downside.
 
Do you have any additional information about microphone placement, or is there another guide you used? That is the only thing that is stopping me from installing my own head unit.

I just ran my wires behind the dash and then put the mike on the steering wheel, next to the scangauge using double-sticky tape. Seems to work OK, although when I talk I typically move my head a little closer to the wheel. If I get ambitious I might eventually run the wire up into the headliner the way it is on my DD car (which was wired by a stereo shop.)

I am also really interested in this particular head unit, but display brightness seems to be the main concern. Is it even visible during the day? It seems like a major downside.

NO, in fact, that's the only complaint I have about it. Even at its brightest setting, it's very tough to read in daylight (if you're wearing sunglasses, forget it.) That's the only negative, really, but it's a big one.

If the stereo on the 4th gen wasn't placed so high on the dash it would be fine, but for this particular vehicle, I have to honestly say I wish I'd picked a different unit.

Just to add: I've already disabled the 'auto dim' feature that dims the display when the headlights are on, as I normally run my headlights during the day. I've also chosen the color that appears to be the brightest, which is yellow. I may try messing with other colors but I doubt they'd be any brighter than the bright yellowish color that I'm using now.

UPDATE: After messing with the colors a bit I've settled on the brightest green as having the best daytime visibility. Now I can pretty much read the display any time except when I'm (a) wearing my sunglasses and (b) have the sun visible in front of me. However, it's still a bit of a struggle. Nevertheless I'm happy with the sound quality and the features so I think I'll be able to live with it.
 
Last edited:
Next mod: Rola Rack with Armortech Off Road Lowering kit...

Just put the Rola Rack with the AOR lowering kit I found on this forum. This resolves the one thing I hate about roof baskets on vehicles like the T4R, that they sit too high perched on an arched cross rail!

2014_0215_160955AA_zps36a855f6.jpg~original


Here are some close up pictures showing just how low the lowering kit makes the rack. The short answer: It's as low as it can get without hitting the roof!

2014_0215_161002AA_zps74be52ce.jpg~original


2014_0215_161011AA_zpsf423cdc1.jpg~original


I like the big size of the rack (I had a Yakima Basket case before, attached to the factory cross rails) and I like the rugged looks.

2014_0216_165213AA_zps00c7888b.jpg~original


2014_0216_165219AA_zpsadd4a860.jpg~original


Definitely a worthwhile mod and I like the fact that it's 100% reversible.
 
Sleeping Platform Done!

Also crossposted at Home - ExPo: Adventure and Overland Travel Enthusiasts

Well, after much thinking and a mountain of "honey-do's" I finally got the time (and some decent weather) to build my sleep platform.

Special thanks to Jnelson from ExPofor giving me the opportunity to look at his and get some ideas.

Since I'm not much of a carpenter, I decided to make a very, very simple platform using a couple of sheets of 15/32" sanded plywood (sanded on both sides, so it's pretty nice.) $32/sheet at the local Home Depot minus 10% military discount, it was the only out-of-pocket expense I had, as everything else (2x4s, 2x2's and 1 1/4" wood screws) were things I had lying around the garage.

For the benefit of those who might be contemplating something similar, I'll show you the process.

Started off by getting the plywood cut at the store. Most of the big box stores will give you 1 or 2 cuts free. I had each piece cut once, at the 6' point on the long side so it would fit into my DD Mazda pickup (also I knew I wouldn't need a piece longer than 6'.) This resulted in my two 4 x 8 plywood sheets becoming two 4 x 6 sheets and two 4 x 2 sheets.

Once I got them home, I measured for the two "bulkheads" on the sides. This will carry most of the weight.

Before you get started, you need to remove the bottom cushions on the back seat. This is easily done with a 14mm socket and the seat cushions lift straight out. Then drop the seat backs down.

The thing that makes this a bit of a challenge is that dropping the seats does not make a flat load deck. Instead, the seat backs actually slope upwards.

I cut a 6' long piece to 10 3/4" high. I then measured where the "up slope" started and how high it went. This gave me a good angle to cut, and then I test fitted it. It needed a little more "angle" so I cut a bit more (I've learned the hard way, cut less rather than more.) Final result: It fits and is level on the top:

2014_0223_123936AA_zps9be33f57.jpg~original


Once I had one, I used it as a template to cut the other one. Having two, I then used 2 2x4's to connect them together.

2014_0223_131555AA_zpsba792ded.jpg~original


Note that this is flipped upside down on the garage floor. This way the cross-piece is flush with the top of the side pieces. Once two of them were on, I put them back in the truck for a test fitting (I did this a LOT. Again, I learned this lesson the hard way!)

2014_0223_132113AA_zps6eb83a52.jpg~original


After this, I measured for the bottom crosspieces, and screwed them in as well. After test fitting that, I put in the rest of the crosspieces. Here is what the "frame" finally ended looking like:

2014_0223_160134AA_zpsc15f57fd.jpg~original


Not sure of the weight but it's pretty easy for me to pick up and move around. I'd say not more than 50lbs max. I ultimately went with 4 crosspieces on the top, three 2 x 4's and one 2 x 2, and 3 across the bottom, two of them 2 x 4s and one of them a 2 x 2. Probably a little "overbuilt" but I want it to be strong. I had originally intended to put a plywood panel across the bottom instead of the 2 x 4, but quickly realized the 2 x 4s would be much stronger.

For the top, bed-area, I took the other 4 x 6 plywood sheet and cut it down to a little less than 4' long, and combined it with one of the 4 x 2 sheets that was created when the original sheets were cut. The smaller sheet will go towards the front, while the larger sheet goes to the back.

2014_0223_151600AA_zpsa420069e.jpg~original


You can see from this picture that the smaller, 4 x 2 sheet, warped quite a bit after it was cut. This may be corrected by putting it on a long piano hinge so it can swing upward.

The other thing that has to happen is I need to get some indoor/outdoor carpeting and cover the platform. Eventually, the big sheet may be screwed to the frame, or I may just put a hook on it and use a turn bolt to connect it to the floor, not sure yet. Being as how the "bed" is only 4' wide, it easily slides in and out of the truck.

The forward end of the platform needs a slight "lift" to make it level, so I cut these legs from some 2 x 2 I had.

2014_0223_161819AA_zps42207d1e.jpg~original


However, I will not permanently attach these legs because it will make it more difficult to slide the platform in and out. Instead, my thought is that while in "travel mode" the legs will remain detached, and then when I get to my campsite I can prop up the front of the platform on the legs. It will only need to be like that when I'm sleeping. I may use wing nuts to attach it or I may just leave them propped up. Since I'll only be using the legs when I'm "static", I'm not sure they need to be attached with a bolt.

My platform will accommodate my super-dooper high speed, high tech 'drawer' system:

2014_0223_145130AA_zps5352d47b.jpg~original


Which I also sourced at the local big box home store. Should be able to get two of these side by side, and the bulk of my camping and cooking gear should fit in there. The area under the forward compartment should be able to accommodate most of my 'emergency' gear, which means the only "boxes" in my truck should be the cooler, the fridge (I use both), the water (a 6 gallon cubic jug) and maybe a 'dry food' box. This should allow for plenty of space for "stealth camping!"

Anyway, I just wanted to post this in case anybody else was thinking of building a platform but worried about how to go about it. I'm pretty much the poster child for being all thumbs, so if I can do it, anyone can! My guess is that anybody could do this for a total cost of <$200, all materials included, and the only tools you'd really need would be a good saw and a screwdriver/drill. I used a table saw, which makes it easy to get nice, straight, long cuts, but I'll bet you could do it with a hand-held circular saw if you were careful.

 
Platform part 2

OK, so the hard part was last weekend (the hardest part for me is always figuring out what I'm going to do.) This weekend I finished it off.

Indoor/outdoor carpet no longer just comes in boring gray, since forest green is my favorite color, I went with that:

2014_0301_131622AA_zps3a25cf2d.jpg~original


The guy I copied my platform from just had his flat panels sitting on top of the frame. I decided I didn't want them bouncing around so I screwed the rear panel to the frame. I had a 15" piano hinge left over from a previous project, so I used it to hinge the forward portion of the deck:

2014_0301_132047AA_zpsa6dad670.jpg~original


2014_0301_131753AA_zps53499591.jpg~original


2014_0301_131809AA_zps3a7fe074.jpg~original


2014_0301_131827AA_zpsda350b7a.jpg~original


I was going to try to "anchor" the platform to the load deck with a set of U bolts, turnbuckles, etc, but then when I looked at it, I realized I could do it much simpler with a ratchet strap:

2014_0301_152903AA_zps8c66def8.jpg~original


That ratchet strap attaches to the two factory tie down D rings that are permanently attached to the floor on the 4runner on each side of the cargo area (4 total.) That will secure the driver's side.

The passenger side will be secured with a ratchet strap that holds my cargo in. I did a "practice packout" with the large, inflexible Items I'll be carrying: My cooler, small fridge, water can, and a lantern box:

2014_0301_155453AA_zps8f879586.jpg~original


The ratchet strap attaches to the passenger side rear D ring in the back and to the U-bolt for the seat back in the front:

2014_0301_155521AA_zpsdc8477bd.jpg~original


Here's the mattress I got. It's a chaise lounge pad, pretty thick and covered with a water- and stain-resistant covering. When I travel I'll put it in a plastic bag to keep it from getting too dusty.

2014_0301_150724AA_zps2f7ce8ac.jpg~original


Yeah, go ahead and laugh at my floral print. :rolleyes: But I prefer to think of it as "Tropical Camouflage" :biggrin1:

I've got a big trip coming up in exactly 4 weeks (Desert Expedition IV) and that will be my first chance to try this out.

Now all I need to do are cut some "blackout curtains" for the windows and I'll be ready to "stealth camp" at Wal Mart. :spy:
 

Members online

Forum statistics

Threads
278,316
Messages
3,554,120
Members
248,016
Latest member
Advally Service

Trending content

Back
Top