

Cubslover
New member
Product of the year, for me anyway.
Turtle Wax's Black Box

It's a 2 part (3 step) detailing package specifically for black vehicles.
Here's why I bought it:
Like and IDIOT this last winter, I used the brush on my ice scraper to clear the snow off my Tundra. We never had a bunch of snow at one time, but enough to need cleaned off about a dozen times. It had also been keyed at some point in time just behind the back driver door ALL the way to the fender well.
Well, I washed the truck and found THOUSANDS of tiny scratches all over the hood, front fenders, and paint around the windows. Also on the tailgate and rear fenders. I had no clue what to do. Normal wax did nothing and I wasn't about to resort to buffing them all out. The local auto parts store had this in stock, but none of them had any experience with it. I picked it up with some new microfiber towels and took it to the ball park. I figured it was a nice day and it'd be nice to do this there.
Ok, so the before pictures. For some reason I didn't think to do pictures before I had already done the hood. It was horrid before I used this.
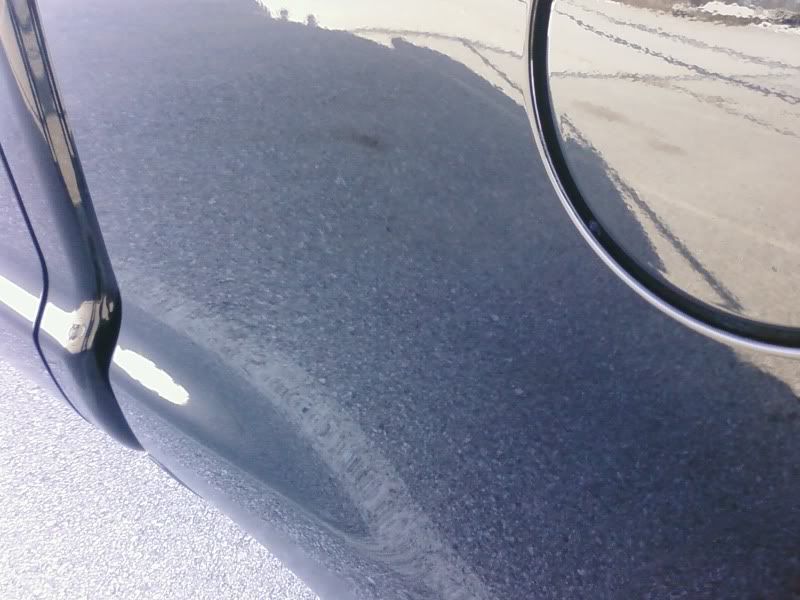
This is the key mark...


This is a pic of the pillar behind the back passenger side door.

First step to the process is obviously to wash the vehicle. I had Mike's Express do the wash and dry for me. They usually leave some water spots and streaks so I had to use a spray detailer and clean those up.
Step 2 - with the supplied applicator, apply the pre-wax cleaner. Funny, this stuff goes on and comes off just like wax. Both the Wax and Pre-Wax cleaner are black, so be prepared to have nasty hands/fingernails and dirty clothes. You apply the cleaner as you would any normal wax, instead they have you apply it back and forth, instead of the typical overlapping circles. To remove you lightly mist it with the spray detailer the buff it with a new microfiber cloth. You use the same cloth to do this step for the entire vehicle.
Step 3 - after applying and removing the cleaner(wax) from step 2, you apply the actual Black Carnuba Wax. I love that smell. Same thing, back and forth instead of circles. I do a little of both depending on the surface. You do the same as step 2 in the removal: Lightly mist it with the spray, then use a fresh microfiber.
The After pictures, the hood is completely perfect, neary a scratch.
The Key Mark, it was pretty bad and you can just barely see a bit of it.

The side pillar...

My thoughts (as if you care)...
The removal of the pre-wax cleaner from step 2 is the toughest. The towel gets a bit damp from all the detailer and you find yourself going back and really rubbing to get out some places. It seems to do the same job as a clay bar, as in it removes stuff imbedded in the paint. Clay bars are much easier on the arms! At the same time, however some of the scratches disappeared, so it's doing two jobs at once. It's a time consuming process and takes a bit of elbow grease, but as I'd give a kidney to have this finish, it's well worth it.
Full picture:


Turtle Wax's Black Box
It's a 2 part (3 step) detailing package specifically for black vehicles.
Here's why I bought it:
Like and IDIOT this last winter, I used the brush on my ice scraper to clear the snow off my Tundra. We never had a bunch of snow at one time, but enough to need cleaned off about a dozen times. It had also been keyed at some point in time just behind the back driver door ALL the way to the fender well.
Well, I washed the truck and found THOUSANDS of tiny scratches all over the hood, front fenders, and paint around the windows. Also on the tailgate and rear fenders. I had no clue what to do. Normal wax did nothing and I wasn't about to resort to buffing them all out. The local auto parts store had this in stock, but none of them had any experience with it. I picked it up with some new microfiber towels and took it to the ball park. I figured it was a nice day and it'd be nice to do this there.
Ok, so the before pictures. For some reason I didn't think to do pictures before I had already done the hood. It was horrid before I used this.
This is the key mark...
This is a pic of the pillar behind the back passenger side door.
First step to the process is obviously to wash the vehicle. I had Mike's Express do the wash and dry for me. They usually leave some water spots and streaks so I had to use a spray detailer and clean those up.
Step 2 - with the supplied applicator, apply the pre-wax cleaner. Funny, this stuff goes on and comes off just like wax. Both the Wax and Pre-Wax cleaner are black, so be prepared to have nasty hands/fingernails and dirty clothes. You apply the cleaner as you would any normal wax, instead they have you apply it back and forth, instead of the typical overlapping circles. To remove you lightly mist it with the spray detailer the buff it with a new microfiber cloth. You use the same cloth to do this step for the entire vehicle.
Step 3 - after applying and removing the cleaner(wax) from step 2, you apply the actual Black Carnuba Wax. I love that smell. Same thing, back and forth instead of circles. I do a little of both depending on the surface. You do the same as step 2 in the removal: Lightly mist it with the spray, then use a fresh microfiber.
The After pictures, the hood is completely perfect, neary a scratch.
The Key Mark, it was pretty bad and you can just barely see a bit of it.
The side pillar...
My thoughts (as if you care)...
The removal of the pre-wax cleaner from step 2 is the toughest. The towel gets a bit damp from all the detailer and you find yourself going back and really rubbing to get out some places. It seems to do the same job as a clay bar, as in it removes stuff imbedded in the paint. Clay bars are much easier on the arms! At the same time, however some of the scratches disappeared, so it's doing two jobs at once. It's a time consuming process and takes a bit of elbow grease, but as I'd give a kidney to have this finish, it's well worth it.
Full picture:


