My suspension lift kit

Egstyle

New member
IMG_1050.jpg

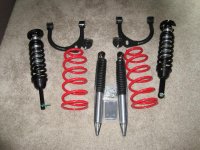
Icon front extended travel struts (with IVD), Icon rear monotube shocks, SAW rear coils, Light Racing UCA's.

After a little various forum trolling, I decided against the reservoir shocks. The only advantage of the reservoirs is that they involve more hydraulic fluid, thus keeping the heat down over extended operation. Since I don't plan on doing any 100+ mph desert racing any time soon, I don't think they'll be necessary. Same goes for the UCA's. There may be some advantage to ride quality with the rear piggyback Icon's, but I am not thinking it will be all that noticeable. Plus, the monotubes have a lifetime warranty vs 2 years for the piggybacks and they were $600 cheaper. I can always swap those for not too much of a loss.

No rear trailing arms for now because they shouldn't make much difference to ride quality, either. It appears the only purpose for upgrading those is for strength.

I decided to attempt the install next weekend with a friend. There is a shop here that rents bays with a low lift for $15/hr. They also rent out specialty tools. Hopefully we can knock it out in 6 hours.

Total kit cost, including shipping & tax: ~$1980.

Hopefully it will have the ride quality of an Icon stage 5 (albeit without as intense of durability) for not too much more than a Toytec with UCA's. For the casual off-roader such as myself, I think it will be more than sufficient.

 

Attachments

  • IMG_1050.jpg
    IMG_1050.jpg
    138.7 KB · Views: 8,952
Register to hide this ad
are those springs toytec i thought icon's were black, by the way nice set up i agree with your explanation congrats
 
Congrats!!

Install should be pretty easy, especially with a bay. Do you or your friend have suspension experience?
 
magaca - the springs are Sway-A-Ways. I went with them on recommendation from Harper. He said they are a little softer than Icons.

Jesse - My friend might have a little experience, but I have none. I figure with the included instructions, some internet research, the 2010 4Runner suspension manual, and the shop also has mechanics on hand who have some experience with suspension systems, we should be ok. Once we've done one side, the other should be a piece of cake. My biggest concern is doing the rear coils. Any wisdom that you may have gained in general from your install would be greatly appreciated :D

If any other Utah 4Runner people want to come check it out or help out, you're more than welcome. We're planning on next Saturday at the Wrench-It Center in Salt Lake.
 
View attachment 30764

Icon front extended travel struts (with IVD), Icon rear monotube shocks, SAW rear coils, Light Racing UCA's.

After a little various forum trolling, I decided against the reservoir shocks. The only advantage of the reservoirs is that they involve more hydraulic fluid, thus keeping the heat down over extended operation. Since I don't plan on doing any 100+ mph desert racing any time soon, I don't think they'll be necessary. Same goes for the UCA's. There may be some advantage to ride quality with the rear piggyback Icon's, but I am not thinking it will be all that noticeable. Plus, the monotubes have a lifetime warranty vs 2 years for the piggybacks and they were $600 cheaper. I can always swap those for not too much of a loss.

No rear trailing arms for now because they shouldn't make much difference to ride quality, either. It appears the only purpose for upgrading those is for strength.

I decided to attempt the install next weekend with a friend. There is a shop here that rents bays with a low lift for $15/hr. They also rent out specialty tools. Hopefully we can knock it out in 6 hours.

Total kit cost, including shipping & tax: ~$1980.

Hopefully it will have the ride quality of an Icon stage 5 (albeit without as intense of durability) for not too much more than a Toytec with UCA's. For the casual off-roader such as myself, I think it will be more than sufficient.
Looks great eg! I guess you found the answer about the LR UCA's.5th Gen UCA's are exactly the same as 4th Gens and FJ's.

The install tip I can give you is to watch the ABS brake wire harnesses front and back. They won't read right if stretched and will throw a CEL light. The front right one cost $80 ,guess how I know!Just unbolt them from the brackets(10mm bolts),hanging loose but leave them attached to the wheel.The rear springs were kind of a pain but I used a small scissor jack to push the axle down far enough to get the longer springs in.

I'll PM you my cell ph. number in case you get stuck or have questions on the install. It's actually not that hard and really helps you understand how your suspension works.

I'll be in Moab from the 18th-23rd but doubt I'll make it as far north as SLC or I'd help you.
 
Don't worry. This was the first lift I did and it is straight forward once you start looking at. What took the longest was compressing the coilovers. But your are already assembled.

I would start with the rear first. Do the driver side, then the passenger side as well since all the weight is on the driver.

You need a breaker bar (a 12in wrench is what we used), 10 to 22mm sockets/ wrenches and two 3ton jack stands. While you have you rear down, you might as well put in the rear diff breather extension too!

Also, a case of beer will make it better
 
Don't worry. This was the first lift I did and it is straight forward once you start looking at. What took the longest was compressing the coilovers. But your are already assembled.

I would start with the rear first. Do the driver side, then the passenger side as well since all the weight is on the driver.

You need a breaker bar (a 12in wrench is what we used), 10 to 22mm sockets/ wrenches and two 3ton jack stands. While you have you rear down, you might as well put in the rear diff breather extension too!

Also, a case of beer will make it better

Good advice. Pair that with the ABS comment, and you should be good to go. I have not done my 4r yet, but I have lots of j**p experience. ;)
 
I'll PM you my cell too, just in case you get hung up somewhere. I can't think of anything to specifically point out right now. Maybe read this thread about installing UCA's:

Camburg UCA Install w/pics - Toyota Forums :: Toyota Nation

*This thread is helpful because the process is essentially the same, except on the 3rd pic down we don't have that bolt in the spindle so ignore that.

Just a reminder for the front suspension, and it's probably obvious, but just in case, remove the UCA first, then remove and replace your new coilover. Once the new coilover is in, then put on the new UCA. Much easier to get the coilover in/out with the UCA out of the way.
 
Last edited:
Can you give me a ride report? This is exactly what I am starting to consider for my lift and wondering how the ride quality is.
 
I had some issues with a tie rod end, so I just got it aligned. Haven't had much of a chance to put it to it. I'll hopefully be able to hit some trails later in the weekend and will give a report and pics then :biggrin2:

So far so good, though! Looks like it should and ride is at least as good as stock (just driving on a few streets). I missed it so much while it was sitting in the shop :cry:

Advice: do it yourself (if you can get access to the tools and a lift), it is not a big deal. Rear coils were a cinch, was able to take the stock ones out without even compressing, though I did have to disconnect the rear KDSS bracket/sway bar on the passenger side to spread the axle enough from the frame. The spring compressors were not frightening, they were the kind that have 2 separate parts with a long threaded bolt through the middle of each. DO NOT DISCONNECT THE TIE RODS, contrary to what the instructions may read. It is not necessary and I ended up having to replace one for galling the threads. You will have to disconnect the front sway bars, though, in order to fit the struts in.

If we didn't have to dink around on that tie rod end, we would have had the whole thing done in 5 to 6 hours (with 1 friend helping and minimal suspension experience). If I were to do it again tomorrow, could probably do the whole thing in 3.

Though it did end up being a big hassle, due to the tie rod end, it was still cheaper than the most inexpensive place I could find (which shop turned out to be $360), including the new tie rod end ($60). I maybe saved 100 to 150 bucks, which isn't a big deal, but the experience on the suspension system was priceless :D It is very valuable to know what is going on down there.

I also noticed when I was working on it that a lug nut stud had been sheared off on the front passenger side, probably from my last tire rotation (those bas****s). I picked up the parts, a new stud and lug nut, for 12.91 from the local dealership, and swapped the stud out myself. No problem, with the help of the repair manual, thanks to Nashman! Removed the wheel, removed the caliper (but did not disconnect the brake line, just supported the caliper so it wouldn't bend the line), pulled the disc off, hit the remaining protrusion of the bolt with a hammer, which popped it right out, put the new bolt in, threw a stack of washers over it on the outside, tightened a lug nut down on top of that with an impact wrench, which sucked the bolt right in, then took the washers and lug nut off. Good as new. The dealer wanted a $100 bucks plus parts to fix it (those bas****s). :D
 
Good to hear man. Installs always throw you a curve ball that make it take a little longer.

what did you need the spring compressor for?
 
Good to hear man. Installs always throw you a curve ball that make it take a little longer.

what did you need the spring compressor for?

Installing the rear coils. Did you get them in without one?

Also, I forgot to mention, if you have a TE and you get the front Icon struts, you do not need the sway bar relocation bracket. I was scratching my head about that one for a little while as well.
 
Nope. If you unbolt the shocks and then sag down the rear, you should be able to get the coils in/out without using a compressor. At least that is how we did it on two 3rd gens and my 5th gen. Those little struts jack up the beautiful paint!

Did you put in a diff drop as well? With the toytec, you do not need the sway bar relocates as well. Also, It didn't happen unless there are pictures to prove it!
 
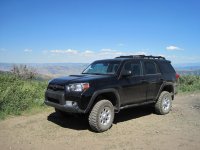
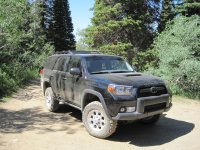
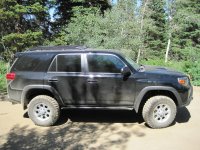
Now that I've driven on it for a bit, I can give my thoughts. Drives and looks great! Could not be happier with it. The extra clearance is great and it takes hits well. Nice on the road, too. This is how they should have been made to begin with.

1.jpg

2.jpg

3.jpg

It looks decent with the 265's, but as soon as I wear these down or sell them, I will get 305's and 9" wide wheels. Thinking about ATX Artillery.
 

Attachments

  • 1.jpg
    1.jpg
    135.7 KB · Views: 39,776
  • 2.jpg
    2.jpg
    143.2 KB · Views: 5,406
  • 3.jpg
    3.jpg
    143.1 KB · Views: 14,065

Members online

Forum statistics

Threads
278,312
Messages
3,554,089
Members
248,016
Latest member
Advally Service

Trending content

Back
Top