mynameistory
New member
Now there's an interesting fix. Nice work and hopefully it doesn't reduce your item-holding capacity!

[MENTION=208721]mynameistory[/MENTION] is 100% right. The flat planes of the side rails, plus no front mounting point creates a lot of play up front. You could actually grab the front of the rack and move it side to side, which is what I was getting with the awning mounted up there. Here are my solutions to create much more rigidity.
I picked up two of these flat metal punched bars from Home Depot. They're the longest ones they had at 72" and the punched holes make for easier bolting down to the cross rails.
https://www.homedepot.com/p/Everbil...ERCH=REC-_-pipsem-_-204225755-_-204225774-_-N
Basically just created an X with them, and bolted them down to the front-most cross bar and angled it out to bolt down to the 3rd bar from the rear. Victory provided 4 screws and rail nuts with the rack so I used those, plus I purchased a few more to bolt them down at multiple points.
The lateral play is virtually gone. Well, seems to be gone with as much force as my 175lb frame can give it. Additionally I put the awning back on, this time using the 3rd bar from the front as the front mounting point. On the drive today with several dips and uneven pavement, so far it's silent up there. Actual trail time will tell the true story, but more to come one that.


Curious as to why you didn't install the flat metal bars on the underside of the rails.

It looks like you guys updated the front mount on this rack to sit in the channel, is that true?
Anything we should be concerned about with the original style? If so, can it be swapped out or did the side rails change too?
Yes, they have been updated. There is nothing to be concerned about. I have run this style and a RTT offroad with no issues. We had a customer with a very large RTT who had some movement from side to side at the front of the rack so we updated the front mounts to eliminate that possibility. If you are concerned that your gear setup might cause some movement, give Tech a call and we can get you updated mounts! (The side rails have not changed)
Looks damn nice, but regarding the lower weight, perhaps the cross bars aren't as sturdy? The LFD Off Road cross bars at least look more sturdy, not sure if they are or not.
It looks like you guys updated the front mount on this rack to sit in the channel, is that true?
Anything we should be concerned about with the original style? If so, can it be swapped out or did the side rails change too?

Assembled mine yesterday and made a few mods. Though I will be calling Victory for the new front bracket, that will eliminate my only concern. Thanks Victory for never stopping product development.
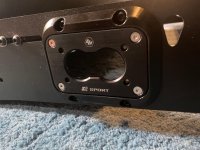
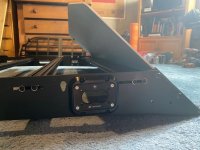
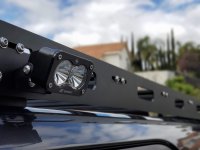
First I have S2 lights as scene lights on the Rhino rack this is replacing. Coming up with a good clean solution on the new rack proved challenging. The side rails have cutouts, but it was a Goldie Locks issue. The front was to big to use a Baja flush mount and the one back from it was to small. So I designed a transition part to use the flush mount and allow mounting holes. The part has nut pockets on back for the Baja hardware. Had them 3D printed then I painted them to prevent delaminate issues with water and freezing temps.
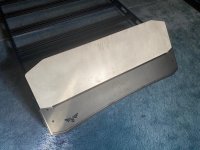
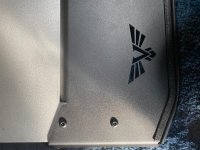
Next up was aerodynamics. I designed an aluminum fairing extension to direct wind over my brick RTT. I did a similar version for my Rhino that went from the roof and above the rack. Made a HUGE difference in wind noise and increased my highway gas milage average my 3 mpg! Those channels can make a lot of noise. Plus in the winter it will direct wind and crude over our skis. The design is the same thickness as the Victory. Is locks in above the racks fairing nuts and interlocks with the brake bend of the Victory fairing. It is fully supported with no hardware. Then 2 M8 SS powder coated BHCS on either end. Now it just needs powder coating. Gave it a little Victory design language on the top corners.
Rhino Pioneer full length with custom front support feet and fairing will be going up for sale BTW. Doesn’t work with my new RTT
Assembled mine yesterday and made a few mods. Though I will be calling Victory for the new front bracket, that will eliminate my only concern. Thanks Victory for never stopping product development.
First I have S2 lights as scene lights on the Rhino rack this is replacing. Coming up with a good clean solution on the new rack proved challenging. The side rails have cutouts, but it was a Goldie Locks issue. The front was to big to use a Baja flush mount and the one back from it was to small. So I designed a transition part to use the flush mount and allow mounting holes. The part has nut pockets on back for the Baja hardware. Had them 3D printed then I painted them to prevent delaminate issues with water and freezing temps.
Next up was aerodynamics. I designed an aluminum fairing extension to direct wind over my brick RTT. I did a similar version for my Rhino that went from the roof and above the rack. Made a HUGE difference in wind noise and increased my highway gas milage average my 3 mpg! Those channels can make a lot of noise. Plus in the winter it will direct wind and crude over our skis. The design is the same thickness as the Victory. Is locks in above the racks fairing nuts and interlocks with the brake bend of the Victory fairing. It is fully supported with no hardware. Then 2 M8 SS powder coated BHCS on either end. Now it just needs powder coating. Gave it a little Victory design language on the top corners.
Rhino Pioneer full length with custom front support feet and fairing will be going up for sale BTW. Doesn’t work with my new RTT
Any chance you'd be willing to 3D print some more of those S2 transition parts. I've been trying to figure out how to flush mount some S2's on my rack as well and have so far been stumped. :help:
Any chance you'd be willing to 3D print some more of those S2 transition parts. I've been trying to figure out how to flush mount some S2's on my rack as well and have so far been stumped. :help:
I've been trying to figure out the same thing. Looks so much cleaner flush mounted but I also want to be able to angle them downwards. This is how I have mine setup atm.
That was my next consideration was to not use the flush mounts and just drill a single hole for the mounting bracket. I just love the look of the flush mounts more.
Yup. I’ve got it installed on my sunroof. I can send pics if needed
Looking into this roof rack. Would you be able to send me some pics with the sunroof? Thanks