New Maestro Radio Solution

[MENTION=147757]GearJunkie88[/MENTION],

Whew! ok, my AX-TOYUSB came today so I decided to install using your instructions; only to find the radio shop had one in there already, but they had it going to the standard USB cable, not the apple iphone cable (doh'!) A quick switcheroo, and the iPhone cable is now functional in the center stack! THANK YOU!!
Also I couldnt understand why the screen wasn't dimming with the park/headlights on and I checked the settings? While I had the radio out, the same mental midgets at the shop never connected the dimmer/illumination wire to the Maestro orange wire! Soooo.... a few extra minutes and now I'm all good!

I do have one last question for you. You said you got your steering wheel set to advance through the bands one after the other, without having to touch the screen to advance to the next band? Was that done when you flashed the Maestro? or is there a setting I'm missing?
 
Last week, I received the iDatalink Maestro ADS-MRR and HRN-RR-TO1 harnesses from Crutchfield, along with other installation accessories and a Kenwood DDX394 head unit. I have to say, once you get the harnesses spread out, it's an intimidating sight! [MENTION=147757]GearJunkie88[/MENTION] wasn't exaggerating about the number of wires. Thankfully, only about 2/3 of them are actually used, and you'll have several harnesses left over. I hardly knew where to start, but taking it slowly, and reading and watching videos, I almost have it figured out. I know where most everything goes and how it's hooked up, and I'm done soldering the Kenwood and Maestro harnesses together. But I have a couple of questions for those of you who have done this:

Both the Kenwood and Maestro harnesses have a purple and white wire that is indicated for reverse sensing. Do these wires need to be connected together? There is also a separate wire with an RCA plug on it that plugs into the back of the head unit for backup camera. It has four tiny wires hanging out of it. What do these connect to? Does the camera feed connect to one of them? If so, which one?

Any help will be appreciated.

I just downloaded the installation guide for the 2012-2013 4Runner without JBL, I'm not sure which you have, with or without. But in the install guide that goes along with the DDX394, it's showing the 4 wires - blue/yellow, black, yellow, brown - do connect to the 4Runner. I'm not really sure where they wire in though. The guide just shows "see wire chart" and the line is running to the vehicle. I'm just guessing you will need the wiring chart for your current stock head unit to know where to tie those in. It's showing blue/yellow as camera power, black as ground, yellow as video +, and brown as video -.
On the purple/white I did solder those two together.
 
@ricomomdo

Glad you got it figured out.

The functions of the steering wheel are set when you flash the Maestro. One of the function options is "band" and that's what I chose. You have to pull the Maestro out of the truck and plug it into your computer to flash it, so it's a bit of a pain. I probably flashed and re-flashed that thing 5 times before I was happy with the settings.
 
This is the guide I was using. Scroll down to 2012-2013 4Runner and with or without JBL. You may already have this guide [MENTION=92268]Auntie Soshul[/MENTION].

http://images.idatalink.com/corporate/Content/Manuals/RR-TOY/ADS-RR(SR)-TOY01-DS-IG-EN_20161017.pdf

Thanks. I do have that guide, but I should take the time to read it more thoroughly. Since I have the base, non-JBL radio in my 4R, I'm going to have to run the backup camera wires from the overhead consle, down the A-pillar, and under the dash. I'll probably wait and do that later. Thanks again.
 
[MENTION=92268]Auntie Soshul[/MENTION]

Just pulled my head unit. Yes - the purple wires from the Kenwood and the Maestro are connected.

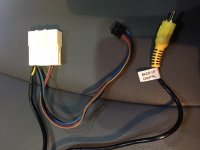
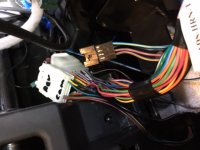
The RCA plug for the backup camera connects to a plug that has 4 other wires coming out of it. Those wires have a black 4-pin connector on the end. That 4-pin connector plugs into its mate on the Maestro wiring harness. See pictures attached.
 

Attachments

  • wires1.JPG
    wires1.JPG
    116.4 KB · Views: 1,385
  • wires2.JPG
    wires2.JPG
    93.3 KB · Views: 1,257
Thanks. I do have that guide, but I should take the time to read it more thoroughly. Since I have the base, non-JBL radio in my 4R, I'm going to have to run the backup camera wires from the overhead consle, down the A-pillar, and under the dash. I'll probably wait and do that later. Thanks again.

Wait... run wires for the backup camera? I have the non-JBL version too and I didn't run any wires for the backup camera. I just plugged into the existing backup camera wires with the Maestro and Kenwood adapters. Maybe I'm missing something. If so, kindly disregard :-)
 
Wait... run wires for the backup camera? I have the non-JBL version too and I didn't run any wires for the backup camera. I just plugged into the existing backup camera wires with the Maestro and Kenwood adapters. Maybe I'm missing something. If so, kindly disregard :-)
He has a 2013. It looks to be a little different in the installation guide than the 2014+ models. I attached the instructions for the 2013 non JBL above. I was going to post going by our instructions earlier but I thought I had better check out the install guide. It looks to be a little tougher than the 2014+ with the backup camera.

Sent from my XT1575 using Tapatalk
 
Thanks. I do have that guide, but I should take the time to read it more thoroughly. Since I have the base, non-JBL radio in my 4R, I'm going to have to run the backup camera wires from the overhead consle, down the A-pillar, and under the dash. I'll probably wait and do that later. Thanks again.
The 2013 install looks to be a little more involved. I hope everything works out good for you and you get it running without any problems.

Sent from my XT1575 using Tapatalk
 
The 2013 install looks to be a little more involved. I hope everything works out good for you and you get it running without any problems.

Sent from my XT1575 using Tapatalk

Thanks. Yeah, the only place the backup camera feeds is to the rear view mirror in my vehicle, which means I'll need to run wires from there to the head unit. Others have done it, so obviously it isn't impossible, just a pain.
 
OK, so I installed the iDatalink Maestro RR, with the Toyota harness and Scosche trim. I bought everything from Crutchfield, as their prices were as good as anyone's and they had some helpful advice. The new head unit is a Kenwood DDX394. Some particulars with my install:

The USB adapter worked fine. The box it plugged into is directly behind the glove box, and fastened to the right side of the car interior. The adapter was barely long enough to reach the center of the car where the head unit goes, but the head unit itself had a long USB pigtail that plugged into the adapter, so no problem.

There was no SiriusXM antenna adapter in the install kit. I argued with Crutchfield that the Maestro ACC-SAT-TO2 contained an adapter that would work, so they sent me one. But they were right - it doesn't fit my vehicle. I'll have to order a $60 adapter from Amazon if I want to use the sharkfin antenna.

The backup camera pigtail supplied with the Maestro kit doesn't fit my vehicle, either. Well, actually it WOULD fit if I ran a four-conductor cable from the rear view mirror, down the A-pillar, and under the dash. I may do that later on. It was mildly disappointing that I won't be able to have the camera display on the head unit, but I can live with it for now.

Surprisingly, everything else worked. I say surprisingly because of the mass of connectors and wires involved. For future buyers, I suggest staring at the contents of the iDatalink boxes until they start making sense, and they eventually will. I'm very satisfied how things turned out. Thanks to all who did this install before me and provided great guidance.
 
I've been curious how it would work on pre-2014. So the factory Bluetooth works? Any vehicle specific data the HU shows or controls?

Thanks
Mike

OK, so I installed the iDatalink Maestro RR, with the Toyota harness and Scosche trim. I bought everything from Crutchfield, as their prices were as good as anyone's and they had some helpful advice. The new head unit is a Kenwood DDX394. Some particulars with my install:


The USB adapter worked fine. The box it plugged into is directly behind the glove box, and fastened to the right side of the car interior. The adapter was barely long enough to reach the center of the car where the head unit goes, but the head unit itself had a long USB pigtail that plugged into the adapter, so no problem.


There was no SiriusXM antenna adapter in the install kit. I argued with Crutchfield that the Maestro ACC-SAT-TO2 contained an adapter that would work, so they sent me one. But they were right - it doesn't fit my vehicle. I'll have to order a $60 adapter from Amazon if I want to use the sharkfin antenna.


The backup camera pigtail supplied with the Maestro kit doesn't fit my vehicle, either. Well, actually it WOULD fit if I ran a four-conductor cable from the rear view mirror, down the A-pillar, and under the dash. I may do that later on. It was mildly disappointing that I won't be able to have the camera display on the head unit, but I can live with it for now.


Surprisingly, everything else worked. I say surprisingly because of the mass of connectors and wires involved. For future buyers, I suggest staring at the contents of the iDatalink boxes until they start making sense, and they eventually will. I'm very satisfied how things turned out. Thanks to all who did this install before me and provided great guidance.
 
The backup camera pigtail supplied with the Maestro kit doesn't fit my vehicle, either. Well, actually it WOULD fit if I ran a four-conductor cable from the rear view mirror, down the A-pillar, and under the dash. I may do that later on. It was mildly disappointing that I won't be able to have the camera display on the head unit, but I can live with it for now.

I just installed the same unit but with a Pioneer head. The Maestro gives great info on what wires to cut into the factory harness for the back up cam. I'm not sure what would be different on yours.

You should have gotten a link to idatalink for the MaestroRR. If you need help, don't hesitate to shoot over a pm.
 
I've been curious how it would work on pre-2014. So the factory Bluetooth works? Any vehicle specific data the HU shows or controls?

Thanks
Mike

The factory Bluetooth works fine. I just finished the install this afternoon, so I haven't gone through all the vehicle data. What I've seen so far is tire pressures and tire temps, and a few other bits of data. I'll go through it more thoroughly tomorrow and report back.
 
I just installed the same unit but with a Pioneer head. The Maestro gives great info on what wires to cut into the factory harness for the back up cam. I'm not sure what would be different on yours.

You should have gotten a link to idatalink for the MaestroRR. If you need help, don't hesitate to shoot over a pm.

The Maestro instructions show two possible harnesses that can be connected into for the backup feed, but my vehicle doesn't have either of those harnesses, at least that I've found, and I looked pretty thoroughly. My factory radio didn't have backup image, so I'm assuming the feed doesn't exist anywhere but in the rear view mirror. I'd love to be wrong,though.
 
There was no SiriusXM antenna adapter in the install kit. I argued with Crutchfield that the Maestro ACC-SAT-TO2 contained an adapter that would work, so they sent me one. But they were right - it doesn't fit my vehicle. I'll have to order a $60 adapter from Amazon if I want to use the sharkfin antenna.

The adapter you need for the shark fin antenna is in Maestro kit ACC-SAT-TO2. $20 on crutchfield.
 

Attachments

  • IMG_2216.jpg
    IMG_2216.jpg
    134.7 KB · Views: 2,016
Last edited:
This is a great thread. Those factory units have always been lacking in the technology dept. I'm trying to decide which kenwood unit to get and if it's worth getting a model with nav and xm (like my stock unit) or just stick to using map/phone apps and save some cash :snacker:
 
I've been putting this off in favor of "practical" truck mods but finally picked up a DNX893S that I'll be installing later this week. I still need to find a shop to paint the dash kit but I grabbed an extra so that I can just paint one matte black as a temporary fix.

I was playing around with the head unit last night and it's very nice and responsive. The Garmin nav seems a little Fisher-Price'esque compared to the nav on the Pioneer 8100NEX but the overall UI is clean and quick to get around in.
 
Some notes from my install (currently in progress due to missing adapters...)
  • The T02 harness does not include the USB adapter. Crutchfield (and others) have it pictured but I did not receive one and iDatalink Support said they had some mistakenly bundled when it was originally released but it's not included. $%^(*!!!!
  • The SAT-T02 adapter set is needed to use the factor GPSr. I don't know how sensitivity compares but I'd rather use the OE receiver and not have to place the included one. I'm now waiting for this because I thought it was just for sat radio antenna and I'm not a sat radio fan.
  • So far I don't have TPMS working. I'm waiting for a reply from Support on that.
  • Factory mic is not retained, you have to use an aftermarket one, which should be included with any head unit.
  • As mentioned in the OP (wish I had read...) you need a Metra adapter for the FM antenna.
  • No idea what the OBDC plug is supposed to do. So far all gauges and vehicle settings work without it, and it doesn't fix the TPMS issue either. Another thing I'm waiting for a response on.
 

Members online

Forum statistics

Threads
278,310
Messages
3,554,079
Members
248,016
Latest member
Advally Service

Trending content

Back
Top