

Hi-desertT4R
Member
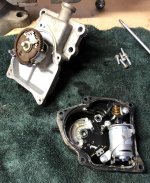
A little about the issue I had with the 4WD and center lock lights flashing and no 4WD. I wanted to show the inside of the A.D.D. and where I soldered in case someone else has a similar issue. I couldn’t find any real answers here on the forum and ultimately found a YouTube video that helped. I tried searching for this multiple different ways.
Like I said, my green 4hi light and yellow center diff lock lights were flashing. Front diff wouldn’t engage but the T-case would. I could hear the t-case actuator working and the front driveshaft wouldn’t turn when selected to 4hi with the switch. 4lo selection would only beep. I had to turn the knob then turn the truck on or off to get the t-case to engage.
I already had skid plates off and I’m a small enough dude I didn’t have to put my truck on stands. No need to drain the entire diff unless you want to. First remove the rubber hose on the driver side and the wiring connector on the other. Four bolts are removed with a 12mm socket and swivels and combo of extensions or whatever else helps get the two top bolts out, the bottom two are easy.
Next use a rubber mallet or small dead blow to gently persuade it off. Careful! You’ll lose some fluid so have a catch pan handy. Rotate the unit down and out towards the passenger side.
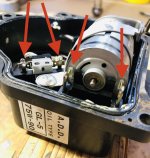
Remove the five screws holding the plastic cover over the motor. Mine weren’t too bad to remove, others I’ve heard have had issues. Use a 9v battery two wires and alligator clips to test the motor. Test each side to make sure the motor spins both directions. Now notice there’s no solder on the connectors at the motor and the micro switch. I soldered all four of these connections and retested it.
I applied lithium grease to all the gears and o-ring on the cover. I reinstalled the screws using a little anti-sieze.
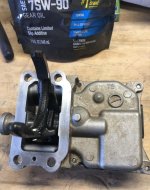
Make sure the fork is aligned properly before reinstalling. Disconnected towards passenger side, connected(4WD engaged) towards driver side.
I dry fit the actuator and tested before permanently installing it. Diff engages and lights are no longer flashing.
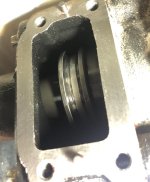
Next I thoroughly cleaned the mating surfaces using a small wire brush and a little brake clean on a paper towel. I applied red hi temp sealant to the mating surfaces being careful not to block or fill in where to two alignment pins sit. Install the actuator taking care to make sure the fork sits in the collar inside of the axle. Finger tighten the bolts and let sealant set for one hour. After one hour torque all four bolts to 15 Ft lbs. I cleaned the electrical connector with an aerosol electric cleaner that is safe for plastic and let dry before connecting.
After 24 hour cure time you can refill the diff to the correct level accounting for what was lost. Reinstall the skid plates and go have fun.
I should mention I had new crush washers from Toyota on hand and replaced on both the fill and drain plugs.
Helpful/necessary tools
3/8” ratchets, swivel or pivoting head
1/4” ratchet
1/4” and 3/8” extensions
Wobbly extension or swivel
12mm shallow and deep sockets
10mm Allen socket
Torque wrench
Rubber mallet or plastic dead blow
#2 Phillips screwdriver
Flat screwdriver or small
Pry bar
Wire brush
Razor blade scraper
Soldering iron/solder
9v battery
8” each red and black wire
Alligator clips
Drop light or flashlight
Jack/ jack stands
Wheel chock
Safety glasses at minimum
Crush washers
2 Qts. 75W-90
Permatex red rtv silicone
Permatex Anti-seize
CRC QD electronic cleaner
CRC Brakleen
Note: the factory service manual has instructions for testing the unit for resistance still in the truck. I found this out afterwards.
Like I said, my green 4hi light and yellow center diff lock lights were flashing. Front diff wouldn’t engage but the T-case would. I could hear the t-case actuator working and the front driveshaft wouldn’t turn when selected to 4hi with the switch. 4lo selection would only beep. I had to turn the knob then turn the truck on or off to get the t-case to engage.
I already had skid plates off and I’m a small enough dude I didn’t have to put my truck on stands. No need to drain the entire diff unless you want to. First remove the rubber hose on the driver side and the wiring connector on the other. Four bolts are removed with a 12mm socket and swivels and combo of extensions or whatever else helps get the two top bolts out, the bottom two are easy.
Next use a rubber mallet or small dead blow to gently persuade it off. Careful! You’ll lose some fluid so have a catch pan handy. Rotate the unit down and out towards the passenger side.
Remove the five screws holding the plastic cover over the motor. Mine weren’t too bad to remove, others I’ve heard have had issues. Use a 9v battery two wires and alligator clips to test the motor. Test each side to make sure the motor spins both directions. Now notice there’s no solder on the connectors at the motor and the micro switch. I soldered all four of these connections and retested it.
I applied lithium grease to all the gears and o-ring on the cover. I reinstalled the screws using a little anti-sieze.
Make sure the fork is aligned properly before reinstalling. Disconnected towards passenger side, connected(4WD engaged) towards driver side.
I dry fit the actuator and tested before permanently installing it. Diff engages and lights are no longer flashing.
Next I thoroughly cleaned the mating surfaces using a small wire brush and a little brake clean on a paper towel. I applied red hi temp sealant to the mating surfaces being careful not to block or fill in where to two alignment pins sit. Install the actuator taking care to make sure the fork sits in the collar inside of the axle. Finger tighten the bolts and let sealant set for one hour. After one hour torque all four bolts to 15 Ft lbs. I cleaned the electrical connector with an aerosol electric cleaner that is safe for plastic and let dry before connecting.
After 24 hour cure time you can refill the diff to the correct level accounting for what was lost. Reinstall the skid plates and go have fun.
I should mention I had new crush washers from Toyota on hand and replaced on both the fill and drain plugs.
Helpful/necessary tools
3/8” ratchets, swivel or pivoting head
1/4” ratchet
1/4” and 3/8” extensions
Wobbly extension or swivel
12mm shallow and deep sockets
10mm Allen socket
Torque wrench
Rubber mallet or plastic dead blow
#2 Phillips screwdriver
Flat screwdriver or small
Pry bar
Wire brush
Razor blade scraper
Soldering iron/solder
9v battery
8” each red and black wire
Alligator clips
Drop light or flashlight
Jack/ jack stands
Wheel chock
Safety glasses at minimum
Crush washers
2 Qts. 75W-90
Permatex red rtv silicone
Permatex Anti-seize
CRC QD electronic cleaner
CRC Brakleen
Note: the factory service manual has instructions for testing the unit for resistance still in the truck. I found this out afterwards.
Attachments
Last edited:


