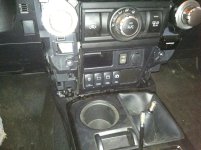
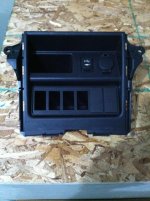
OTRATTW 6 switch plate

Engineer

New member
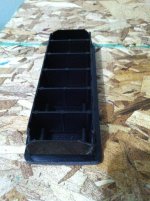
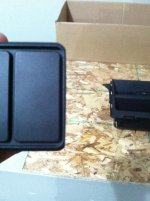
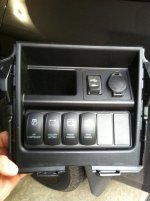
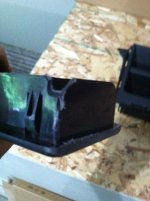
In the middle of installing the switch holder/trim in the lower section of the center console. After trimming of the trim on the edges (the long direction) and then cutting the back corners out the fit is perfect, it looks as close to factory as I could expect for an aftermarket part.I see no reason to glue in place as it is a snug fit with enough hold that I don't expect it to come loose and will be easily removable to get behind the switches if need be. Hopefully in the next couple weekends I will get my wiring all figured out. Thought I would share some photos. In one photo it looks like the switch covers are a different black then the factory plastic, in person you can not tell, it is all a great match.

*Pardon the Dust/Pollen, been to busy driving her the first week to give her a bath.
** Sorry for the [MENTION=65614]Antman[/MENTION] quality photos
 

Attachments

  • IMG_0528.jpg
    IMG_0528.jpg
    136.4 KB · Views: 4,674
  • IMG_0530.jpg
    IMG_0530.jpg
    136.2 KB · Views: 4,308
  • IMG_0532.jpg
    IMG_0532.jpg
    138 KB · Views: 4,332
  • IMG_0535.jpg
    IMG_0535.jpg
    136.4 KB · Views: 8,702
  • IMG_0533.jpg
    IMG_0533.jpg
    139.2 KB · Views: 4,350
  • IMG_0546.jpg
    IMG_0546.jpg
    137.2 KB · Views: 5,348
Register to hide this ad
I will be relocating my compressor and light switches to the same location. Now that the Mrs is more comfortable driving the truck offroad, she keeps turning stuff on with her knee. Will have to get the blanks to cover up the holes in the old location. Wish Carling made push switches as well as the rockers......

Okki
 
How is this holding up? Saw another done the same way and really liked how it looked and met my needs. I just ordered 6 Carling switches, I have 5 lights and 1 battery switch, and I am going to use two or three other on board air for my Fridge and Winch power. It is diffcult to add accessories and make it look like it is factory.
 
Reviving an old thread as I am about to embark on using the cubby to house my 6 panel SPOD switch bank.
[MENTION=96008]Engineer[/MENTION] and others, from the pictures above, did you just cut the switch bank housing and not cut into the cubby itself? I have been looking at other's installs and it looks like they had to hack up their cubbies. I would rather not destroy the cubby if possible. If anyone has tips/tricks for the most seamless install, please let me know.
 
You can just trim the switch panel and get it to fit in there fine but you won't be able to run any wires to the switches without some kind of hole in the back

On mine I cut a slot along the inside top of the cubby so I could run wires through there and yet still have things not fall right out the back if I wanted to revert it later
 
Reviving an old thread as I am about to embark on using the cubby to house my 6 panel SPOD switch bank.
[MENTION=96008]Engineer[/MENTION] and others, from the pictures above, did you just cut the switch bank housing and not cut into the cubby itself? I have been looking at other's installs and it looks like they had to hack up their cubbies. I would rather not destroy the cubby if possible. If anyone has tips/tricks for the most seamless install, please let me know.

Some things to know here... The little cubby is not the same on all models so please confirm prior to trying.

I know the 2010 and 2011 have a little door and the bottom cubby is smaller than the 2014+. Someone please confirm the 2012 and 2013 are the same as the 2014+ and not like the 2010/2011.

I tried to install this in my 2011 and it would not fit without significant trimming of the switch panel as well as the cubby. because of this i abandoned the idea and just went with AOB style switches in the factory cutouts. I do like this approach better though and may do it down the road when I am a bit more keen on cutting factory parts.
 
Good point. I do have the door covering the 2nd smaller cubby, usb plug, and cigarette lighter adapter. If I screw this up, its a $150 part to replace the unit.

For anyone else who responds, please do confirm your cubby dimensions.
 
Good point. I do have the door covering the 2nd smaller cubby, usb plug, and cigarette lighter adapter. If I screw this up, its a $150 part to replace the unit.

For anyone else who responds, please do confirm your cubby dimensions.

If you have the door then that means it changed in 2014 and 2010-2013 were the same. The switch plate is like 15 bucks so its worth a shot to see if you feel like making cuts.
 
How is this holding up? Saw another done the same way and really liked how it looked and met my needs. I just ordered 6 Carling switches, I have 5 lights and 1 battery switch, and I am going to use two or three other on board air for my Fridge and Winch power. It is diffcult to add accessories and make it look like it is factory.

A year late and a dollar short, has held up great. I think the looks are perfect, I prefer these with White LED's as they are not trying to match the factory stuff. Even the AOB's with blue lights bug me as in the photos its clear the light is a different hue blue (maybe in person its not noticeable)....that said I do like that the AOB style will fit int he factory cut outs. If I ever need more then these 6 I may consider.

Last note, after a couple years the fit is not as tight as it once was an dI have noticed that about every couple weeks I will have to push the switch plate/switches to reset them back into the cubby. Will work something up someday to get them more firmly mounted but still be removable.
 
Some things to know here... The little cubby is not the same on all models so please confirm prior to trying.

I know the 2010 and 2011 have a little door and the bottom cubby is smaller than the 2014+. Someone please confirm the 2012 and 2013 are the same as the 2014+ and not like the 2010/2011.

I tried to install this in my 2011 and it would not fit without significant trimming of the switch panel as well as the cubby. because of this i abandoned the idea and just went with AOB style switches in the factory cutouts. I do like this approach better though and may do it down the road when I am a bit more keen on cutting factory parts.

Are you 100% sure its smaller? I recall someone with a 2014+ buying what I thought was just the door but maybe its the entire Cubby+door and in that case it could certainly be smaller. If its ANY smaller it won't work. I had to trim the switch blank housing a decent amount (I actually sanded it) to get it to fit so if pre 2014 units are smaller then it likely won't work well......The guy I took this idea from had a pre 2014 though so maybe someone can verify that they are actually smaller or maybe not all the pre 2014's had doors
 
Reviving an old thread as I am about to embark on using the cubby to house my 6 panel SPOD switch bank.
[MENTION=96008]Engineer[/MENTION] and others, from the pictures above, did you just cut the switch bank housing and not cut into the cubby itself? I have been looking at other's installs and it looks like they had to hack up their cubbies. I would rather not destroy the cubby if possible. If anyone has tips/tricks for the most seamless install, please let me know.

I think you already have your answer but yes you have to cut the back of the cubby to be able to run wires. I had to hack the entire back off because I have "quick disconnect"(no idea the real term) blocks on the back of the switches which stuck out further then the switch back and hit the back of the cubby
 
Adding to the thread for completeness as I just finished installing a bank of 6 switches into the large cubbyhole of the 4Runner center console.

The large cubbyhole of the center consoles that have a door (pre-2014 I believe) is in fact sized smaller than the ones without the door (2014+). I had modified the corners of the OTRATTW 6-bank switch plate as 'Engineer' had indicated, but when test fitting in the cubbyhole of the center console that came with my 2013, it was clear that it wasn't going to fit in w/o some major cutting of the console. I purchased a used 2014 center console from another forum member and the modified switch bank slipped right in. I drilled a 1/2" hole in the back of the large cubbyhole to feed the SPOD harness and used some double sided tape to keep the switch bank secure. That was it, no major cutting of the console required.

Note: Removing the cigarette adapter from the old center console to transfer to the new one was a PITA. If anyone needs to know how, feel free to PM me.

spod%20switch%20bank_zpszzlojso6.jpg~original
 
Adding to the thread for completeness as I just finished installing a bank of 6 switches into the large cubbyhole of the 4Runner center console.

The large cubbyhole of the center consoles that have a door (pre-2014 I believe) is in fact sized smaller than the ones without the door (2014+). I had modified the corners of the OTRATTW 6-bank switch plate as 'Engineer' had indicated, but when test fitting in the cubbyhole of the center console that came with my 2013, it was clear that it wasn't going to fit in w/o some major cutting of the console. I purchased a used 2014 center console from another forum member and the modified switch bank slipped right in. I drilled a 1/2" hole in the back of the large cubbyhole to feed the SPOD harness and used some double sided tape to keep the switch bank secure. That was it, no major cutting of the console required.

Note: Removing the cigarette adapter from the old center console to transfer to the new one was a PITA. If anyone needs to know how, feel free to PM me.

spod%20switch%20bank_zpszzlojso6.jpg~original

Looks good and thanks for posting up your experiance with the pre 2014
 
A year late and a dollar short, has held up great. I think the looks are perfect, I prefer these with White LED's as they are not trying to match the factory stuff. Even the AOB's with blue lights bug me as in the photos its clear the light is a different hue blue (maybe in person its not noticeable)....that said I do like that the AOB style will fit int he factory cut outs. If I ever need more then these 6 I may consider.

Last note, after a couple years the fit is not as tight as it once was an dI have noticed that about every couple weeks I will have to push the switch plate/switches to reset them back into the cubby. Will work something up someday to get them more firmly mounted but still be removable.


Have been pretty absent due to some personal stuff. But O did mod my cubby and install the plate as well. I left it unglued in there for now as Iwas waiting for new wiring setup and then person issues. Anyway I never glued it in there and was tight for at least 8 or so months. Now i likes to pop out on its own. And when I can spare some time without medical appointments I need ti put in the new wiring and will hot glue the plate in place. I will still be able to remove the switches as I have the switch backs all wird up with the carling backings.

I want to do more on the truck yet am up in the air about getting a military humvee and use as a daily driver. Crazy yes thats why I am so undecided....
 
HMMWV as a daily? Or 4Runner as daily? Just curious, many would not even consider a 4runner as a good daily. I may or may not understand though, I've decided to keep my fzj80 as a daily, traffic is too nuts around here. Especially up in the city, I much prefer my older truck, I never worry about it. It's ridiculous cause I'll take my new truck into hairy offroad situations, but I demand reliability for the places I go. Around town the old cruiser is my ride of choice.. It's got ABS and airbags so I figure it's safe enough.

Anyways back to the original intent of this thread, thanks to everyone for posting. I'll probably end up doing this mod in the future so it's great to hear your experiences. For now I'm gonna try to get by using the factory knockouts, but once I start adding more lights the 6-switch panel may be the ticket!
 

Members online

Forum statistics

Threads
278,309
Messages
3,554,068
Members
248,016
Latest member
Advally Service

Trending content

Back
Top