Question on Replacing #3 Fuel Injector

donkeyhoatie

New member
Looks like my buddy's 01 4Runner has a bad #3 injector. Been poking around a bit on replacement procedures and I'm seeing conflicting instructions. Most people have been saying that you need to remove the throttle body and the intake plenum to get to the fuel rail on the passenger side. But, I've seen 1-2 other people say they only removed the throttle body to get to it.

Can anyone confirm or refute which way it is? I'd love it if we didn't have to spend a couple hours to remove the intake plenum, but have that budgeted into the time frame for the replacement process. We've ordered new gaskets for both the throttle body and the intake, but will return the intake ones if it turns out we don't need to get in there.

Thanks in advance.
 
Register to hide this ad
I just replaced my #4 injector over the weekend, and the intake plenum did have to come off because it sits over the fuel rail on the drivers side, covering injectors #2, #4, and #6.

Injector #3 sits right under the throttle body, and you can see it without taking anything off. Now, to get to it, the throttle body will need to come off, but I see no reason why anything else would need to come off besides the air intake tube.

While taking off the intake plenum, I kept thinking about how easy it would have been if I had to replace any injectors #1, #3, or #5.

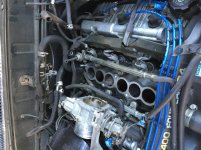
In the first pic with the plenum off, you can see both fuel rails and how they pretty much mirror each other, but the fuel rail covers the drivers side rail.

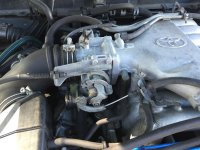
In the second pic, you can see injector #3 underneath the throttle body. Should be relatively easy to get that one swapped out.
 

Attachments

  • IMG_0043.jpg
    IMG_0043.jpg
    137.3 KB · Views: 6,451
  • IMG_0030.jpg
    IMG_0030.jpg
    134.5 KB · Views: 5,855
Intake plenum needs to come off

I'd love it if we didn't have to spend a couple hours to remove the intake plenum, but have that budgeted into the time frame for the replacement process.

Just finished replacing timing belt, pulleys etc. I'm still chasing a pesky knock sensor problem after changing both the knock sensors and the harness. Another story. Anyway, I also replaced my old fuel injectors with LC engineered injectors and the one thing you ABSOLUTELY must do before the installation is lubricate the O rings with a petroleum based product (aka: Vaseline) before installing the injector. The last thing you want is a sliced O ring after everything is put back together.

If you can loosen up those four bolts and give yourself some wiggle room to get to the injector rail raised without damaging any of them then great. I'm pretty sure you'll need to take the plenum off. You'll also need to re-torque the bolts.

Don't forget to cover up those big holes with a rag or masking tape! You don't need anything extra in your intake like a socket. Have fun.

________________________
2001 4Runner SR5 Sport Package 308K miles
Airaid and Deck Plate, Toytec Coilovers 890's, OME rear Springs and Shocks, SPC Performance UCA's with a 1" diff drop, Weathertech, PIAA Lights
B&M Transmission Cooler, LC Engineering Equalized fuel injectors
Budbuilt skid plate
 

Attachments

  • intake and fuel rail.jpg
    intake and fuel rail.jpg
    130.7 KB · Views: 4,671
I just replaced my #4 injector over the weekend, and the intake plenum did have to come off because it sits over the fuel rail on the drivers side, covering injectors #2, #4, and #6.

Injector #3 sits right under the throttle body, and you can see it without taking anything off. Now, to get to it, the throttle body will need to come off, but I see no reason why anything else would need to come off besides the air intake tube.

While taking off the intake plenum, I kept thinking about how easy it would have been if I had to replace any injectors #1, #3, or #5.

In the first pic with the plenum off, you can see both fuel rails and how they pretty much mirror each other, but the fuel rail covers the drivers side rail.

In the second pic, you can see injector #3 underneath the throttle body. Should be relatively easy to get that one swapped out.

Thanks for the great photos. Very helpful!

Question for you: do you have the torque specs on the following:
4 Throttle body bolts

2 fuel rail bolts that are on top
2 fuel rail bolts on the ends

Thanks again.
 
the one thing you ABSOLUTELY must do before the installation is lubricate the O rings with a petroleum based product (aka: Vaseline) before installing the injector. The last thing you want is a sliced O ring after everything is put back together.

If you can loosen up those four bolts and give yourself some wiggle room to get to the injector rail raised without damaging any of them then great. I'm pretty sure you'll need to take the plenum off. You'll also need to re-torque the bolts.

Don't forget to cover up those big holes with a rag or masking tape! You don't need anything extra in your intake like a socket. Have fun.

Good reminder on lubricating the O rings. Plus, I forgot to order new O rings for the other injectors. Oh well, looks like a quick run down the street to Napa is in order before we start work next weekend.
 
Thanks for the great photos. Very helpful!

Question for you: do you have the torque specs on the following:
4 Throttle body bolts

2 fuel rail bolts that are on top
2 fuel rail bolts on the ends

Thanks again.

Torque values from the Haynes Manual (Chapter 4-1)

Throttle body mounting bolts - 144 in lbs (NOTE: Inch Pounds)
Fuel rail bolts that sit on the black plastic supports - 132 in lbs. (NOTE: Inch Pounds)
Banjo bolts are 22 ft lbs. (NOTE: Foot not inch)

Make sure all of the injectors rotate smoothly and there's no gaps between the injector and the rail. It should seat very nicely. As for Napa or OEM O rings, I know I would get them from the dealer. They have them in stock and they're cheap but made in Japan not China. The cost for OEM was worth it for me. Good luck!!

Remember 50% of maintenance is due to 50% of maintenance! Take your time and do it right the first time around.

________________________
2001 4Runner SR5 Sport Package 308K miles
Airaid and Deck Plate, Toytec Coilovers 890's, OME rear Springs and Shocks, SPC Performance UCA's with a 1" diff drop, Weathertech, PIAA Lights
B&M Transmission Cooler, LC Engineering Equalized fuel injectors
Budbuilt skid plate
 
Last edited:
I replaced 2, 4 and 6 the other day. I kept the throttle body attached to the plenum and removed as 1 whole piece (and removed the short air intake tube).

Few issues I had (original injectors at 210,000 miles):
1) 3 of the injectors broke while pulling up and out. The plastic white part with the 2 holes at the bottom became completely removed from Fuel Injector Body and stuck. They were a miserable time getting out cleanly and without further damage.
2) The stupid black plastic wire harness cover was extremely brittle (watch for debris getting down and in)
3) I'm glad I got 2 gaskets for the plenum because there was a small leak apparent from oxidation on plenum

Question for all: can #1,3,5 be changed without disturbing 2,4,6 injectors and that half of the fuel rail?
 
Last edited:
All right, am I forgetting anything for the fuel injector install? Only replacing #3.

What I've got:
Reman fuel injector
Throttle body gasket (since it's coming off and hasn't been replaced ever)
Intake manifold gasket (got 2, but only replacing the upper)

What I'm going to pick up tomorrow:
O-rings from the dealership
Replacement banjo gaskets
Heat resistant tape for when the harness breaks inevitably
Vaseline for the O-rings (sure, I could use gasoline to lube them, but it's always fun to go buy Vaseline)

Anything else? Are there any gaskets for the upper fuel rail bolts?

FYI, I know there are other maintenance things to do while we're in there, but it's my buddy's rig and he's just looking to get in and out as he's going to be in the market for a new set of wheels in about a year.
 
Handy checklist for pulling off the plenums...Add to this...

Anything else?

I like to disconnect the battery before I do any heavy maintenance.

1 - Take digital photos of every angle of your engine before you begin
2 - Take photo's during the process
3 - Cover all holes with masking tape and rags
4 - Have ziploc baggies handy with a sharpie and pre-label - NO EXTRA HARDWARE and no "Where the heck does this go?"
5 - Aluminum is sensitive to warping - break the torque and ensure you do this on all bolts evenly (end bolt, other end, middle etc...) Same with the installation.
6 - If using Fel Pro gaskets - NO SEALANT required. clean the surface with Brake Kleen (well ventilated) small wire brush on a dremel/drill and put the gasket on dry.
7 - If you have to "cut" your fuel line becasue it's old and hard, replace with Fuel Injection Hose ONLY! Have a tin can handy to catch fuel.
8 - When you disconnect your throttle cable, remember which nut you lossened...passenger side or driver side of the cable support.
9 - Add to the list
10 - ?
11 - ?

I think that's about it for now. Good luck and keep us posted. I'm taking mine to the stealership today to have them read the waveforms for the knock sensor code. I might be tearing my top end apart again this weekend.

________________________
2001 4Runner SR5 Sport Package 308K miles
Airaid and Deck Plate, Toytec Coilovers 890's, OME rear Springs and Shocks, SPC Performance UCA's with a 1" diff drop, Weathertech, PIAA Lights
B&M Transmission Cooler, LC Engineering Equalized fuel injectors
Budbuilt skid plate
 
Last edited:
Vaseline for the O-rings (sure, I could use gasoline to lube them, but it's always fun to go buy Vaseline)

You can also use white lithium grease, or regular 5W30 motor oil to lube the o-rings. Last injector I replaced I used a few drops of motor oil and it worked fine. It has lasted over a year now, no problems...
 
I like to disconnect the battery before I do any heavy maintenance.

1 - Take digital photos of every angle of your engine before you begin
2 - Take photo's during the process
3 - Cover all holes with masking tape and rags
4 - Have ziploc baggies handy with a sharpie and pre-label - NO EXTRA HARDWARE and no "Where the heck does this go?"
5 - Aluminum is sensitive to warping - break the torque and ensure you do this on all bolts evenly (end bolt, other end, middle etc...) Same with the installation.
6 - If using Fel Pro gaskets - NO SEALANT required. clean the surface with Brake Kleen (well ventilated) small wire brush on a dremel/drill and put the gasket on dry.
7 - If you have to "cut" your fuel line becasue it's old and hard, replace with Fuel Injection Hose ONLY! Have a tin can handy to catch fuel.
8 - When you disconnect your throttle cable, remember which nut you lossened...passenger side or driver side of the cable support.
9 - Add to the list
10 - ?
11 - ?

Good advice ^^^

When loosening the throttle cable, kickdown linkage, and cruise control cable, I suggest two things:

1. Loosen all cables from the same side (meaning, for me, the wrench in my left hand only holds the nut, and the wrench in my right hand turns and loosens the other nut).

2. Put blue tape (or some other marking method/tape) on the side that was loosened, so you don't forget which side was loosened. I even wrote it down to keep from forgetting, since beers were involved when I fixed my injector...

Good luck!
 
Done!!!!

Wow, total learning experience for me as a very, very amateur wrencher. To date, the only things I've undertaken on a car were the following: Radiator replacement (01 4Runner, 05 Sienna, and 06 Altima), spark plugs (98 4Runner and 01 4Runner), and alternator (06 Altima).

A bit of the history on this project. My buddy's 01 4Runner was throwing a CEL over a year ago. I ran the code, saw a p0303 and, upon checking the plug found that it was pretty blown. We changed all of them out and the code was gone. No biggie.

Fast forward to December. His 4Runner throws a code again and the engine is misfiring. The worst misfire comes at around 50MPH when traveling up hill. According to the scanner, it's a p0303 again. So, over the phone, I tell him to check 2 things: see if the plug is blown again, and make sure the coil pack is good by switching it to #1 and seeing if the code switches along with it. He tells me he's still getting a code, leading me to think it might be the wires (original, because he's cheap and didn't want to spend the $30 on a new set) or possibly a fouled fuel injector. Since a re-man injector is only about $35 and everything needed to do the job clocks in at about $65 total, we decide to give it a whirl. I mean, why not?

At first, I was a little nervous about the whole idea of taking the plenum apart. Fortunately, I can confirm: YOU DO NOT NEED TO TAKE THE PLENUM OFF TO ACCESS THE 1, 3, AND 5 INJECTORS!!! All you need to do is remove the throttle body. That means you don't need to replace the manifold gasket (top or bottom) at about $20, instead you only need to replace the throttle body gasket (and at 160k, it was advisable) for about $5. Yes, it's a bit tight working in there, but I can't imagine gaining enough real estate by removing the plenum to make the time spent on that worth it.

I did have some issues with getting replacement banjo gaskets for the fuel rail. Went to the local dealership and they had none and all the other ones in the nearby suburbs were out of them. Went to Napa, but the only similar gaskets they carried were SAE and I needed metric. Usually, I curse the fact that I'm a poor guy living in a high-income bracket neighborhood, but then I remember there's a Lexus dealership 1/4 mile from my house. We head over there and relieve them of their last 3 gaskets. Yes, ideally we should have had 4, but you do what you can under the time crunch. I need to remember to use the Lexus dealership more often for Toyota stuff. Getting to the Toyota dealership is a 20 minute trip, so this is a no-brainer, even if it costs a little bit more.

Working slowly, we get the injector rail out and replace #3. As long as you're careful and methodical, it's not difficult at all. I also convinced my buddy that it was worth it to clean the throttle body as there's a good amount of buildup on it. We get it all put back together and torqued to specs and fire it up. At first, there's an issue with the throttle not engaging. Turns out, I tightened the cable a bit too much. After loosening it a touch, it's working great. Success!

Then, we hit the road. And the code returns. Dangit!!!!!!!! We head back to my garage, recheck everything. As cheap insurance, we buy a new spark plug and install it in the #3 cylinder. Nope, nothing. I'm trying to figure it out, and I ask my buddy again, "You're sure the code didn't switch when you moved the coil pack?" And he drops this bomb on me: "Uh, I never did that. I just assumed the whole time it was the fuel injector. It was the only thing that seemed to make sense."

Needless to say, it took 10 minutes to switch the coil pack over and sure enough, that was it. Ordered a new OEM one off of Amazon for $60 and free 2-day delivery. It arrived yesterday and 10 minutes later, it's code free and running better than it has in years. He couldn't believe how well it handled and the better throttle response that came from cleaning and tightening it. He thought he was going to have to get rid of it in the near future, but I just don't understand that thinking. An 01 4Runner with 160k is not something to get rid of, especially with new car payments around $400. For about $120 total and an afternoon in the garage, we got it running again. We could do that 3 times and still be ahead of 1 new car payment.

TLDR: Replacing fuel injectors 1, 3, and 5 is not difficult, if you take your time. You don't have to remove the plenum to get to them. But, you do need to make sure your buddy isn't an idiot and actually checks the simple stuff before undertaking the whole project. Oh, and don't forget to check Lexus shops for basic maintenance items if your Toyota dealership doesn't have them in stock.

 
Wow, total learning experience for me as a very, very amateur wrencher.

TLDR: Replacing fuel injectors 1, 3, and 5 is not difficult, if you take your time. You don't have to remove the plenum to get to them. But, you do need to make sure your buddy isn't an idiot and actually checks the simple stuff before undertaking the whole project. Oh, and don't forget to check Lexus shops for basic maintenance items if your Toyota dealership doesn't have them in stock.

Glad to see you got it all apart and back together again. Too bad about finding out about the coil pack later into the job. When it comes to troubleshooting you gotta do the easy stuff first. "Half of your maintenance is due to half of your maintenance." (Haha - this statement coming from me who was chasing knock sensor codes due to crappy aftermarket sensors - replaced with OEM sensors and the codes went away! So much for eating my own words.)


Have fun and thanks for keeping us posted. Catch you on the forum

________________________
2001 4Runner SR5 Sport Package 308K miles
Airaid and Deck Plate, Toytec Coilovers 890's, OME rear Springs and Shocks, SPC Performance UCA's with a 1" diff drop, Weathertech, PIAA Lights
B&M Transmission Cooler, LC Engineering Equalized fuel injectors
Budbuilt skid plate
 
what o-rings are you guys replacing when you swap out the injectors?

I'm finding a few different types/sizes when looking up injector o-rings on rock auto
 

Members online

Forum statistics

Threads
278,309
Messages
3,554,069
Members
248,016
Latest member
Advally Service

Trending content

Back
Top