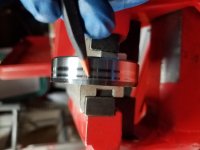
Rear axle seal measurement

Yes easy to do using the grease test.

Be careful not to score the axle if you are cutting the old ones off. Best way is to press them off but if you have to cut them, cut about half way through than take a cold chisel and put it in the groove and give it one good whack with a hammer. Should crack the retainer and make it much easier to get off.

Press the new retainer on until 4-5mm of polished axle is showing. Go slow and easy as it is easier to go further on than to go too far and have to back the retainer off.

Yeah I got the tool to do the press work. Just double checking. Because I thought I heard someone say that the retainer only had small area of polished surface. But it’s the whole retainer.
 
I just received the OEM retainer cups. They are polished all around. But idea is to seat the seal center correct ?

The retainer has a 10mm polished shoulder and a 2-3mm bevel. Ideally, you get the lip of the seal riding in the middle of the polished shoulder. When doing the grease tests on several sets of axles, I've found 5mm of polished axle showing above the retainer is about right. However, I was recently helping [MENTION=169810]calnhob[/MENTION] with an e-locker swap job and we had did his axle seal job around a year ago. When we pulled his axles, I was a little surprised where the seal witness marks were on the retainer. They were closer to the edge of the retainer than I thought they should have been based off the grease test result. So, for future jobs, I think I'm going to start with 4mm of polished axle showing, and if the grease test looks like it puts the seal lip near the center of the retainer, I'm going to call it good. By the way, this is when using the Dr. Coffee flip technique.

The key is you want the seal lip riding somewhere close to center to allow for bearing play as the bearing ages.
 
If you haven't tried the "Dr Coffee flip" then you haven't tried everything under the sun. In your case the axle may have been the issue but we'll never know if the "flip" could have also resolved the issue. Did you replace anything on the replacement axle you acquired or did you leave it the way it was? It's also possible that the axle you pulled already had the "Dr Coffee flip" done on it since its a fairly well known solution/mod. It's a well documented and thought out simple solution to a seemingly widespread problem.

A possible solution to leaking axle seals

The flip might be a solution if you have pressed you retainer too far, but hardly well thought out, the tapered end allows you to install the axle reducing the chances of cutting the seal. I've never done the "flip" on any of my repairs, and my personal 4runner is the only one that has ever been an issue, and no the "new" axle isn't flipped, I would have left it at the yard. But it's up to the person to take advice from the YouTube "mechanics" or not, hell I love it when my customers are YouTube certified, they always end up spending more than they could have.
 
Seems like flipping the retainer and setting it 5mm is best. However , I still wonder why not leave the retainer the factory orientation and set it 5mm. The tapered end should rise the seal smoother then the back side of the retainer. Which is a edge. I do understand that people say it can make contact with the axle housing. But can it ? Has anyone simpytleft the retainer in factory orientation and set it 5mm?
 
The flip might be a solution if you have pressed you retainer too far, but hardly well thought out, the tapered end allows you to install the axle reducing the chances of cutting the seal. I've never done the "flip" on any of my repairs, and my personal 4runner is the only one that has ever been an issue, and no the "new" axle isn't flipped, I would have left it at the yard. But it's up to the person to take advice from the YouTube "mechanics" or not, hell I love it when my customers are YouTube certified, they always end up spending more than they could have.

Well for you who has never fondled the retainer and seal, here is a video to expend your understanding of the relationship between the two. Oh btw, this forum is littered with youtube mechanic who have helped save members THOUSANDS of dollars on repairs that the so called experts as yourself have either created or failed to fix. My favorite failure excuse is "your axle is bend." And in honor of that, please bend over and take it like a man. LOL you "experts" are so annoying.

https://youtu.be/9tdGpmpNRFU
 
Well for you who has never fondled the retainer and seal, here is a video to expend your understanding of the relationship between the two. Oh btw, this forum is littered with youtube mechanic who have helped save members THOUSANDS of dollars on repairs that the so called experts as yourself have either created or failed to fix. My favorite failure excuse is "your axle is bend." And in honor of that, please bend over and take it like a man. LOL you "experts" are so annoying.

https://youtu.be/9tdGpmpNRFU

I absolutely agree with [MENTION=78997]Drcoffee[/MENTION] on this. It seems us DIYers are more often cleaning up the mistakes the supposed "Professionals" have made than the other way around. The rear axle seal job on these rigs has got to be the #1 repair that is screwed up by the paid guys. I've used the Dr. Coffee method on around 9 sets of axles and it works great. That's 9 people that avoided getting bent over at shops with $150-200/hour rates. With how pliable these new seals are, you don't need the bevel facing the seal.
[MENTION=148927]Toyotayoda[/MENTION] your pompous attitude towards us DIYers or as you said "YouTube" mechanics (which I am) isn't going to be well-received on a forum like this. The channel I started with [MENTION=102606]infamousRNR[/MENTION] has helped countless people repair, maintain and modify their rigs saving themselves tons of money in the process.
 
Seems like flipping the retainer and setting it 5mm is best. However , I still wonder why not leave the retainer the factory orientation and set it 5mm. The tapered end should rise the seal smoother then the back side of the retainer. Which is a edge. I do understand that people say it can make contact with the axle housing. But can it ? Has anyone simpytleft the retainer in factory orientation and set it 5mm?

The reason for the flip is you can keep the retainer in the OEM position on the axle and get the seal lip riding near center on the polished shoulder of the retainer. The updated seals from Toyota were an improvement due to how pliable they are but it caused an issue that the Toyota engineers didn't think about or maybe didn't care. The seal lip of the new seals now sits 2mm more inboard than the old seal. With the OEM orientation of the inner retainer, bevel facing the seal, you first have to push past the 2mm bevel to get up onto the shoulder. By flipping it, you gain the 2mm back from the seal re-design because the seal immediately gets up onto the shoulder with the retainer flipped, bevel facing the ABS tone ring.

If you kept the inner retainer in the OEM orientation and with 5mm of polished axle showing above, the seal will be riding very close to the bevel which isn't good. With a little axle play from the bearing wearing over time, that seal will ultimately ride on the bevel and the seal will fail.

They say a picture speaks a 1000 words. The seal witness mark in the center is where the original seal from the factory was riding. The seal witness mark near the bevel is where the newly designed seal rides on the retainer if you don't reposition or flip it. I pulled this retainer off one of the axles I worked on. It's obvious somebody thought they could just replace the seal not knowing Toyota redesigned it.

20171126_081627.jpg
 

Attachments

  • 20171126_081627.jpg
    20171126_081627.jpg
    122.1 KB · Views: 226
I absolutely agree with [MENTION=78997]Drcoffee[/MENTION] on this. It seems us DIYers are more often cleaning up the mistakes the supposed "Professionals" have made than the other way around. The rear axle seal job on these rigs has got to be the #1 repair that is screwed up by the paid guys. I've used the Dr. Coffee method on around 9 sets of axles and it works great. That's 9 people that avoided getting bent over at shops with $150-200/hour rates. With how pliable these new seals are, you don't need the bevel facing the seal.

[MENTION=148927]Toyotayoda[/MENTION] your pompous attitude towards us DIYers or as you said "YouTube" mechanics (which I am) isn't going to be well-received on a forum like this. The channel I started with [MENTION=102606]infamousRNR[/MENTION] has helped countless people repair, maintain and modify their rigs saving themselves tons of money in the process.

This is very well said! Plus I am more so of a hands on person and learning to fix things myself makes me tick.

I have an extra complete axle shaft, my plan is to grind the inner retainer ring off (being very carful of course to not damage the shaft itself) leaving a small part of the ring connected together and then chipping it off.

Heating the new retainer ring up with a torch and flipping it on the shaft and sliding it down until i get it a 5mm of polished showing.

In regards to the inner seal, i have a deal driver and ive felt with my fingers all the way around and it seems to be square. Measured from seal to outer axle housing and all measurements are very similar. Anything special needed by this or is everything literally depending on the retainer here.

Also plan to grease test it currently and then again on the newer axle after the work above is done. I spoke with a local Toyota shop who is all ex Toyota dealer mechanics and they said the same thing. Flip method. grind it up, chip it off, heat it up and slide it on. And pray haha
 
I am having a driver side seal leakage problem currently as well. I have been meaning to bring my seal to work so I can machine a seal setter slug out of aluminum but keep forgetting the seal on the work bench. Anyone know the exact diameter of the seal?


Also, I am only replacing the seal and hoping it holds for a few months but the retainer spacing seems like a place where someone could make a spacer tool. if someone knows the spacing spread some one could make like a V block spacer easily I bet.


3856f9f5777f015f718570a2d604b035.jpg


Finally brought a seal to work and made this little slug to use as a seal setter.

Seal is like 2.762” OD and the slug is 2.725” OD


Sent from my iPhone using Tapatalk
 
The reason for the flip is you can keep the retainer in the OEM position on the axle and get the seal lip riding near center on the polished shoulder of the retainer. The updated seals from Toyota were an improvement due to how pliable they are but it caused an issue that the Toyota engineers didn't think about or maybe didn't care. The seal lip of the new seals now sits 2mm more inboard than the old seal. With the OEM orientation of the inner retainer, bevel facing the seal, you first have to push past the 2mm bevel to get up onto the shoulder. By flipping it, you gain the 2mm back from the seal re-design because the seal immediately gets up onto the shoulder with the retainer flipped, bevel facing the ABS tone ring.


If you kept the inner retainer in the OEM orientation and with 5mm of polished axle showing above, the seal will be riding very close to the bevel which isn't good. With a little axle play from the bearing wearing over time, that seal will ultimately ride on the bevel and the seal will fail.


They say a picture speaks a 1000 words. The seal witness mark in the center is where the original seal from the factory was riding. The seal witness mark near the bevel is where the newly designed seal rides on the retainer if you don't reposition or flip it. I pulled this retainer off one of the axles I worked on. It's obvious somebody thought they could just replace the seal not knowing Toyota redesigned it.


View attachment 315802



Well crap, I was going to use a new seal and just put the axle back in as a quick fix on axles that I assume have the stock wheel bearing and retainers in place not flipped.

I don’t have be bearing puller and really the time or money at the moment to do a complete replacement of all the parts.

[emoji1743]*[emoji3603] just hoping the seal fixes my issue for the next 6 or so months. Plan is to swap a 9” under my 4Runner when I do a leaf spring swap next spring / summer.


Sent from my iPhone using Tapatalk
 

Members online

Forum statistics

Threads
278,316
Messages
3,554,111
Members
248,016
Latest member
Advally Service

Trending content

Back
Top