Rear Bilstein 5100 - Correct Upper Bushing and Washer Arrangement

KP Texan

New member
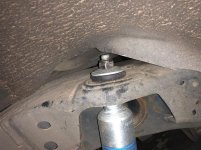
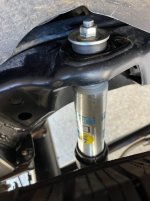
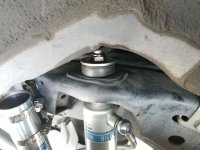
Just did my 5100 @.85" install on Monday, but ran into an issue figuring out the correct rear shock upper bushing arrangement. I ran numerous searches on this an various other forums, with no truly definitive answer. I ended up installing them like this, since it was a holiday and I needed to get my 4Runner back on the ground:

attachment.php


Now that I've had a talk with Bilstein, the one rep I spoke with said that the washers should actually be flipped opposite of the above so that they are not cupping the bushing. He said this allows more articulation of the shock shaft and will prevent the shaft from breaking.

How did you guys do yours? Of those who did it like the above image, have you had any issues? Just wondering if I should go through the trouble of pulling the dang things off and re-installing.

Other than that, the install went perfectly using the "no spring compressor" method, and I think my alignment came out pretty good too.

Thanks for the help!
 
Register to hide this ad
I inverted mine per the instructions...I didn’t know the reasoning, but it makes sense from what you mentioned. Mine are 5160s, but assume the same install.

0BBE3CF0-445A-40B8-B8CC-3531123CD6E4.jpg
 

Attachments

  • 0BBE3CF0-445A-40B8-B8CC-3531123CD6E4.jpg
    0BBE3CF0-445A-40B8-B8CC-3531123CD6E4.jpg
    127.8 KB · Views: 13,520
Yeah it would've been nice if Bilstein included instructions with the 5100 rears. Now that I'm looking at it, I see they show that detail in the 5160 instructions. :frusty:

I can't be the only one who's made this mistake, haha...
 
Last edited:
Looks like the spam bot has taken a real liking to my thread, haha.

Thanks for the input guys! Anyone else remember how you set your washers up?
 
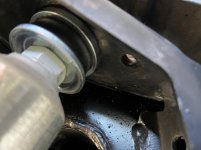
For my 5100s, I just went by how the Toyota washers were installed, the Bilstein stock photos/other instructions. So my washers are "cupped". But so have they been every shock absorber on every vehicle I have replaced shocks on. I'm not going to worry about it.
 

Attachments

  • F143836867.jpg
    F143836867.jpg
    66.6 KB · Views: 17,328
  • IMG_0973.jpg
    IMG_0973.jpg
    86 KB · Views: 12,744
  • IMG_0974.jpg
    IMG_0974.jpg
    69.7 KB · Views: 10,970
  • Screen Shot 2018-06-01 at 10.31.50 AM.jpg
    Screen Shot 2018-06-01 at 10.31.50 AM.jpg
    36.7 KB · Views: 10,528
For my 5100s, I just went by how the Toyota washers were installed, the Bilstein stock photos/other instructions. So my washers are "cupped". But so have they been every shock absorber on every vehicle I have replaced shocks on. I'm not going to worry about it.

Thanks for the reply! That makes sense, and is also one of the reasons I cupped my washers too.

I think I'll probably just leave them be then. I don't think I recall seeing many 5100 shaft failures on here anyway (although I found record of a few, but it seems with lifted rear and heavy duty off-road use).
 
Last edited:
Just did my 5100 @.85" install on Monday, but ran into an issue figuring out the correct rear shock upper bushing arrangement. I ran numerous searches on this an various other forums, with no truly definitive answer. I ended up installing them like this, since it was a holiday and I needed to get my 4Runner back on the ground:

attachment.php


Now that I've had a talk with Bilstein, the one rep I spoke with said that the washers should actually be flipped opposite of the above so that they are not cupping the bushing. He said this allows more articulation of the shock shaft and will prevent the shaft from breaking.

How did you guys do yours? Of those who did it like the above image, have you had any issues? Just wondering if I should go through the trouble of pulling the dang things off and re-installing.

Other than that, the install went perfectly using the "no spring compressor" method, and I think my alignment came out pretty good too.

Thanks for the help!


I had the same question when I did the rear shocks. Posed the question to “Bilstein” and got the same answer you did: the washers should dish away from the rubber, not cup it. Maybe I spoke to the same “Bilstein” guy a year ago. Although I did the install per his instruction, I am still a bit dubious. A week ago, I went to the trouble of taking the top washer and bushing off for a looksie. Everything was well seated and centered. The shock threaded rod was not rubbing against the mount. I left everything as is, at least for now.
 
They should've just made them flat and a bit smaller in diameter. Then no one could put them on "backwards", whatever that may be, and they could've saved some money. :D
 
I’ve put my share of bushings together, there’s no way they want them like that.
Edit: they want them like that.
 
Last edited:
Sorry to necro this thread, but it seems that the consensus is to have the cupping edge pointed inward, regardless of what Bilstein said. I agree that flat washers would have been a better option, considering that they welded a nut to the shaft of the rear shock for tightening and removal. I tried it the way Bilstein said and if I were to put it on that way I would not be able to access the welded nut after installation. I guess if it's a dedicated off roader it would matter more, but where my rig is 90% on the highway until my 3rd gen gives up, it doesn't hurt to install them the same as the factory Toyota bushings. I do have some QC concerns, as there was some spackling on my threads for the shock which wouldn't allow the smaller washer to slide onto the shaft. Not a deal breaker, but I wouldn't expect that from Bilstein.
 
The instructions were included in each Bilstein box and although I didn't like that method, I followed them. The cups face outward.

Every other shock of that style I've ever installed in my life has been been with the cups facing inward. I'm surprised I even looked at the instructions anyway.
 
One of my 5100 rear shocks has already blown at less than 50k miles. Would be nice if this new configuration will make these last longer. Not holding my breath.
 
I replaced my leaky rear Bilstein with a new one this week. I followed the new (2020) instructions.
Here are a couple tips:
Use a 22mm thin wrench to hold the shock body.
The new configuration of the washers makes it hard, or impossible, to get a normal wrench in there.
You can get a useable 22mm thin wrench on Amazon for less than $10.
The new Bilstein nylock nut is an 18mm, not 19mm.
But…a 19mm wrench will work.
I got a ratcheting 18mm on Amazon for about $15. Any excuse to buy new tools.
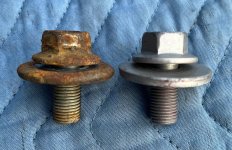
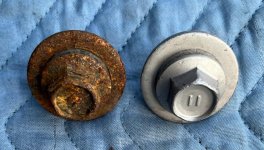
My lower bolts were rusty but finding the correct and available part number to replace them is proving surprisingly difficult.
I just cleaned mine up and hit them with rust reformer.
 

Attachments

  • IMG_2015.jpg
    IMG_2015.jpg
    117.3 KB · Views: 5,755
  • IMG_2016.jpg
    IMG_2016.jpg
    84.1 KB · Views: 5,231
Last edited:
I went to order replacement lower shock bolts but Toyota parts website is screwed up. I can confirm the correct bolt is 90119-A0018 even if Toyota says it doesn’t fit. Torque to 72ft-lbs.
 

Attachments

  • IMG_2710.jpg
    IMG_2710.jpg
    147.9 KB · Views: 297
  • IMG_2709.jpg
    IMG_2709.jpg
    144.3 KB · Views: 297
Last edited:
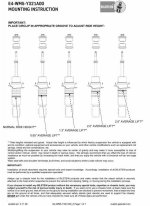
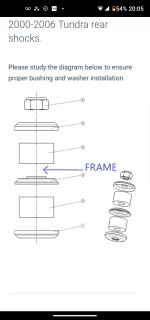
Proper order per Bilstein w/illustration

Sorry for the late post to this old thread, but thought I might be able to help anybody else looking to solve this issue. I found this on the Bilstein website when I was installing my rear shocks on my 2016 4Runner the other day and it worked out and mimics exactly the way the untouched original from the factory arrangement. Even though on the Bilstein website it shows this for the Tacoma and the Tundra, it's the same for the 4Runner, I promise you. It worked out perfectly and the shock seated into its mount exactly as it should. Hope this helps clear this up!
 

Attachments

  • Screenshot_20250319-200540.jpg
    Screenshot_20250319-200540.jpg
    111.2 KB · Views: 215

Members online

Forum statistics

Threads
278,316
Messages
3,554,120
Members
248,016
Latest member
Advally Service

Trending content

Back
Top