Rear door panel installation tip

GrantK

New member
I was a little concerned about doing Antman's door handle light mod because he and others have warned that re-installing the door panel is a pain in the butt and takes a lot of patience, which I don't have. So after doing the mod I tried to refit the panel only to have trouble getting the pins and weather stripping to line up as predicted. After several tries and words that would make a hooker blush I surrendered my Man-Card and read the PDF repair manual (thanks to those that made it available).

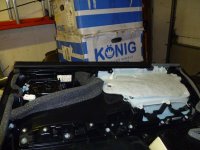
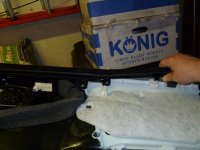
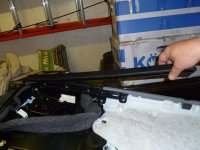
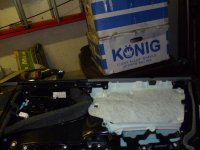
The trick makes re-installing the panel soooooooo easy that I installed it in 15 seconds! While the panel is off, pull the top weather stripping off. It is held in place by three clips and you just, carefully, pull it straight out from the panel. Then when re-installing, mount the weather stripping to the door and the panel goes on with no arguments at all!!! I now have no concerns about doing it again for installing speakers or any other dumb ideas I come up with.

BTW - A couple of tips for doing the door handle LED mod (everyone does things different). I used 3mm 12v pre-wired orange LEDs from Ozium. I carefully drilled a hole from the back with a Dremel without taking the panel apart. Then I super glued the LED in place and wired it to the window switch's LED power wires. The orange LED seems to match the amber LEDs in T4R very closely.
 
Register to hide this ad
I was a little concerned about doing Antman's door handle light mod because he and others have warned that re-installing the door panel is a pain in the butt and takes a lot of patience, which I don't have. So after doing the mod I tried to refit the panel only to have trouble getting the pins and weather stripping to line up as predicted. After several tries and words that would make a hooker blush I surrendered my Man-Card and read the PDF repair manual (thanks to those that made it available).

The trick makes re-installing the panel soooooooo easy that I installed it in 15 seconds! While the panel is off, pull the top weather stripping off. It is held in place by three clips and you just, carefully, pull it straight out from the panel. Then when re-installing, mount the weather stripping to the door and the panel goes on with no arguments at all!!! I now have no concerns about doing it again for installing speakers or any other dumb ideas I come up with.
Pics or it didn't happen!

Been there done that on those door panels! Mentioned before on the other "door panel removal" thread..........http://www.toyota-4runner.org/5th-g...nel-removal-any-hidden-screws.html#post747906
 
Pics or it didn't happen!

Good thing I hadn't don't the other door...

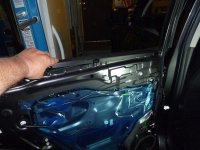
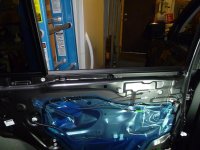
First the panel with the weatherstrip and taking it off. Then the weather strip going onto the door. After that, the panel goes straight on.
 

Attachments

  • DoorPanel_wWeatherStrip.JPG
    DoorPanel_wWeatherStrip.JPG
    64.2 KB · Views: 3,705
  • DoorPanel_wWeatherStrip1.JPG
    DoorPanel_wWeatherStrip1.JPG
    57.7 KB · Views: 3,606
  • DoorPanel_wWeatherStrip2.JPG
    DoorPanel_wWeatherStrip2.JPG
    64.3 KB · Views: 3,641
  • DoorPanel_noWeatherStrip.JPG
    DoorPanel_noWeatherStrip.JPG
    58.5 KB · Views: 3,572
  • Door_weatherStripInstall.JPG
    Door_weatherStripInstall.JPG
    63.7 KB · Views: 3,743
  • Door_wWeatherStrip.JPG
    Door_wWeatherStrip.JPG
    66.2 KB · Views: 3,713
Grant -- thanks for posting this. I front doors are easy compared to the rears... I almost committed Hari-kari trying to get the rear panels back on, but found this thread.... :banana:

I put some 6.5 JLs in the doors. Next is the amp...
 
Sorry to ressurect an old thread, but it must be done for sake of a HUGE thank you to GrantK! You saved my sanity and my rear door panel which was >this< close to getting stomped and thrown in the dumpster :frusty:. That or I would have had to slink to Toyota with my tail between my legs and reveal to them how much of a dummy I am.
 
I was moments from lighting the truck on fire and walking away forever, when my passenger rear door panel magically snapped into place after a literal hour of fighting it. I only wish I’d have had the wisdom to search the forum before starting the job! Thanks so much for posting this. I now feel a lot more confident about applying sound deadener to the driver rear door and hopefully not losing my mind.
 
I've shared this tip several times, I literally drove around without my rear door panels for a couple days before figuring out this trick. Definitely a life saver after much frustration
 
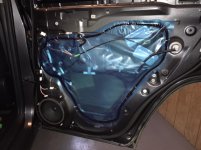
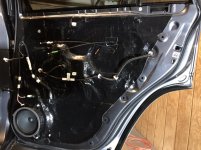
Before and after of passenger rear door sound deadener. I installed deadener on the inside of the door skin as well as sealing the inner door in preparation for my planned speaker install.
 

Attachments

  • 6230554D-1ED3-49FA-856E-D5246AA8E32F.jpg
    6230554D-1ED3-49FA-856E-D5246AA8E32F.jpg
    117.8 KB · Views: 1,987
  • 8B88D6D1-8B52-48E1-90DA-F6268AF8A327.jpg
    8B88D6D1-8B52-48E1-90DA-F6268AF8A327.jpg
    131 KB · Views: 2,310
Massive thank you to this thread. I was about to have a meltdown putting the rear door panel back on. Sweating profusely, cussing, and about to give up after and hour and a half. Then discovered this thread and it was back on on in 3 minutes!!!
 
Before and after of passenger rear door sound deadener. I installed deadener on the inside of the door skin as well as sealing the inner door in preparation for my planned speaker install.

Did you went over the moisture barrier with your sound deadening material, or did you take the barrier off?
 
Thank you

So glad I found this, after spending 30 min and walking away, doing other things. Came home, searched found..30 sec later, done.
THANK YOU.
 

Members online

Forum statistics

Threads
278,306
Messages
3,554,045
Members
248,016
Latest member
Advally Service

Trending content

Back
Top