

ScarfaceT4R
New member
I haven’t seen a lot of info within one thread regarding the details of swapping out our 5th Gen T4R’s rear sway bar brackets/bushing that attach to the rear axel. Probably because our 5th Gen’s are too new to need the bushings replaced, but besides this being a Hyper-Flex polyurethane product that is advertised to last much longer & provide less body roll than OEM rubber bushings – maybe you just happened to ruin your stock setup like I did…womp, womp…So here ya go!
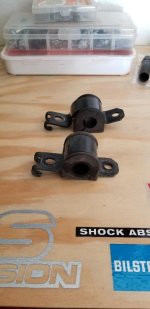
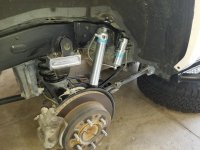
As you can see here, one of my OEM brackets was bent to heck during the install of a OME trim packer on my driver side (bent bracket pictured below in the back – you know, the one all bowed up an what not). I tried bending it back & everything I could to get it fixed but I gave up – the thing is pretty resilient!
After numerous searching for the size of a 5th Gen rear sway bar, I was finally able to download the spec sheet for a 2013 TR4 SR5.
https://www.google.com/url?sa=t&rct...ecs.download&usg=AOvVaw2P8AGOL5g4Dl4X6rZM_gvI
The sheet lists the diameter of the rear sway bar at 0.787” or 1.18” w/ KDSS. I am not KDSS equipped. Now for math. 0.787” = 19.9898mm. I have seen people on this forum state that their bushings they ordered from Energy Suspension were 19mm, and if you do the vehicle specific product search on the website, they will also recommend a 19mm (0.74”) bushing. Why they recommend a bushing that is 0.74” when the specs for our 5th Gen’s state that our bars are 0.787”, I don’t know??
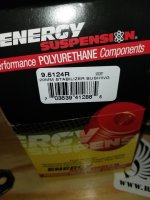
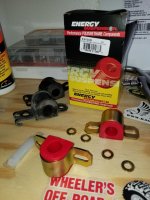
So given our 0.787” sway bars equal dang near 20mm, that’s what I went with. I went with part number 9.5124R which is a 20mm (0.78”) non-greasable universal bushing. I chose the non-greasable one because it was cheaper to have the option without the little nipple that you can run a grease gun up to. You still need to grease it with the included grease (& I bought the 3 grease pack for future use). You have options of red or black bushings. I chose red because Toyota.
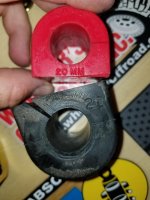
As you can see here, the OEM black bushing has a 20 on it. Not too sure it means 20mm, but I’m kind of guessing that’s what it stands for. While researching bushing sizes, the Energy Suspension site has a really good 6 or 7 methods for determining the size of your sway bar. They state that just because your spec sheet may read one size, or someone else’s sway bar is one size, that may not mean yours is that size. They say that they have noticed that some model of cars may have 7 or 8 different size sway bars.
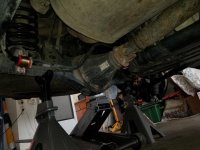
You will want to jack up the rear via the rear diff & place jack stands below the rear axle. You don’t want to set the truck down on the frame with the jack stands because you want the suspension to be compressed for this install as to prevent binding of the bushings when lowering the 4Runner back onto earth. Raising up by the rear axle will also allow the sway bar to remain parallel to the ground, which is what you want. Remove wheels for easy access. You will need a 9/16 socket for 3 of the bolts & a 9/16 wrench for the upper bolt on the driver side, due to the gas tank making it difficult to fit the socket & socket wrench behind.
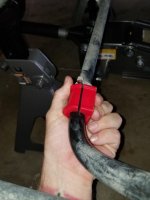
Like I said, I went with the 20mm bushing (unlike the 19mm that a few people suggested), & I wish I went with 21mm. I test fitted this one without applying the grease (if you apply the grease you cannot exchange/return them), and by just hand tightening it around the sway bar it looks like it could be a tad short on the circumference of the sway bar. I figured once I tightened everything down it could squeeze the bushing tight to be a perfect fit, so I went ahead and applied grease to the inside of the bushing and around the outside that sits inside the bracket as instructed. This grease, entitled ‘Formula 5 Prelube’, seems like it will last forever on this bushing – although I know that cannot happen over time. But this stuff really sticks well & seems very well made. I suggest rubber gloves as this stuff is very hard to get off of your hands.
After you unscrew the OEM bolts, save them as you will need to reuse them on the new brackets. The new brackets also came with new washers but I just used the old washers that I had on the bolts before as they seem a little beefier. Installing the new bushing & bracket was a breeze & I really don’t have too much advise on the actual process of that besides just try not to get that grease on your hands or tools.
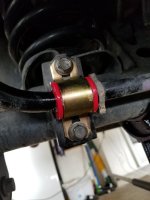
After I tightened the brackets up the gap size of the bushing nearly disappeared :reckon:
After throwing the wheels back on & lowering the car I think it looks very nice! Can’t wait to drive it around and inspect it after a few road trips. Next will prob be the end link bushings in red poly, along with the front sway bar bushings.
Hope this helped!
Happy wrenching!
As you can see here, one of my OEM brackets was bent to heck during the install of a OME trim packer on my driver side (bent bracket pictured below in the back – you know, the one all bowed up an what not). I tried bending it back & everything I could to get it fixed but I gave up – the thing is pretty resilient!
After numerous searching for the size of a 5th Gen rear sway bar, I was finally able to download the spec sheet for a 2013 TR4 SR5.
https://www.google.com/url?sa=t&rct...ecs.download&usg=AOvVaw2P8AGOL5g4Dl4X6rZM_gvI
The sheet lists the diameter of the rear sway bar at 0.787” or 1.18” w/ KDSS. I am not KDSS equipped. Now for math. 0.787” = 19.9898mm. I have seen people on this forum state that their bushings they ordered from Energy Suspension were 19mm, and if you do the vehicle specific product search on the website, they will also recommend a 19mm (0.74”) bushing. Why they recommend a bushing that is 0.74” when the specs for our 5th Gen’s state that our bars are 0.787”, I don’t know??
So given our 0.787” sway bars equal dang near 20mm, that’s what I went with. I went with part number 9.5124R which is a 20mm (0.78”) non-greasable universal bushing. I chose the non-greasable one because it was cheaper to have the option without the little nipple that you can run a grease gun up to. You still need to grease it with the included grease (& I bought the 3 grease pack for future use). You have options of red or black bushings. I chose red because Toyota.
As you can see here, the OEM black bushing has a 20 on it. Not too sure it means 20mm, but I’m kind of guessing that’s what it stands for. While researching bushing sizes, the Energy Suspension site has a really good 6 or 7 methods for determining the size of your sway bar. They state that just because your spec sheet may read one size, or someone else’s sway bar is one size, that may not mean yours is that size. They say that they have noticed that some model of cars may have 7 or 8 different size sway bars.
You will want to jack up the rear via the rear diff & place jack stands below the rear axle. You don’t want to set the truck down on the frame with the jack stands because you want the suspension to be compressed for this install as to prevent binding of the bushings when lowering the 4Runner back onto earth. Raising up by the rear axle will also allow the sway bar to remain parallel to the ground, which is what you want. Remove wheels for easy access. You will need a 9/16 socket for 3 of the bolts & a 9/16 wrench for the upper bolt on the driver side, due to the gas tank making it difficult to fit the socket & socket wrench behind.
Like I said, I went with the 20mm bushing (unlike the 19mm that a few people suggested), & I wish I went with 21mm. I test fitted this one without applying the grease (if you apply the grease you cannot exchange/return them), and by just hand tightening it around the sway bar it looks like it could be a tad short on the circumference of the sway bar. I figured once I tightened everything down it could squeeze the bushing tight to be a perfect fit, so I went ahead and applied grease to the inside of the bushing and around the outside that sits inside the bracket as instructed. This grease, entitled ‘Formula 5 Prelube’, seems like it will last forever on this bushing – although I know that cannot happen over time. But this stuff really sticks well & seems very well made. I suggest rubber gloves as this stuff is very hard to get off of your hands.
After you unscrew the OEM bolts, save them as you will need to reuse them on the new brackets. The new brackets also came with new washers but I just used the old washers that I had on the bolts before as they seem a little beefier. Installing the new bushing & bracket was a breeze & I really don’t have too much advise on the actual process of that besides just try not to get that grease on your hands or tools.
After I tightened the brackets up the gap size of the bushing nearly disappeared :reckon:
After throwing the wheels back on & lowering the car I think it looks very nice! Can’t wait to drive it around and inspect it after a few road trips. Next will prob be the end link bushings in red poly, along with the front sway bar bushings.
Hope this helped!
Happy wrenching!
Attachments
Last edited:


