
You are using an out of date browser. It may not display this or other websites correctly.
You should upgrade or use an alternative browser.
You should upgrade or use an alternative browser.
Removable fridge slide with 3rd row
- Thread starter bigair96
- Start date
Register to hide this ad

Xtremluck
New member
Does anyone with an sr5 or limited who has a third row have a fridge in the rear? How did you mount it so it comes out if you are people moving and need the third row? Thanks!
I do but I ripped the useless 3rd row out. Relieving the truck of 100 lbs of dead weight. A slide mounted on the back of one of the 3rd row seats may be doable but you would need to check clearances with the rear hatch.

jimmynotjim
New member
I don't have a third row but could you use an anchor plate (fancy for piece of plywood) that attaches to the factory tie downs? Not exactly fat to install or remove, but you want a fridge attached pretty solidly.
I don't have a third row but could you use an anchor plate (fancy for piece of plywood) that attaches to the factory tie downs? Not exactly fat to install or remove, but you want a fridge attached pretty solidly.
Yeah that's not a bad idea. Thanks

matoolie
New member
I made a custom setup having a fridge slide with tilt, small slide out table and drawer with fold out table lid. I am using the two factory tie downs on passenger side and the LATCH anchor point on the back of the 2nd row passenger seat. All can be removed to use the 3rd row.
Last edited:

Cymon
New member
Does anyone with an sr5 or limited who has a third row have a fridge in the rear? How did you mount it so it comes out if you are people moving and need the third row? Thanks!
Just about to do the write-up on my thread. I used t-nuts and bolts the same size as the screws. Here is the link to my modular build “shelving”. I uses containers that slide in underneath with camping and recovery gear.
Cymon's Weekend Warrior and MFD Thread
Dfg Fridge Slide installed...
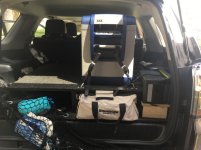
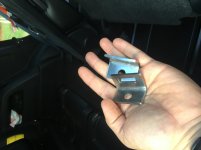
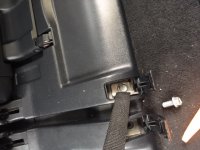
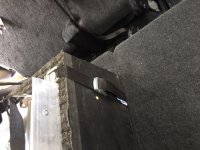
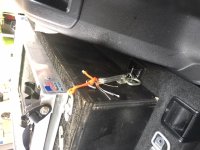
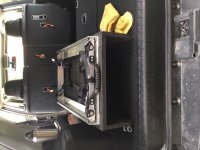
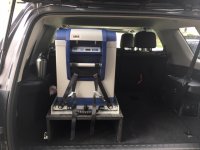
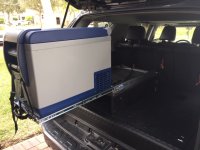
The tricky part was finding a place to tie down the back of my drawer boxes that still allows access and use to one side for when we travel with 6 people. Found the front bolt that attaches the 3rd Row seats to the floor. The attachment point is what Frontrunner uses for their GX460 rear storage units. Had a person at my wife’s job fabricate a stainless steel tie down that would bolt up. So now I have a completely modular unit. First pic is both sides when attached, before the fridge slide. I can also remove the slide easily to create a flat surface since it is not screwed into the wood but bolted using t-nuts leaving the area below the platform flush for our storage bins. The unit is completely modular so I can use either side of the 3rd Row when I want. The two sides get bolted together into a one life unit when I want the full storage in the back.
Attachments
-
 E1FAF1CB-5F4C-46C0-B0AD-0DD64A63F91C.jpg120.7 KB · Views: 1,966
 -
 F60EB55B-1AAC-4299-8EC0-D7E303F2E0E4.jpg108.5 KB · Views: 1,663
 -
 3C584A64-6FCD-43BF-986C-6DBF192E8EA4.jpeg121.2 KB · Views: 1,678
 -
 F5BA47C4-45FE-4D83-9465-3D52D592258E.jpeg135.3 KB · Views: 1,669
 -
 1FD76973-E20A-4B6A-BCB7-F0C08F8C50F8.jpeg129.4 KB · Views: 1,660
 -
 06D45F60-5DFD-4BD8-8C4C-18BCE92A75C2.jpeg106.5 KB · Views: 1,740
 -
 F4441EFA-BF64-4BC6-86FF-9F8C361EEFBC.jpeg89.4 KB · Views: 1,833
 -
 86F0B888-764C-49C1-A672-8F23AFFC8F21.jpeg103.2 KB · Views: 1,907
Cymon
New member
:thumb3:
:cheers:
How'd you power that fridge? It looks like its plugged into something in one of those pictures. Tried attaching picture but didnt work from phone.
Thanks!
Cymon
New member
How'd you power that fridge? It looks like its plugged into something in one of those pictures. Tried attaching picture but didnt work from phone.
Thanks!
In the picture you see it plugged into a Goal Zero Yeti 400 Lithium, which in turn is plugged into the rear 120v outlet so it can charge when the car is running. The battery would run the fridge for about 16-22 hours depending on ambient temperature without charging. Since then I got a killer deal on an open box Goal Zero Lithium 1400 solar generator. In the current setup the 1400 gets strapped down next to the fridge (too big for the old spot). The fridge is plugged into the generator and generator into the 120v outlet to charge while driving. Theoretically it will run the fridge for 3-5 days on a full charge. I also have a 100w solar panel in my trailer if we need charging off of the grid for extended periods. On our next trip I made attachment teathers using my kids car seat anchors that they don’t need anymore since they aren’t rear facing to the drivers seat anchor points. I’ll strap the generator down under my kids dangling feet using 1000lb straps. An extension chord will run from the rear outlet to the generator allowing it to charge while driving, and the fridge chord is long enough to run under/to the side of the second row drivers side seat and still allow for the fridge slide to completely slide out.
Essentially instead of a dual battery setup I use solar charging batteries because they are portable and interchangeable between vehicles. I can also use them for emergency power during hurricane season down here in South Florida.
Last edited:
Cymon
New member
[MENTION=120701]Cymon[/MENTION] that's an awesome setup and very similar to what my goal setup would be overall. Where the heck dod you find an open box yeti 1400?
How long did it take to charge the 400? The 1400?
It was at an REI garage sale as a returned item as the backlight button was not working properly. I bought it for $500 (very lucky).
The Yeti 400 takes roughly 6-8 hours to fully charge by the plug in the back of the 4runner (about the same time as from a standard wall socket). The fridge pulls about 60-70 watts when the compressor is running, but only 5-7 when not. The vehicle inputs a pretty constant 60-70 watts to the battery when it is plugged in, so it is a net zero loss when the compressor is running and then charges back up whenever the compressor is not running. When stationary in good sun the 100w Boulder solar suitcase I have pulls in about 50-70 watts, so again it matches the fridge with the compressor running and then charges the battery when the fridge is not.
The 1400 would take about 25 hours to charge fully, with the same inputs and output of energy as stated above. But it does have the storage capacity to run the fridge for about 4-6 days depending on the ambient temperature, as the fridge takes an average of about 2-3amps and its a 396 amp/hr lithium battery.
Hope this helps.
Last edited:
It was at an REI garage sale as a returned item as the backlight button was not working properly. I bought it for $500 (very lucky).
The Yeti 400 takes roughly 6-8 hours to fully charge by the plug in the back of the 4runner (about the same time as from a standard wall socket). The fridge pulls about 60-70 watts when the compressor is running, but only 5-7 when not. The vehicle inputs a pretty constant 60-70 watts to the battery when it is plugged in, so it is a net zero loss when the compressor is running and then charges back up whenever the compressor is not running. When stationary in good sun the 100w Boulder solar suitcase I have pulls in about 50-70 watts, so again it matches the fridge with the compressor running and then charges the battery when the fridge is not.
The 1400 would take about 25 hours to charge fully, with the same inputs and output of energy as stated above. But it does have the storage capacity to run the fridge for about 4-6 days depending on the ambient temperature, as the fridge takes an average of about 2-3amps and its a 396 amp/hr lithium battery.
Hope this helps.
Wow. That is lucky. Great find. That is really helpful info. Thanks
Does anyone have any pictures of a plywood type base they have built for the rear and how they bolted it down? I do have the third row, but would be open to seeing anything that someone has put together.
I really like [MENTION=120701]Cymon[/MENTION] 's setup, but I think I am going to try to build mine flat and not with any space below. I have a custom molle surround so I can put stuff on top of the fridge and on the sides. I may copy what cymon did but flat, but I also want to see if I can get it closer to the side to free up some space, otherwise it goes almost to the middle of the back.
Post up pictures or let me know what you did. Thanks!
I really like [MENTION=120701]Cymon[/MENTION] 's setup, but I think I am going to try to build mine flat and not with any space below. I have a custom molle surround so I can put stuff on top of the fridge and on the sides. I may copy what cymon did but flat, but I also want to see if I can get it closer to the side to free up some space, otherwise it goes almost to the middle of the back.
Post up pictures or let me know what you did. Thanks!
Cymon
New member
Check out this system by [MENTION=107460]Magnetic4R[/MENTION] . His was the original I saw and inspiration, I just simplified it for my needs. Here is the link.
3rd row drawer system Part 1
Oh and I just installed an ARB fridge wiring kit and installed it. I’ll do a write up soon on my thread although there are plenty of writeups on it already. So now I have the yeti for when larked for several nights and the wired to battery for road trips/local trips where we are not in one place for more than 36 hours.
3rd row drawer system Part 1
Oh and I just installed an ARB fridge wiring kit and installed it. I’ll do a write up soon on my thread although there are plenty of writeups on it already. So now I have the yeti for when larked for several nights and the wired to battery for road trips/local trips where we are not in one place for more than 36 hours.
Check out this system by [MENTION=107460]Magnetic4R[/MENTION] . His was the original I saw and inspiration, I just simplified it for my needs. Here is the link.
3rd row drawer system Part 1
Oh and I just installed an ARB fridge wiring kit and installed it. I’ll do a write up soon on my thread although there are plenty of writeups on it already. So now I have the yeti for when larked for several nights and the wired to battery for road trips/local trips where we are not in one place for more than 36 hours.
Looking forward to your write up. I read that other thread as well. Not sure if what I want to do is even possible unfortunately. Flat piece of plywood and fridge slide all the way against the side. I may have to build a box like yours but I'm going to push it all the way against the side. Will have to modify the side latches a bit. Going to have to keep thinking about it and build some templates to see what my options are.
Last edited:
I made a custom setup having a fridge slide with tilt, small slide out table and drawer with fold out table lid. I am using the two factory tie downs on passenger side and the LATCH anchor point on the back of the 2nd row passenger seat. All can be removed to use the 3rd row.
Do you have any pics of this setup? Especially the tie downs and latch? Thanks!
Cymon
New member
Looking forward to your write up. I read that other thread as well. Not sure if what I want to do is even possible unfortunately. Flat piece of plywood and fridge slide all the way against the side. I may have to build a box like yours but I'm going to push it all the way against the side. Will have to modify the side latches a bit. Going to have to keep thinking about it and build some templates to see what my options are.
Sounds like a solid plan. Check out [MENTION=91899]Jhalko[/MENTION] build here....Post #78 and 105 for more ideas. When I built mine I used what he was doing and [MENTION=107460]Magnetic4R[/MENTION] build and did what worked for me. It definitely takes some trial and error but having a custom system that works for you is worth it in the end.
Jhalko's 2011 Limited build/travel thread
:cheers:
Check out this system by [MENTION=107460]Magnetic4R[/MENTION] . His was the original I saw and inspiration, I just simplified it for my needs. Here is the link.
3rd row drawer system Part 1
Oh and I just installed an ARB fridge wiring kit and installed it. I’ll do a write up soon on my thread although there are plenty of writeups on it already. So now I have the yeti for when larked for several nights and the wired to battery for road trips/local trips where we are not in one place for more than 36 hours.
Did you use screws or bolts for your slide to the box? I know you said it was pretty clean on the inside because you could get an under bed storage container.
To get the box closer to the side I think the built in rings on the floor will have to be inside the box. Will have to cut holes in the top of the box so my tie down can go from the d ring on the box to the built in floor ring. Then I will try to do the same thing you did for the back middle and tie down to the third row bolt. Will see if a d ring will fit there as I dont have anyone to fabricate. Will use tie down straps at the 3 corners. Going to try to do it as low as possible, maybe raised 1-2 inches. May be able to get a narrow slide out table as well. Only going to build one box for half the rear. We shall see.
Similar threads
- Replies
- 3
- Views
- 163

- Replies
- 0
- Views
- 3K
- Replies
- 6
- Views
- 167

