Replacing Alternator in 2008 V8

jdkilroy

New member
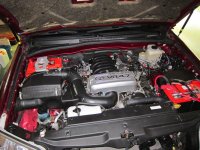
Replaced stock alternator with a high output version.
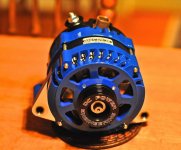
jdk_4707.jpg

Just an FYI; I read a lot of posts about alternator removal/replacement and none of them prepared me for what I was in for.

For a 2008 V8:
First things first: disconnect the neg terminal of the battery and remove the front skid plate.

1) remove radiator seal (that plastic trim piece covering top of radiator)

2) remove fan shroud and fan assembly/fluid coupling. (done after first disconnecting and removing the overflow line and tank from radiator) (removing the four 12mm bolts that hold the fluid coupling on requires preventing the fluid coupling from spinning as you loosen the bolts holding it on; you will need a ratchet box wrench here; nothing else will do) The fan shroud and fan/fluid coupling need to come out together. All bolts assoc with the fan shroud and overflow tank are 10mm.

3) remove serpentine belt (this requires that you put a 14mm socket on the belt tensioner nut and turn it counterclockwise to relieve the tension on the belt. the nut on that pulley is a left hand thread so righty-loosey)

4) remove vane pump assembly... (what the f**k is the "vane pump" you ask, its the power steering pump whose pulley prevents you from removing the alternator) Don't remove hoses; just unbolt the three 14mm bolts and move the unit aside using a bungee cord to pull it up and out of the way as necessary.

5) Unbolt the alternator and then disconnect the power wire and plastic connector (easier after unbolting it)

6) Remove the alternator. (a bit of gymnastics involved here and do your best not to bugger up the fins on the back side of the radiator)

7) install new alternator (#6 in reverse... kinda. Try to remember how you got the alternator out and do that backwards)

8) connect wires and connector to new alternator (connecting is easier than disconnecting; I added an additional 1/0 gauge wire to connect alternator to battery)

So now the real fun begins...

9) replace the vane pump assembly (VPA) (not too bad actually)

edit: the top bolt to attach VPA is actually a stud with a Torx fitting on the end. Make sure that this stud is bottomed out and tight before replacing the nut. You will need a Torx socket that fits it to achieve this level of comfort. Initially, this one never felt right when I tightened it and when I ran it past my local mechanic who works on all our Toyotas he said, " If you're not happy with the way that nut tightened, then don't be happy... sort it out until you are..." so I went back and removed the radiator overflow tank and and had another go at the offending stud/nut. It is pretty easy to get to through the holes in the VPA pulley. It was completely loose and had it backed out into the pulley I would have heard what my Father calls, "expensive noises." Turns out, I stripped the first mm or so of threads on the stud when replacing it. To fix: I ground the terminal couple mm into a taper and then used a small triangle file to fix the threads. I replaced the stud and, thank the Gods above, it threaded and bottomed out nice and tight. Then I tightened the nut and that too went tight and solid. (please don't ask me how many ft-lbs)

10) replace the serpentine belt (the idler pulley that sits behind the fluid coupling is loose on the 4 studs but it will stay in place with the belt on)

11) replace the fan shroud and fan together; (replacing the fan shroud requires a bit of finageling to maneuver around all the hoses. Replacing the 4 nuts on the fluid coupling is a royal pain in the ass and you need to prepare to be patient and be at it a while. There is very little room to work and I found that I needed to get the nuts barely started with the ratchet box wrench and then remove it and tighten by hand as they are too loose initially for the ratchet to work... sounds like fun eh ? It ain't, trust me)
Do your best to tighten the fluid coupling nuts to 21 ft-lbs while somehow preventing the assembly from turning.

12) replace the radiator seal.

13) eyeball the whole job carefully to be sure the serpentine belt is on all the pulleys properly and everything lines up.

14) reconnect the battery.

15) replace the front skid plate if you removed it. (It is helpful to do so)

I would not recommend this project to the faint-of-heart mechanically... its not that hard to do but it takes time and as I said earlier, its a royal pain in the ass.

I will add more pics later if anyone wants 'em.
 

Attachments

  • jdk_4707.jpg
    jdk_4707.jpg
    71.7 KB · Views: 10,097
Last edited:
Register to hide this ad
Replaced stock alternator with a high output version.
View attachment 70211

Just an FYI; I read a lot of posts about alternator removal/replacement and none of them prepared me for what I was in for.

For a 2008 V8:
First things first: disconnect the neg terminal of the battery and remove the front skid plate.

1) remove radiator seal (that plastic trim piece covering top of radiator)

2) remove fan shroud and fan assembly/fluid coupling. (done after first disconnecting overflow line and tank from radiator) (removing the four 12mm bolts that hold the fluid coupling on requires preventing the fluid coupling from spinning as you loosen the bolts holding it on; you will need a ratchet box wrench here; nothing else will do) The fan shroud and fan/fluid coupling need to come out together. All bolts assoc with the fan shroud and overflow tank are 10mm.

3) remove serpentine belt (this requires that you put a 14mm socket on the belt tensioner nut and turn in counterclockwise to relieve the tension on the belt. the nut on that pulley is a left hand thread so righty-loosey)

4) remove vane pump assembly... (what the f**k is the "vane pump" you ask, its the power steering pump whose pulley prevents you from removing the alternator) Don't remove hoses; just unbolt the three 14mm bolts and move the unit aside using a bungee cord to pull it up and out of the way as necessary.

5) Unbolt the alternator and then disconnect the power wire and plastic connector (easier after unbolting it)

6) Remove the alternator. (a bit of gymnastics involved here and do your best not to bugger the up the fins on the back side of the radiator)

7) install new alternator (#6 in reverse... kinda. Try to remember how you got the alternator out and do that backwards)

8) connect wires and connector to new alternator (connecting is easier than disconnecting; I added an additional 1/0 gauge wire to connect alternator to battery)

So now the real fun begins...

9) replace the vane pump assembly (not too bad actually)

10) replace the serpentine belt (the idler pulley that sits behind the fluid coupling is loose on the 4 studs but it will stay in place with the belt on)

11) replace the fan shroud and fan together; (replacing the fan shroud requires a bit of finageling to maneuver around all the hoses. Replacing the 4 nuts on the fluid coupling is a royal pain in the ass and you need to prepare to be patient and be at it a while. There is very little room to work and I found that I needed to get the nuts barely started with the ratchet box wrench and then remove it and tighten by hand as they are too loose initially for the ratchet to work... sounds like fun eh ? It ain't, trust me)
Do your best to tighten the fluid coupling nuts to 21 ft-lbs while somehow preventing the assembly from turning.

12) replace the radiator seal.

13) eyeball the whole job carefully to be sure the serpentine belt is on all the pulleys properly and everything lines up.

14) reconnect the battery.

15) replace the front skid plate if you removed it. (It is helpful to do so)

I would not recommend this project to the faint-of-heart mechanically... its not that hard to do but it takes time and as I said earlier, its a royal pain in the ass.

I will add more pics later if anyone wants 'em.


Good info, thanks for posting

On step #8 you say you connected a 1/0 wire for the battery.

Shouldnt the alternator be sending power to the battery with the current connections? What is the function for the additional wire?
 
Good info, thanks for posting

On step #8 you say you connected a 1/0 wire for the battery.

Shouldnt the alternator be sending power to the battery with the current connections? What is the function for the additional wire?

I just added more capacity; the new wire piggybacks the original which is much smaller gauge; 8/0 I'm guessing. (I also added a 1/0 ground wire to make the upgrade complete.)
 
damn nice 800-900 dollar alternator 370amps. wish i had that for my system, but 2 group31 agms will do for now. whats your opinion on mechman alternator?
 
No hands on experience; I know Mechman by reputation only and all I've heard/read is good; same with Iraggi and both at lower cost. (also faster delivery). Some of the "high output" alternators are achieving the output by reducing pulley diameter so alternator RPM's are really up there. That, to me, suggests a shorter life span. I wanted to have strong output at idle as I use the winch for all sorts of chores in the woods. Adequate power means a happy/cooler winch motor. Its a little overkill for my other electrical demands but the winch at max load draws 470 amps. My stereo amps are 600w x 2 so way more than they need.

I didn't want to get into a multiple-alternator set-up. This was a clean swap and (according to specs) puts out 170 amps at idle hot. None of the other builders I looked at had a unit with specs close to this one. DCPE uses new Denso units to work from so compatibility/fit no issue.
 
I flipped through their website and read some of their information including their detailed breakdowns of their "Competiors" alternators. It seems that they are running a quality product with a very good design, I am very interested in their "hairpin stator" design as it does appear to be a much denser coil winding.

Though I will admit that their article had a little bit of a cocky additude to it, but I figure they know they make a quality product, so why be modest? lol

I've heard mixed reviews on customer service, which makes me a little wary. But chances are this will be my future alternator.

Anyone ever heard of: http://www.smartbatterycharger.net They're claiming a little more power at idle and output on their higher end model, I've just never heard of them.
 
Last edited:
"... I am very interested in their "hairpin stator" design as it does appear to be a much denser coil winding.


Anyone ever heard of: SBC High Output Alternators for Armored cars, Rescue and off road vehicles They're claiming a little more power at idle and output on their higher end model, I've just never heard of them.

They are actually building upon Denso's design and quality construction. Denso designed and produces the "hairpin stator" and from everything I've seen from Denso, they do it right.

As an off-the-cuff review of the DC Engineering alternator: High quality build/adaptation (they take a new stock Denso and add their own cast aluminum drive end frame and add highest quality diodes and everything else. The design was a little disconcerting at first as they did away with the middle mounting point and I thought they sent wrong unit initially) Their own pulley is 2.0" in diameter vs the 2.25" OEM pulley so they are increasing rotational speed to get some of the output.

I don't have an amp meter only a VOM but once I borrow one I will post the output results. Their published specs have a reputation of being quite conservative compared to actual output so that will be interesting to measure.

As far as the "Smart Battery Charger," I have not heard of them but I am always seeking enlightenment.
Edit: After reading/perusing their site I am inclined to believe they are related to DC Power Engineering; same castings; same specs, same cores etc. Very similar if you compare the two.

I am using the National Luna dual battery management system with a 200 amp solenoid that I got from Cole-Herse (instead of the usual 85 amp supplied from Nat'l Luna)

My batteries are both Odessey: PC 2150 for the main and my auxiliary is a PC 1700 (pic is prior to wiring the auxiliary battery in)
Two batts.jpg

I expect that the new alternator will shrug off all loads except the winch at highest demands.
 

Attachments

  • Two batts.jpg
    Two batts.jpg
    115 KB · Views: 9,640
Last edited:
you should rotate the second battery around, have the positive post away from the body, and have the negative close to the body.
 
you should rotate the second battery around, have the positive post away from the body, and have the negative close to the body.

Great point; I wouldn't want that terminal touching or arcing across to the hood strut. It will mean some rewiring to keep it all neat and tidy but worth it for safety factor.
Thanks!
 
Replaced stock alternator with a high output version.
View attachment 70211

Just an FYI; I read a lot of posts about alternator removal/replacement and none of them prepared me for what I was in for.

For a 2008 V8:
First things first: disconnect the neg terminal of the battery and remove the front skid plate.

1) remove radiator seal (that plastic trim piece covering top of radiator)

2) remove fan shroud and fan assembly/fluid coupling. (done after first disconnecting and removing the overflow line and tank from radiator) (removing the four 12mm bolts that hold the fluid coupling on requires preventing the fluid coupling from spinning as you loosen the bolts holding it on; you will need a ratchet box wrench here; nothing else will do) The fan shroud and fan/fluid coupling need to come out together. All bolts assoc with the fan shroud and overflow tank are 10mm.

3) remove serpentine belt (this requires that you put a 14mm socket on the belt tensioner nut and turn it counterclockwise to relieve the tension on the belt. the nut on that pulley is a left hand thread so righty-loosey)

4) remove vane pump assembly... (what the f**k is the "vane pump" you ask, its the power steering pump whose pulley prevents you from removing the alternator) Don't remove hoses; just unbolt the three 14mm bolts and move the unit aside using a bungee cord to pull it up and out of the way as necessary.

5) Unbolt the alternator and then disconnect the power wire and plastic connector (easier after unbolting it)

6) Remove the alternator. (a bit of gymnastics involved here and do your best not to bugger up the fins on the back side of the radiator)

7) install new alternator (#6 in reverse... kinda. Try to remember how you got the alternator out and do that backwards)

8) connect wires and connector to new alternator (connecting is easier than disconnecting; I added an additional 1/0 gauge wire to connect alternator to battery)

So now the real fun begins...

9) replace the vane pump assembly (VPA) (not too bad actually)

edit: the top bolt to attach VPA is actually a stud with a Torx fitting on the end. Make sure that this stud is bottomed out and tight before replacing the nut. You will need a Torx socket that fits it to achieve this level of comfort. Initially, this one never felt right when I tightened it and when I ran it past my local mechanic who works on all our Toyotas he said, " If you're not happy with the way that nut tightened, then don't be happy... sort it out until you are..." so I went back and removed the radiator overflow tank and and had another go at the offending stud/nut. It is pretty easy to get to through the holes in the VPA pulley. It was completely loose and had it backed out into the pulley I would have heard what my Father calls, "expensive noises." Turns out, I stripped the first mm or so of threads on the stud when replacing it. To fix: I ground the terminal couple mm into a taper and then used a small triangle file to fix the threads. I replaced the stud and, thank the Gods above, it threaded and bottomed out nice and tight. Then I tightened the nut and that too went tight and solid. (please don't ask me how many ft-lbs)

10) replace the serpentine belt (the idler pulley that sits behind the fluid coupling is loose on the 4 studs but it will stay in place with the belt on)

11) replace the fan shroud and fan together; (replacing the fan shroud requires a bit of finageling to maneuver around all the hoses. Replacing the 4 nuts on the fluid coupling is a royal pain in the ass and you need to prepare to be patient and be at it a while. There is very little room to work and I found that I needed to get the nuts barely started with the ratchet box wrench and then remove it and tighten by hand as they are too loose initially for the ratchet to work... sounds like fun eh ? It ain't, trust me)
Do your best to tighten the fluid coupling nuts to 21 ft-lbs while somehow preventing the assembly from turning.

12) replace the radiator seal.

13) eyeball the whole job carefully to be sure the serpentine belt is on all the pulleys properly and everything lines up.

14) reconnect the battery.

15) replace the front skid plate if you removed it. (It is helpful to do so)

I would not recommend this project to the faint-of-heart mechanically... its not that hard to do but it takes time and as I said earlier, its a royal pain in the ass.

I will add more pics later if anyone wants 'em.


I'm currently working on this and have a question. Why do you need to bottom out the VPA stud? I thought to remove the VPA, you only need to remove 2 bolts and the nut on the stud. The stud itself is torqued down to something like 16-ft-lbs already. You don't need to loosen the stud to remove the VPA. Please let me know if this is not correct because I already have the VPA off and when I reinstall, I would like to know if I need to do anything with the stud.
 
Great write up !!

Really great info !! Thanks for the all the info ! This makes it that much easier for me to do mine I am waiting for a time frame on mine from mech man but thanks for all your guys excellent work super clean rig by the way jd kill !!
 
Last edited:
great writeup

I did this the other day following these great instructions and have just a few things to add.

1. take the pulley of the VPA to get to the bolts which hold it on.
2. the torx socket you need is an E8 size.
3. The VPA won't slide off will all of the hoses connected unless you take out the torx stud. Close... but not quite.
4. the clearance getting thie alternator out is TIGHT. I recommend undoing the wire clamp on the alternator and taking it off before pulling it out of it's home, and putting it back on the new one once it is in place. Overall this job took me 4 hours working deliberately and including a test drive to make sure it was charging correctly.
Note: alternator dying was preceded by a faint whirring noise for a couple of days, so if you hear that, you know what it is!
 
Glad you posted this...

I've been having some charging issues that required multiple jump starts. Replaced the battery because it was under warranty and it didn't really fix anything (back to the same issues after a day or so). Toyota said the alternator was fine but couldn't comment on the whirring noise I have been hearing. I knew the whirring noise was new but couldn't find where it was coming from. I'm betting it's from the alternator (bearings I guess?) and it's been intermittent.

One thing that has had me scratching my head is that after a jump start it's like the system resets and there is no problem for a while. I know it takes a while to recharge the battery. So, if the battery was discharged (hence the need for a jump start) and the alternator is failing it doesn't seem like the jump would "reset" anything. I would expect it to die almost immediately. Just an odd behavior I can't explain.

Anyway, thanks for the comment on the whirring noise I think that is the key I needed! :D

-Cyber-
2006 4Runner Sport V8
 
I'm in for this project over the next couple of days. My wife was running an errand Sunday night when suddenly the AC shut off, the radio turned off, the headlights started flickering, all lights on the dash were flashing, and the vehicle went into limp mode. Thankfully she was only 2 miles from home, so she made it back. I replaced the 2 year old battery on Monday (Labor Day) under warranty and the whirling sound is very pronounced. I went to get the Alternator checked at Autozone this afternoon and the new battery is already showing too low to run the test with their tester. They said they are 99% sure the alternator is dead. I got a quote on a remanufactured Denso unit at Autozone for $161 and called the dealership for a quote. Dealer wants almost $1k to replace with a factory unit. Looks like I'm doing this install. I also came across a YouTube video that follows the same steps, but gives a visual for anyone in the future needing to do this.
 
Alt

Looks like ill be tackling this next weekend. I started hearing a periodic whirrling noise, changed with rpm, that would stop after a few minutes with a faint smell like welding. Thanks for the info!
 
Got this done today. Took about 4hours. I found it helpful to jack the truck up a bit to move the sway bar forward. Also remove the hose bracket on the top of the cross member. The alt will come out the bottom. The hardest part for me was getting the dang serp. Belt back on.
 

Members online

Forum statistics

Threads
278,309
Messages
3,554,071
Members
248,016
Latest member
Advally Service

Trending content

Back
Top