Replacing bearings in pulleys - V6

iBison

New member
There are other threads describing how to replace the pulleys or the bearings in the pulleys. My issue was locating the proper parts. While doing the dread head gasket job I wanted to replace the pulley bearings. One was to the point it would no longer turn freely by hand,

First, it seems Toyota likes to use unique parts that no one sells and no one else uses. For example, the exhaust manifold studs, the pulley bearings. The idler bearings have a 10mm center bore, but all of the available bearings are 15mm and require a sleeve. Motion Industries said they could get all of the bearings, but I didn't ask if they used sleeves or not, they were slower and more expensive.

In the end you can buy everything I used at O'Reilly. One of the threads I read on here had a part number for a sleeve on Amazon, but it was no longer available. We worked with what I could easily get.

I'm not going through the step by step as there are other threads that do that. I wanted to create a place with the parts, dimensions, links and prices for the next guy/gal so here it is.

TWO UPPER IDLER PULLEYS and ONE LOWER IDLER PULLEY (2 bearings)

O'Reilly Auto
NationalBall Bearing
Part No 302-CC (4 required)
National 302CC - Ball Bearing | O'Reilly Auto Parts
Part # 302CC
Line: BCA

Bore (mm): 15mm (0.596 inch)
Outer Race Outside Diameter (mm): 42mm (1.6535 Inch)
Width (mm): 13mm (0.5118 inch)
$28.99


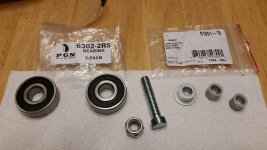
The bearings on the factory pulleys have a center diameter opening of 10mm, these have a center diameter of 15mm. We used these sleeves from O'Reilly Auto as we couldn't find the proper ones locally.

Gates - Accessory Drive Hardware Kit
Gates 91051-15 - Accessory Drive Hardware Kit | O'Reilly Auto Parts
Part # 91051-15
Line: GAT

Inside diameter 10mm
Depth 13mm
Outside diameter 16-17mm
$2.29 each, 4 required. I bought 5 to have a backup as they had to order them.

In order to make these fit we stuck a bolt just smaller than the inside of the bushing in a vise and slid the bushing on to it. We then took a grinder and ground it down to approximately 15mm. The grinder keeps the bushing spinning so it stays round. Note, if you make it to big when you press it in the center opening can shrink from the compression. This actually worked very well. You could also put a bolt through one and chuck it in a drill press and hit it with a file or find a place with a lathe.

I never found a part number for the tensioner pulley bearing, but was able to go to O'Reilly Auto and they looked one up. This one is a direct fit.


TENSIONER PULLEY

O'Reilly Auto
National - Ball Bearing
National 5203KSSE - Ball Bearing | O'Reilly Auto Parts
Part # 5203KSSE (no sleeve required)
Line: BCA

Bore (mm): 17mm (0.6693 Inch)
Outer Race Outside Diameter (mm): 40mm (1.5748 inch)
Width (In): 0.6875 Inch (17.4625mm)
$34.99

This requires nothing more than pressing it into the pulley.

Hope this helps someone.
 
Register to hide this ad
Great info. . .the unfortunate part is now you are giving me more info to make me believe I can tackle this on my own. . . . .
 
It's really pretty simple. I would not have tackled the head gaskets were it not for my son being a tech. The pulleys I would not hesitate. If you can find the proper sleeves that were mentioned in a previous thread it would be simple. If you don't want to mess with pressing the bearings out and in a machine shop shouldn't charge much. When you price out replacing the three pulleys and the tensioner, even with Oreilly or whatever parts it's a fraction of the cost.
 
I'm just posting this here as an alternative for people that want to replace their pulleys but don't want to mess with any fabrication or pressing. I certainly don't want to take away from the advice that you are giving or the work that you put into solving your own solution.

When my pulleys went out I bought the Gates pulley kit from RockAuto. It was $170'ish and came with all three idler pulleys (with new bearings), a tensioner arm with pulley, and a new belt. Since there was nothing wrong with my tensioner I just pulled the pulley off of the new tensioner assembly and swapped it out for the one on the truck because it was a lot easier than swapping out the whole tensioner assembly.

I've been running it for 6 months now and am happy with it.
 
what's the mileage of your truck when you replaced the pulleys?


I'm just posting this here as an alternative for people that want to replace their pulleys but don't want to mess with any fabrication or pressing. I certainly don't want to take away from the advice that you are giving or the work that you put into solving your own solution.

When my pulleys went out I bought the Gates pulley kit from RockAuto. It was $170'ish and came with all three idler pulleys (with new bearings), a tensioner arm with pulley, and a new belt. Since there was nothing wrong with my tensioner I just pulled the pulley off of the new tensioner assembly and swapped it out for the one on the truck because it was a lot easier than swapping out the whole tensioner assembly.

I've been running it for 6 months now and am happy with it.
 
what's the mileage of your truck when you replaced the pulleys?

125k give or take. They aren't something that you really need to replace on a schedule though. I only replaced mine because it was obvious that a bearing was shot. Mine squealed as the engine speed ramped up. It sounded like a turbocharger.
 
In order to make these fit we stuck a bolt just smaller than the inside of the bushing in a vise and slid the bushing on to it. We then took a grinder and ground it down to approximately 15mm. The grinder keeps the bushing spinning so it stays round. Note, if you make it to big when you press it in the center opening can shrink from the compression. This actually worked very well. You could also put a bolt through one and chuck it in a drill press and hit it with a file or find a place with a lathe.

I'm having some difficulty visualizing the grinding down process on the vice.

-B
 
I got the gates kit which include 3 pulleys, 1 tensioner with pulley, 1 gates belt for $170 at rockauto. shipping not included for around $10. no hassle of replacing the bearing. just remove the old part and replace it with the new one. I would think it's much easier this way. my old part crapped out at 110000 miles, not bad!
 
Or for all the same parts that's included in the RockAuto kit you could spend $225 at the local Toyota dealership and get ALL OEM, like I did, which arrived today for me to pick up. You know what my dinners plans will be this evening.
 
there was a discussion about how the toyota ones are not sealed like the aftermarket ones, i was reading this on fj cruiser forum, i too used the gates pulley, upper and lower when i did my high output alternator, it seem to work fine.
 
There are other threads describing how to replace the pulleys or the bearings in the pulleys. My issue was locating the proper parts. While doing the dread head gasket job I wanted to replace the pulley bearings. One was to the point it would no longer turn freely by hand,

First, it seems Toyota likes to use unique parts that no one sells and no one else uses. For example, the exhaust manifold studs, the pulley bearings. The idler bearings have a 10mm center bore, but all of the available bearings are 15mm and require a sleeve. Motion Industries said they could get all of the bearings, but I didn't ask if they used sleeves or not, they were slower and more expensive.

In the end you can buy everything I used at O'Reilly. One of the threads I read on here had a part number for a sleeve on Amazon, but it was no longer available. We worked with what I could easily get.

I'm not going through the step by step as there are other threads that do that. I wanted to create a place with the parts, dimensions, links and prices for the next guy/gal so here it is.

TWO UPPER IDLER PULLEYS and ONE LOWER IDLER PULLEY (2 bearings)

O'Reilly Auto
NationalBall Bearing
Part No 302-CC (4 required)
National 302CC - Ball Bearing | O'Reilly Auto Parts
Part # 302CC
Line: BCA

Bore (mm): 15mm (0.596 inch)
Outer Race Outside Diameter (mm): 42mm (1.6535 Inch)
Width (mm): 13mm (0.5118 inch)
$28.99


The bearings on the factory pulleys have a center diameter opening of 10mm, these have a center diameter of 15mm. We used these sleeves from O'Reilly Auto as we couldn't find the proper ones locally.

Gates - Accessory Drive Hardware Kit
Gates 91051-15 - Accessory Drive Hardware Kit | O'Reilly Auto Parts
Part # 91051-15
Line: GAT

Inside diameter 10mm
Depth 13mm
Outside diameter 16-17mm
$2.29 each, 4 required. I bought 5 to have a backup as they had to order them.

In order to make these fit we stuck a bolt just smaller than the inside of the bushing in a vise and slid the bushing on to it. We then took a grinder and ground it down to approximately 15mm. The grinder keeps the bushing spinning so it stays round. Note, if you make it to big when you press it in the center opening can shrink from the compression. This actually worked very well. You could also put a bolt through one and chuck it in a drill press and hit it with a file or find a place with a lathe.

I never found a part number for the tensioner pulley bearing, but was able to go to O'Reilly Auto and they looked one up. This one is a direct fit.


TENSIONER PULLEY

O'Reilly Auto
National - Ball Bearing
National 5203KSSE - Ball Bearing | O'Reilly Auto Parts
Part # 5203KSSE (no sleeve required)
Line: BCA

Bore (mm): 17mm (0.6693 Inch)
Outer Race Outside Diameter (mm): 40mm (1.5748 inch)
Width (In): 0.6875 Inch (17.4625mm)
$34.99

This requires nothing more than pressing it into the pulley.

Hope this helps someone.

How did you remove the tensioner pulley from the tensioner assembly? My bolt holding the pulley is real tight!
 
I got the gates kit which include 3 pulleys, 1 tensioner with pulley, 1 gates belt for $170 at rockauto. shipping not included for around $10. no hassle of replacing the bearing. just remove the old part and replace it with the new one. I would think it's much easier this way. my old part crapped out at 110000 miles, not bad!

How did you remove the tensioner pulley from the tensioner assembly?
 
There are a couple of good idler pulley bearing threads but this one seems to have more traffic in the past so I'll re-hash it with my latest attempt at the process. I'm a DIY and kind of cheapskate guy with plenty of hand tools and a few bench power items (belt sander) so I'll tear into projects with low chance of failure, injury, or blowing a bunch of extra money when I screw up. I figured doing these bearings was a pretty easy way to save over $100 with some sweat.

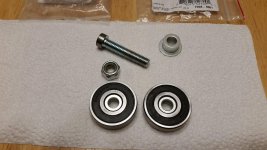
I searched and searched Amazon and the parts stores for the proper bearings and bushings to make this as plug-and-play as possible. Yes, I went cheap on the bearings so these may last a year or the life of the truck. Time will tell. For the bushings I got the same gates part# from the start of this thread. But I cut them down slightly differently. Doing these top two bearings took me about half an hour start to finish and of course the 2nd one went much faster than the first.

The bolt is a 10mm from the hardware store so that round top used to be hex. I stacked two bearings on there under the locknut, chucked the whole thing in my cordless drill, and proceeded to spin it against the belt on my bench sander. In short order I had some surprisingly round bushings with a 15mm OD. I did have to reverse the order on the bolt near the end because I was trying to keep from grinding down the nut. I went just a wee bit too far as the fit wasn't as snug as I would have liked. However, looking at the mounting setup on the block these bushings don't do much. The big washer/bolt pulls the inner bearing race against a post on the block. Therefore, these bushings really just keep the assembly centered on that post. The mounting bolts have a 14mm hex head plus a flare that's bigger than the inner race so these are still mounted very solidly.

I only did the pair of idler #2 (the ones with a single bearing). I drove the old ones out with an old impact socket from the backside on top of a piece of lumber. Worked great. Assembly was the reverse but I used a big socket (1-1/2") that was about the size of the outer race. I cleaned up the pulley well and smeared some grease inside the bore to make assembly a little easier.

Once reassembled, the noise is dramatically better. I guess these two were so loud they were drowning out the other two. There's still a bit of a hiss/growl from either the tensioner or idler #1. I'll tear into those later.

One question though.....anyone that's done the bearings or simply replaced the whole assembly. For removing the tensioner pulley I know it's reverse threaded. Did you break it loose with the belt in place (reverse threaded)? I think the alternative would be to crank the tensioner to the left, put a locking pin in place, then remove the pulley bolt. However, the tensioner is aluminum so I'm afraid of putting too much force on that locking pin setup. Any suggestions??
 

Attachments

  • 20180728_215903.jpg
    20180728_215903.jpg
    130 KB · Views: 457
  • 20180728_215807.jpg
    20180728_215807.jpg
    133.3 KB · Views: 475

Members online

Forum statistics

Threads
278,309
Messages
3,554,075
Members
248,016
Latest member
Advally Service

Trending content

Back
Top