

rickashay
New member
Before I release the Colossal write up in the next week or two, I thought I'd share my sleeping platform configuration. Honestly copied a bunch of it from [MENTION=67615]Dirtco[/MENTION] and his old design before his truck went under the knife. I've built a couple storage solutions now (the OG Dirt Duster, my 80-Series, the Tundra, and I had one being built for the 4th Gen) and this is definitely a cumulation of what I've learnt.
I am 6'6" tall so sleeping in the 3rd gen is not an easy task. Plus with a new baby (3 month old) it was a requirement to keep at least 3 seats in the truck (or at least make it modular to some extent). I also camp differently with my family vs. when I go wheelin' with the guys. So baby, wife and dogs for one configuration (I will sleep on the ground in a tent when this happens - until I build my trailer) and solo inside-the-truck sleeping when it's a guys trip. If it was my wife and I only, I probably would have deleted the rear seats altogether but this made some some interesting design challenges and honestly, there is not a lot I'd change about my current design if I had to do it all over again. Super happy with it overall. Additionally, I wanted to do a better job organizing my gear so I spend less time loading/unloading and shuffling things around when I get to camp. Organization is something that I've always tried to master but it seems there is no perfect formula.
Design Notes:
- I'm 6'6" tall and needed a LONG area to sleep in (even if I have to move one of the seats forward all the way to gain more legroom
- I decided to delete the rear driver's side seat and make the passenger rear seat interchangeable depending on my use configuration
- for the sleeping area, I wanted it as low as possible to retain as much sit-up room to be able to get changed etc in the morning
- wanted the sleeping area to be just wide enough for my Thermarest luxury mattress to fit, and then to maximize the rest of the space for cargo
- had to house my fridge and compressor and as much of my camping gear as possible.
- the area under the fridge is JUST tall enough to accept Front Runer Cub Pack bins without the lids on. I did this so I could try to keep wait down and NOT install drawer slides and make a drawer, but rather simply use the light weight plastic cub packs. TBD if I will install a drawer
Construction Notes:
- basically the entire unit is 3/4 baltic birch.
- wood tools required were a table saw, router, drill, and a skill saw (probably could of not had a table saw and just clapped a level for the skill saw to make the longer rip cuts)
- I did use my Everlast 110V welder to make the mounting brackets and to make the mount for the driver's side gear platform (as shown in pics)
BABY MODE CONFIGURATION:
3rd seat installed. My sub box is easily removed when I go camping (un-necessary weight) but I may opt for an under-seat sub down the road to eliminate that altogether.

_08I3642.jpg by Addison Rickaby, on Flickr
Same configuration in the cargo area. Notice the Front Runner Cub Packs under the fridge. Space for the dogs ontop of the lower section when camping with the family:

_08I3643.jpg by Addison Rickaby, on Flickr
Cargo deck lifts up for emergency supplies and spare parts storage. These are items I do not use all the time typically but still fine-tuning what goes in there:

_08I3646.jpg by Addison Rickaby, on Flickr
SOLO WHEELING CONFIGURATION:
Passenger rear seat bottom un-bolted with 2x 12mm bolts. Seat back folds down flat and you can see the "lip" to catch the sleeping extension that is later installed.
_08I3649.jpg by Addison Rickaby, on Flickr
Sleeping extension installed. Bolts into the rear cargo platform with the 2x 12mm bolts.

_08I3652.jpg by Addison Rickaby, on Flickr
Another angle. Lots of room for a giant like me when the passenger front seat is slid forward.

_08I3656.jpg by Addison Rickaby, on Flickr
CARGO DECK / SEAT DELETE:
My thinking here is that I don't need to haul the weight of that extra seat around and the space could be better utilized for my regular camping gear. I removed the seat back by unbolting it and you actually have to cut along a single seam of fabric to actually get it to release, which I thought was strange but it is still reversible should i ever need to put the seat back in. the crgo extension mounts to the rear cargo area exactly like the sleeping extension but instead of just using a leg that reached to the floor, I fabricated a bracket to bolt into the factory seat bottom location as shown.

_08I3651.jpg by Addison Rickaby, on Flickr
I'm still figuring out the best optimization of this space but a couple configurations below.
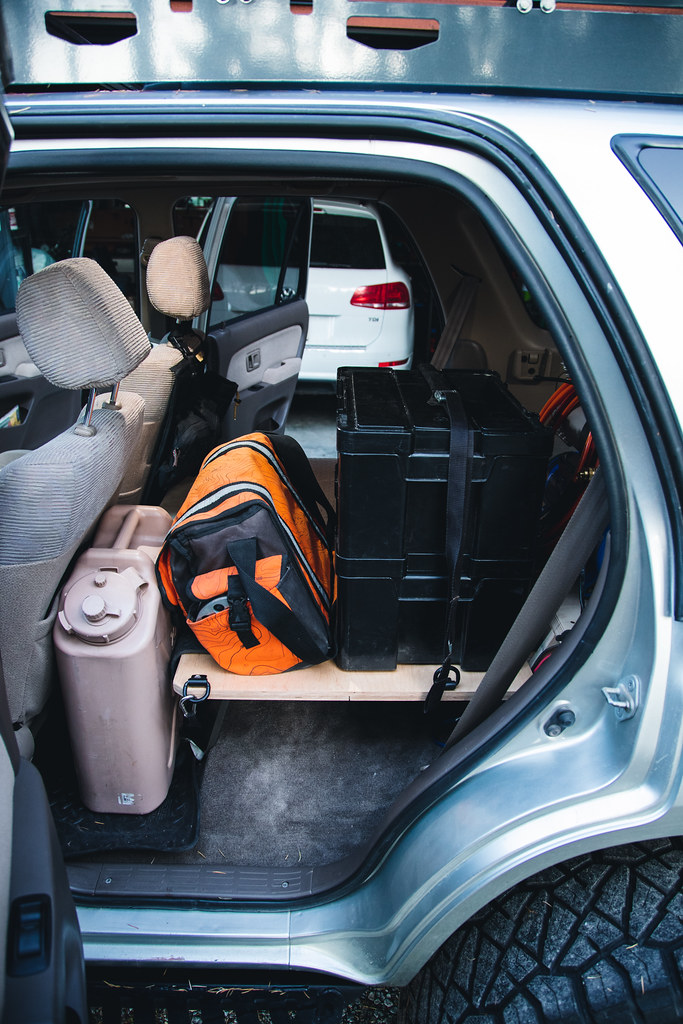
_08I3663.jpg by Addison Rickaby, on Flickr

_08I3658.jpg by Addison Rickaby, on Flickr
This shot is to show the access when you roll down the rear window. Once I rig my Sceptor water jug up to be air pressurized, this would be great to reach in and fill up your water bottle while your on the trail, without having to remove anything.

_08I3660.jpg by Addison Rickaby, on Flickr
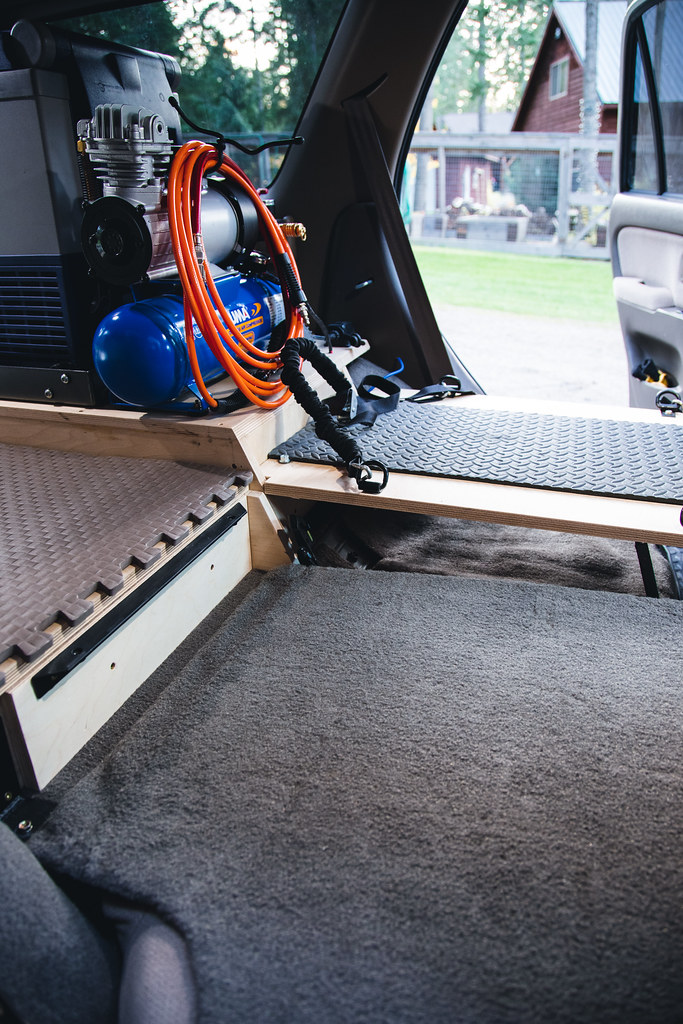
Finally, a shot showing where I mounted my PUMA PD1006 compressor. This compressor is widely used in the 80-Series LC community. I can't believe no one has caught wind of it here yet. It was $260 USD and is as quick as my old ARB twin with a built in tank and 100% duty cycle. It's even super quiet, the only downside I've seen so far is its size. But the tank can be split and re-located if you so choose. I'm absolutely loving this thing so far!

_08I3665.jpg by Addison Rickaby, on Flickr
I've actually slept in the truck now for 13 nights so my writing is with a decent amount of actual usage. A coupe finished touches to come as I install a latch for the lower cargo storage area and get stronger lift struts as the ones I have now are too weak to hold the lid up once my sleeping bag and Thermarest are installed ontop. I still may install a real drawer under the fridge but that is TBD.
Hope this helps as you plan your own storage solutions!
I am 6'6" tall so sleeping in the 3rd gen is not an easy task. Plus with a new baby (3 month old) it was a requirement to keep at least 3 seats in the truck (or at least make it modular to some extent). I also camp differently with my family vs. when I go wheelin' with the guys. So baby, wife and dogs for one configuration (I will sleep on the ground in a tent when this happens - until I build my trailer) and solo inside-the-truck sleeping when it's a guys trip. If it was my wife and I only, I probably would have deleted the rear seats altogether but this made some some interesting design challenges and honestly, there is not a lot I'd change about my current design if I had to do it all over again. Super happy with it overall. Additionally, I wanted to do a better job organizing my gear so I spend less time loading/unloading and shuffling things around when I get to camp. Organization is something that I've always tried to master but it seems there is no perfect formula.
Design Notes:
- I'm 6'6" tall and needed a LONG area to sleep in (even if I have to move one of the seats forward all the way to gain more legroom
- I decided to delete the rear driver's side seat and make the passenger rear seat interchangeable depending on my use configuration
- for the sleeping area, I wanted it as low as possible to retain as much sit-up room to be able to get changed etc in the morning
- wanted the sleeping area to be just wide enough for my Thermarest luxury mattress to fit, and then to maximize the rest of the space for cargo
- had to house my fridge and compressor and as much of my camping gear as possible.
- the area under the fridge is JUST tall enough to accept Front Runer Cub Pack bins without the lids on. I did this so I could try to keep wait down and NOT install drawer slides and make a drawer, but rather simply use the light weight plastic cub packs. TBD if I will install a drawer
Construction Notes:
- basically the entire unit is 3/4 baltic birch.
- wood tools required were a table saw, router, drill, and a skill saw (probably could of not had a table saw and just clapped a level for the skill saw to make the longer rip cuts)
- I did use my Everlast 110V welder to make the mounting brackets and to make the mount for the driver's side gear platform (as shown in pics)
BABY MODE CONFIGURATION:
3rd seat installed. My sub box is easily removed when I go camping (un-necessary weight) but I may opt for an under-seat sub down the road to eliminate that altogether.
_08I3642.jpg by Addison Rickaby, on Flickr
Same configuration in the cargo area. Notice the Front Runner Cub Packs under the fridge. Space for the dogs ontop of the lower section when camping with the family:
_08I3643.jpg by Addison Rickaby, on Flickr
Cargo deck lifts up for emergency supplies and spare parts storage. These are items I do not use all the time typically but still fine-tuning what goes in there:
_08I3646.jpg by Addison Rickaby, on Flickr
SOLO WHEELING CONFIGURATION:
Passenger rear seat bottom un-bolted with 2x 12mm bolts. Seat back folds down flat and you can see the "lip" to catch the sleeping extension that is later installed.
_08I3649.jpg by Addison Rickaby, on Flickr
Sleeping extension installed. Bolts into the rear cargo platform with the 2x 12mm bolts.
_08I3652.jpg by Addison Rickaby, on Flickr
Another angle. Lots of room for a giant like me when the passenger front seat is slid forward.
_08I3656.jpg by Addison Rickaby, on Flickr
CARGO DECK / SEAT DELETE:
My thinking here is that I don't need to haul the weight of that extra seat around and the space could be better utilized for my regular camping gear. I removed the seat back by unbolting it and you actually have to cut along a single seam of fabric to actually get it to release, which I thought was strange but it is still reversible should i ever need to put the seat back in. the crgo extension mounts to the rear cargo area exactly like the sleeping extension but instead of just using a leg that reached to the floor, I fabricated a bracket to bolt into the factory seat bottom location as shown.
_08I3651.jpg by Addison Rickaby, on Flickr
I'm still figuring out the best optimization of this space but a couple configurations below.
_08I3663.jpg by Addison Rickaby, on Flickr
_08I3658.jpg by Addison Rickaby, on Flickr
This shot is to show the access when you roll down the rear window. Once I rig my Sceptor water jug up to be air pressurized, this would be great to reach in and fill up your water bottle while your on the trail, without having to remove anything.
_08I3660.jpg by Addison Rickaby, on Flickr
Finally, a shot showing where I mounted my PUMA PD1006 compressor. This compressor is widely used in the 80-Series LC community. I can't believe no one has caught wind of it here yet. It was $260 USD and is as quick as my old ARB twin with a built in tank and 100% duty cycle. It's even super quiet, the only downside I've seen so far is its size. But the tank can be split and re-located if you so choose. I'm absolutely loving this thing so far!
_08I3665.jpg by Addison Rickaby, on Flickr
I've actually slept in the truck now for 13 nights so my writing is with a decent amount of actual usage. A coupe finished touches to come as I install a latch for the lower cargo storage area and get stronger lift struts as the ones I have now are too weak to hold the lid up once my sleeping bag and Thermarest are installed ontop. I still may install a real drawer under the fridge but that is TBD.
Hope this helps as you plan your own storage solutions!
Last edited:


