Whtrnr
New member
After much pondering and wandering, (around hardware stores) I decided to make cross beams since the originals were missing from my 2000 4Runner. I wanted to go inexpensive as possible.
And, I wanted something a different than original. After seeing many great ideas on this site I decided on the following;
Items used:
10' Superstrut 1 5/8" x 7/8" - $17.34
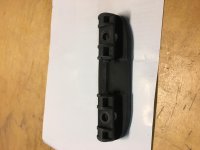
2' Superstrut 1 5/8" x 1 5/8" - $7.94
4 - 3/8" galvanized bolts 1 1/2" long - $2.40
4 - 3/8" galvanized nuts - $0.88
4 - 3/8" galvanized washers - $0.88
4 - 1/2" nylon spacers - $2.60
Flat black spray paint - $5.97
Locktite - $6.47
Total = $44.48 plus tax
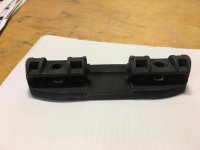
Using a hacksaw (no sawsall) I cut the 2' foot section of strut into four 4" pieces, drilled 2 - 3/16" holes into the sides to mount them to the rail. I also drilled 1 - 3/8" hole into the opposite side of each section to mount the cross beam to each piece.
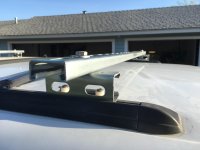
I mounted the 4" sections to the rails using the 2 stainless bolts and the square nuts in the rails that held the original bracket to the rails. Since the bolts were too long I used the nylon spacers to take up difference. Prior to mounting these 4" pieces I pinched them in a vice so the cross beams would lay flat across them. (The angle of the roof causes an upward angle otherwise)
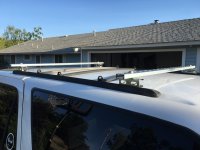
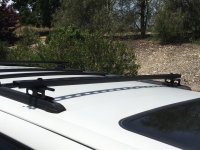
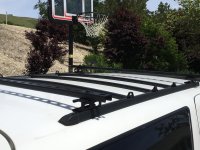
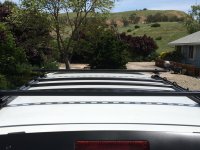
I then cut the 10' piece into 44" sections and mounted them to the 4" pieces using the galvanized bolt, washer and nut.
I still need to disassemble it, sand it down, paint it black and reassemble with Locktite.
I will probably use a shorter bolt and do away with the nylon spacer.
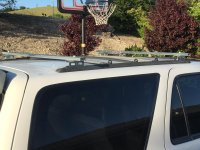
Here is what it looks like so far
And, I wanted something a different than original. After seeing many great ideas on this site I decided on the following;
Items used:
10' Superstrut 1 5/8" x 7/8" - $17.34
2' Superstrut 1 5/8" x 1 5/8" - $7.94
4 - 3/8" galvanized bolts 1 1/2" long - $2.40
4 - 3/8" galvanized nuts - $0.88
4 - 3/8" galvanized washers - $0.88
4 - 1/2" nylon spacers - $2.60
Flat black spray paint - $5.97
Locktite - $6.47
Total = $44.48 plus tax
Using a hacksaw (no sawsall) I cut the 2' foot section of strut into four 4" pieces, drilled 2 - 3/16" holes into the sides to mount them to the rail. I also drilled 1 - 3/8" hole into the opposite side of each section to mount the cross beam to each piece.
I mounted the 4" sections to the rails using the 2 stainless bolts and the square nuts in the rails that held the original bracket to the rails. Since the bolts were too long I used the nylon spacers to take up difference. Prior to mounting these 4" pieces I pinched them in a vice so the cross beams would lay flat across them. (The angle of the roof causes an upward angle otherwise)
I then cut the 10' piece into 44" sections and mounted them to the 4" pieces using the galvanized bolt, washer and nut.
I still need to disassemble it, sand it down, paint it black and reassemble with Locktite.
I will probably use a shorter bolt and do away with the nylon spacer.
Here is what it looks like so far