Satoshi Mod on 4th Gen?

43242code1

New member
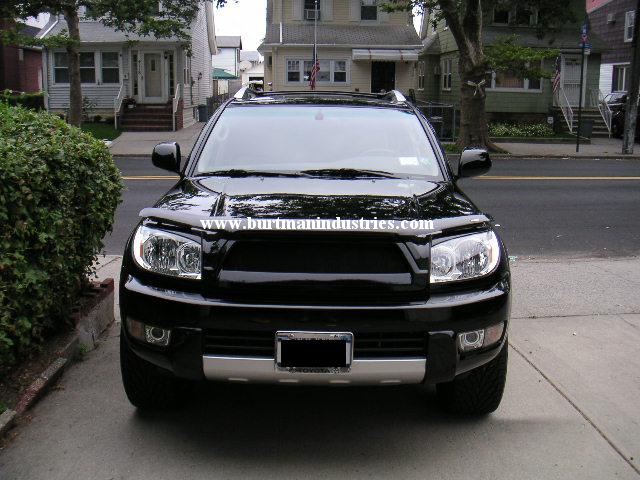
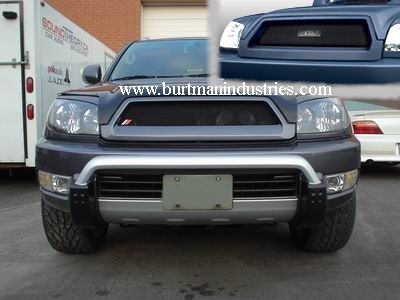
4th Gen Satoshi Mod/Mesh Grill

I have done a search for any pics or write ups of a satoshi mod on a 4th gen but have not come up with anything.

Has anybody done or seen a satoshi mod on a 4th gen?
The bottom bar of the stock grill looks like it would cause some problems.

I have seen several X-Runners with recessed grills and they look amazing.
www.xr-underground.com


DIY Mesh Grill is complete but ready for minor tweaking :)

Comments, suggestions, questions, etc. encouraged and welcomed!

-J
 
Last edited:
Register to hide this ad
I have been thinking about this mod non stop and I think what I will do is create a new grill from scratch in this manner:
1 put plastic over the stock grill
2 put spray and foam over the plastic
3 remove the stock grill

now I have a form of the stock grill

4 fill the new tray with fiberglass, let dry
5 remove the new fiberglass grill
6 bond where needed
7 remove horizontal bars from stock grill
8 bondo/ fiberglass more
9 let dry
10 paint

this is the first time I will be working with any if these materials, have I overlooked anything obvious? Any tips from experienced users?

Thanks for any tips, advise or pics!
 
I have been thinking about this mod non stop and I think what I will do is create a new grill from scratch in this manner:
1 put plastic over the stock grill
2 put spray and foam over the plastic
3 remove the stock grill

now I have a form of the stock grill

4 fill the new tray with fiberglass, let dry
5 remove the new fiberglass grill
6 bond where needed
7 remove horizontal bars from stock grill
8 bondo/ fiberglass more
9 let dry
10 paint

this is the first time I will be working with any if these materials, have I overlooked anything obvious? Any tips from experienced users?

Thanks for any tips, advise or pics!
Good writeup #1
Good writeup #2

FWIW, the '03-'05 grill is going to be a little harder to work on as it is a lower profile design. The '06+ have a thicker grill surround that will be easier to work on, especially for a novice. I have actually been looking ito it as well but haven't come up with a surefire way to make my '05s grill look as good as the Tacoma's in the link above.

Also, I have seen a custom one on the 120 forum and here is a link for a replacement grill that is about $600 too rich for my blood.
4run_aura_03_up.jpg

4run_aur_gril_03_up.jpg


They can be had here as well.
 
i started this on my 08 4Runner grill right after i picked up the color matched. After this test fit, i decided not to continue. bronchogg is right, pretty easy for us 06+ folks.

IMG_0176.jpg~original
 
Good writeup #1
Good writeup #2

FWIW, the '03-'05 grill is going to be a little harder to work on as it is a lower profile design. The '06+ have a thicker grill surround that will be easier to work on, especially for a novice. I have actually been looking ito it as well but haven't come up with a surefire way to make my '05s grill look as good as the Tacoma's in the link above.

Also, I have seen a custom one on the 120 forum and here is a link for a replacement grill that is about $600 too rich for my blood.
4run_aura_03_up.jpg

4run_aur_gril_03_up.jpg


They can be had here as well.


looks nice on the black runner....
 
In my research I came across that grill. I think flipjin has one, and i followed the links from one of his posts.

I agree, this is about 600$ more than i am willing to pay.

So lets say i basically create a custom fiberglass/bondo grill from scratch...couldn't i just reinforce it with a steel frame on the inside?

When i start this build I will document the steps and contribute something to the forum :)
 
In my research I came across that grill. I think flipjin has one, and i followed the links from one of his posts.

I agree, this is about 600$ more than i am willing to pay.

So lets say i basically create a custom fiberglass/bondo grill from scratch...couldn't i just reinforce it with a steel frame on the inside?

When i start this build I will document the steps and contribute something to the forum :)

please keep us posted
 
I have been mulling the whole process over in my head and this will be less of a traditional satoshi mod and more of a recessed grill mod.

i'm going to pick up the supplies this weekend and start planning it all out.

measure twice and cut once right?
 
I will be doing this same grille mod shortly. I ordered a color match limited grille and when it comes in im going to mod my chrome grille first. If its a success I will mod the color matched. Im figuring the second time around will be a cake walk! Good luck and keep us posted with lots of pics!! I'll do the same.
 
Have you had any luck with grille material? I installed my color match grille today, and im going to get started on my mod this weekend. Still trying to find the right looking mesh! Any suggestions?
 
I bought some fiberglass and resin on Sunday but i caught something so I haven't made any other progress. I think my first step is going to be to fill the gap behind the chrome bars because I believe they are concaved.
 
Here are progress pics of the grill I ended up creating for my 2005 t4r.
I could not have done this project without the help of my father, whose hands you will see in some of the photos :)

Tools Needed:
10mm deep socket
philips head screw driver
tin snips
needle nose pliers
hammer
your choice of paint
masking tape
drop cloth/news paper

suggested:
vise
grinder
safety glasses
gloves


Step One:

Pick out an appropriate material. I bought an 8'x4' sheet of perforated galvanized metal for under $8 at Home Depot. In retrospect the metal is a little thin but perhaps many many other layers of paint will resolve this.

<table style="width:auto;"><tr><td><a href="http://picasaweb.google.com/lh/photo/J2AgNXPTuOiuJOqXVbiZig?feat=embedwebsite"><img src="http://lh4.ggpht.com/_t2ONXRtwPnk/SsDEKATnnvI/AAAAAAAAAIo/nrt6rp4PD7Q/s400/IMG_0109.JPG" /></a></td></tr><tr><td style="font-family:arial,sans-serif; font-size:11px; text-align:right">From <a href="http://picasaweb.google.com/jovienj/2009?feat=embedwebsite">2009</a></td></tr></table>

<table style="width:auto;"><tr><td><a href="http://picasaweb.google.com/lh/photo/o9sAfSPNR2KxTywkKOGdWA?feat=embedwebsite"><img src="http://lh6.ggpht.com/_t2ONXRtwPnk/SsDEK30O_4I/AAAAAAAAAIs/fZGLflNIG3s/s400/IMG_0110.JPG" /></a></td></tr><tr><td style="font-family:arial,sans-serif; font-size:11px; text-align:right">From <a href="http://picasaweb.google.com/jovienj/2009?feat=embedwebsite">2009</a></td></tr></table>


Step Two:

Create a paper template/stencil to guide the cuts. Something to remember is that the grill had a slight curve, and if you use the brackets from the stock grill you should compensate for that curve, although I did not encounter any issues specific to this. I would highly suggest being generous with your cuts. You can trim as much as you want later.

<table style="width:auto;"><tr><td><a href="http://picasaweb.google.com/lh/photo/X-M7PPhuq8osziu9u9sFNw?feat=embedwebsite"><img src="http://lh3.ggpht.com/_t2ONXRtwPnk/SsDEI4d_gkI/AAAAAAAAAIg/z7ykVngGjTA/s400/IMG_0105.JPG" /></a></td></tr><tr><td style="font-family:arial,sans-serif; font-size:11px; text-align:right">From <a href="http://picasaweb.google.com/jovienj/2009?feat=embedwebsite">2009</a></td></tr></table>

<table style="width:auto;"><tr><td><a href="http://picasaweb.google.com/lh/photo/VZ1eq8gLR6nQiUsxEtGgoA?feat=embedwebsite"><img src="http://lh4.ggpht.com/_t2ONXRtwPnk/SsDEOORXqsI/AAAAAAAAAJE/_cqdd_WMoNk/s400/IMG_0124.JPG" /></a></td></tr><tr><td style="font-family:arial,sans-serif; font-size:11px; text-align:right">From <a href="http://picasaweb.google.com/jovienj/2009?feat=embedwebsite">2009</a></td></tr></table>

Step Three:

Size your cut out against the the gap in your hood. You may notice rubbing in some areas, which you would want to trim away. Please be aware of the "grain" in the perforated metal. My grill has a slight angle but it doesn't bother me too much.

<table style="width:auto;"><tr><td><a href="http://picasaweb.google.com/lh/photo/N2866BlqfKBqWbpXrPqnnQ?feat=embedwebsite"><img src="http://lh5.ggpht.com/_t2ONXRtwPnk/SsDERhPynSI/AAAAAAAAAJY/FlxNrj9a9Lc/s400/IMG_0129.JPG" /></a></td></tr><tr><td style="font-family:arial,sans-serif; font-size:11px; text-align:right">From <a href="http://picasaweb.google.com/jovienj/2009?feat=embedwebsite">2009</a></td></tr></table>


This is all I can do for now. I will update after work.
 
Last edited:
Here are progress pics of the grill I ended up creating for my 2005 t4r.
I could not have done this project without the help of my father, whose hands you will see in some of the photos :)

Step One:

Pick out an appropriate material. I bought an 8'x4' sheet of perforated galvanized metal for under $8. In retrospect the metal is a little thin but perhaps many many other layers of paint will resolve this.

<table style="width:auto;"><tr><td><a href="http://picasaweb.google.com/lh/photo/J2AgNXPTuOiuJOqXVbiZig?feat=embedwebsite"><img src="http://lh4.ggpht.com/_t2ONXRtwPnk/SsDEKATnnvI/AAAAAAAAAIo/nrt6rp4PD7Q/s400/IMG_0109.JPG" /></a></td></tr><tr><td style="font-family:arial,sans-serif; font-size:11px; text-align:right">From <a href="http://picasaweb.google.com/jovienj/2009?feat=embedwebsite">2009</a></td></tr></table>

<table style="width:auto;"><tr><td><a href="http://picasaweb.google.com/lh/photo/o9sAfSPNR2KxTywkKOGdWA?feat=embedwebsite"><img src="http://lh6.ggpht.com/_t2ONXRtwPnk/SsDEK30O_4I/AAAAAAAAAIs/fZGLflNIG3s/s400/IMG_0110.JPG" /></a></td></tr><tr><td style="font-family:arial,sans-serif; font-size:11px; text-align:right">From <a href="http://picasaweb.google.com/jovienj/2009?feat=embedwebsite">2009</a></td></tr></table>


Step Two:

Create a paper template/stencil to guide the cuts. Something to remember is that the grill had a slight curve, and if you use the brackets from the stock grill you should compensate for that curve, although I did not encounter any issues specific to this. I would highly suggest being generous with your cuts. You can trim as much as you want later.

<table style="width:auto;"><tr><td><a href="http://picasaweb.google.com/lh/photo/X-M7PPhuq8osziu9u9sFNw?feat=embedwebsite"><img src="http://lh3.ggpht.com/_t2ONXRtwPnk/SsDEI4d_gkI/AAAAAAAAAIg/z7ykVngGjTA/s400/IMG_0105.JPG" /></a></td></tr><tr><td style="font-family:arial,sans-serif; font-size:11px; text-align:right">From <a href="http://picasaweb.google.com/jovienj/2009?feat=embedwebsite">2009</a></td></tr></table>

<table style="width:auto;"><tr><td><a href="http://picasaweb.google.com/lh/photo/VZ1eq8gLR6nQiUsxEtGgoA?feat=embedwebsite"><img src="http://lh4.ggpht.com/_t2ONXRtwPnk/SsDEOORXqsI/AAAAAAAAAJE/_cqdd_WMoNk/s400/IMG_0124.JPG" /></a></td></tr><tr><td style="font-family:arial,sans-serif; font-size:11px; text-align:right">From <a href="http://picasaweb.google.com/jovienj/2009?feat=embedwebsite">2009</a></td></tr></table>

Step Three:

Size your cut out against the the gap in your hood. You may notice rubbing in some areas, which you would want to trim away. Please be aware of the "grain" in the perforated metal. My grill has a slight angle but it doesn't bother me too much.

<table style="width:auto;"><tr><td><a href="http://picasaweb.google.com/lh/photo/N2866BlqfKBqWbpXrPqnnQ?feat=embedwebsite"><img src="http://lh5.ggpht.com/_t2ONXRtwPnk/SsDERhPynSI/AAAAAAAAAJY/FlxNrj9a9Lc/s400/IMG_0129.JPG" /></a></td></tr><tr><td style="font-family:arial,sans-serif; font-size:11px; text-align:right">From <a href="http://picasaweb.google.com/jovienj/2009?feat=embedwebsite">2009</a></td></tr></table>


This is all I can do for now. I will update after work.

looking good, and looks like this is going to be a great write-up :bigok:
 
Step Three (continued):

<table style="width:auto;"><tr><td><a href="http://picasaweb.google.com/lh/photo/rnTY4kbNwEwGIDlhD_YecQ?feat=embedwebsite"><img src="http://lh3.ggpht.com/_t2ONXRtwPnk/SsDEWCrSTiI/AAAAAAAAAJ0/Pjwq7y_2CrE/s400/IMG_0136.JPG" /></a></td></tr><tr><td style="font-family:arial,sans-serif; font-size:11px; text-align:right">From <a href="http://picasaweb.google.com/jovienj/2009?feat=embedwebsite">2009</a></td></tr></table>

Attach the bottom frame from the stock grill.
A method we used with the grill was to curl the ends. This kept the sharp edges from being too dangerous not only to skin but to your paint!
We had the benefit of a vise, but we also employed the use of needle nosed pliers to get a really tight curl. The vise worked fantastic for a very straight fold and curl.

<table style="width:auto;"><tr><td><a href="http://picasaweb.google.com/lh/photo/mjdhHOivj0G7iHebVBKdVQ?feat=embedwebsite"><img src="http://lh5.ggpht.com/_t2ONXRtwPnk/SsDETKGIvTI/AAAAAAAAAJg/IbnLi3YnmR4/s400/IMG_0131.JPG" /></a></td></tr><tr><td style="font-family:arial,sans-serif; font-size:11px; text-align:right">From <a href="http://picasaweb.google.com/jovienj/2009?feat=embedwebsite">2009</a></td></tr></table>

<table style="width:auto;"><tr><td><a href="http://picasaweb.google.com/lh/photo/R5DxZPlh5mrUFJ07cYoy2w?feat=embedwebsite"><img src="http://lh6.ggpht.com/_t2ONXRtwPnk/SsDEUkKbihI/AAAAAAAAAJo/IHpUi7ghShY/s400/IMG_0133.JPG" /></a></td></tr><tr><td style="font-family:arial,sans-serif; font-size:11px; text-align:right">From <a href="http://picasaweb.google.com/jovienj/2009?feat=embedwebsite">2009</a></td></tr></table>


At this point you should have accomplished the following;
1. removed stock grill
2. made a template of the opening where stock grill used to be
3. transfered template shape to perforated metal
4. cut your new grill out of perforated metal
5 (optional but suggested). fold and curled the flaps that touch the light housings, and the bottom of the new grill.

Step Four:
Prepare the hood for the new grill.

Place your new grill where it will be mounted. Mark where you will have to tin-snip or drill holes for your mounting screws. We opted to <b>not</b> use the mounting holes on the top corners because they were recessed too much. I felt they would create a really distracting hump if used, IMO.


Mask the following:
Hood (above and below!), Fenders, Bumper, Engine Bay.

<table style="width:auto;"><tr><td><a href="http://picasaweb.google.com/lh/photo/uN2dC2G-J-6R38C0rbgxLw?feat=embedwebsite"><img src="http://lh4.ggpht.com/_t2ONXRtwPnk/SsDEWtrhP1I/AAAAAAAAAJ4/g8o4UPX69oA/s400/IMG_0137.JPG" /></a></td></tr><tr><td style="font-family:arial,sans-serif; font-size:11px; text-align:right">From <a href="http://picasaweb.google.com/jovienj/2009?feat=embedwebsite">2009</a></td></tr></table>

<table style="width:auto;"><tr><td><a href="http://picasaweb.google.com/lh/photo/WgGhH7_wNTnuT-I58zpbNQ?feat=embedwebsite"><img src="http://lh4.ggpht.com/_t2ONXRtwPnk/SsDEXLrjmNI/AAAAAAAAAKA/gMEOcfLquek/s400/IMG_0138.JPG" /></a></td></tr><tr><td style="font-family:arial,sans-serif; font-size:11px; text-align:right">From <a href="http://picasaweb.google.com/jovienj/2009?feat=embedwebsite">2009</a></td></tr></table>

The stock grill is mounted to a lip beneath the hood.
Because the perforated metal is fairly transparent, we painted the lip the same semi-gloss black that the new grill is painted.

Remove the bottom frame from the stock grill. Paint this frame with the same paint as the lip of the hood and the new grill.

Paint your new grill. This is pretty straight forward. If you made it this far with the mod I trust that you can spray paint without a visual :P
Just remember that there are flat surfaces from nearly every angle. I spray painted and re-spray painted about 6 different times. Spray from above, below, left, right, straight ahead and most importantly from behind!


I will continue with the final steps after i watch tonight's Heroes episode :flipoff:

 
Step Five:

Paint all bolt heads that you will be using.
Paint all washers that you will be using.


Step Six:

Re-attach the bottom frame grill.
Test fit the painted grill.
If it all fits to your liking bolt the new grill in!


Step Seven:

Re-attach the hood latch release lever.
Remove all the masking.

Step Eight:

Take tons of pics and post on t4r.org, then go joy riding. :cheers:

link to my picasa web album of this project:

<table style="width:194px;"><tr><td align="center" style="height:194px;background:url(http://picasaweb.google.com/s/c/transparent_album_background.gif) no-repeat left"><a href="http://picasaweb.google.com/jovienj/2009?feat=embedwebsite"><img src="http://lh3.ggpht.com/_t2ONXRtwPnk/SY1HKQpF3ZE/AAAAAAAAAKI/oacDw4qyQao/s160-c/2009.jpg" width="160" height="160" style="margin:1px 0 0 4px;"></a></td></tr><tr><td style="text-align:center;font-family:arial,sans-serif;font-size:11px"><a href="http://picasaweb.google.com/jovienj/2009?feat=embedwebsite" style="color:#4D4D4D;font-weight:bold;text-decoration:none;">2009</a></td></tr></table>

Things I would have done differently;
Selected a spot in the perforated metal where the "grain" ran straight up and down.
Thicker layers of paint, or other type of paint, before I had mounted it.
Manufactured a thin strip of metal to mount between the new grill and bottom frame.


Please feel free to contact me if you have questions, concerns, or need close ups or specifics.

-J
 
Any pictures of finished product by chance? I will be doing this mod later on but after looking at the existing grill close-up I think about different approach. I will purchase new grill, cut out two middle sections and retain bottom portion since it holds hood latch lever and I dont want to mess with it. Then I use fiberglass & bondo to make grill look de-pressed about 1-1.5" or as much as I could and then wrapped in black painted mesh.
By the way, where you buy that mesh? I checked in Home Depot and Totem and didnt see anything like that.
 
I found the perforated metal in the roofing supplies, in their building materials part of the store.

Here are some pics of the finished product;

<table style="width:auto;"><tr><td><a href="http://picasaweb.google.com/lh/photo/ERt0cyeMRYmMxATWENZfXQ?feat=embedwebsite"><img src="http://lh5.ggpht.com/_t2ONXRtwPnk/SsKq0JaSItI/AAAAAAAAAL4/i5qGzs14dSU/s400/DSC_3038.JPG" /></a></td></tr><tr><td style="font-family:arial,sans-serif; font-size:11px; text-align:right">From <a href="http://picasaweb.google.com/jovienj/2009?feat=embedwebsite">2009</a></td></tr></table>

<table style="width:auto;"><tr><td><a href="http://picasaweb.google.com/lh/photo/clAuIMFnveSw71y6sCeJRg?feat=embedwebsite"><img src="http://lh5.ggpht.com/_t2ONXRtwPnk/SsKq-Qxdv9I/AAAAAAAAAME/FpW8y_ynLhM/s400/DSC_3044.JPG" /></a></td></tr><tr><td style="font-family:arial,sans-serif; font-size:11px; text-align:right">From <a href="http://picasaweb.google.com/jovienj/2009?feat=embedwebsite">2009</a></td></tr></table>

The way we created this mesh grill we were able to use the stock hood latch. It it bolted to the bottom frame used with the stock grill.

Here are close ups of how we re-attached it;

<table style="width:auto;"><tr><td><a href="http://picasaweb.google.com/lh/photo/1EPLtkxuPkgfvsphX9uXsQ?feat=embedwebsite"><img src="http://lh3.ggpht.com/_t2ONXRtwPnk/SsKq3PZMY1I/AAAAAAAAAL8/xuuCeV6R5Sc/s400/DSC_3040.JPG" /></a></td></tr><tr><td style="font-family:arial,sans-serif; font-size:11px; text-align:right">From <a href="http://picasaweb.google.com/jovienj/2009?feat=embedwebsite">2009</a></td></tr></table>

<table style="width:auto;"><tr><td><a href="http://picasaweb.google.com/lh/photo/s7EiHh3iGot58hk7dxFFFg?feat=embedwebsite"><img src="http://lh3.ggpht.com/_t2ONXRtwPnk/SsKq5QwXXgI/AAAAAAAAAMA/79ZAt18Kk2Q/s400/DSC_3041.JPG" /></a></td></tr><tr><td style="font-family:arial,sans-serif; font-size:11px; text-align:right">From <a href="http://picasaweb.google.com/jovienj/2009?feat=embedwebsite">2009</a></td></tr></table>

<table style="width:auto;"><tr><td><a href="http://picasaweb.google.com/lh/photo/JFeXv4Bjqs0F0fd2uZZjOA?feat=embedwebsite"><img src="http://lh4.ggpht.com/_t2ONXRtwPnk/SsKrC7FWOsI/AAAAAAAAAMI/uQUdVIocFs4/s400/DSC_3042.JPG" /></a></td></tr><tr><td style="font-family:arial,sans-serif; font-size:11px; text-align:right">From <a href="http://picasaweb.google.com/jovienj/2009?feat=embedwebsite">2009</a></td></tr></table>

I hope this helps!
 
thanks for heads up on material. I'm trying to find something local, I'm in Canada and shipping and customs will kill pretty much any deal. I found some diamond shape mesh which used for welding truck toolboxes etc, but I'm affraid it might be too thick for this project. How is ridgity on yours by the way? This will be my winter project and I'm planning to butcher brand new OE grill to make a new Satoshi one :biggrin2:
 

Members online

Forum statistics

Threads
278,307
Messages
3,554,050
Members
248,016
Latest member
Advally Service

Trending content

Back
Top