
You are using an out of date browser. It may not display this or other websites correctly.
You should upgrade or use an alternative browser.
You should upgrade or use an alternative browser.
Sirius satellite install
- Thread starter Ash
- Start date

Register to hide this ad

RevoRunner
New member
If I'm understanding you... then yes, you'll need to install an antenna. I have a sporster 5 installed (used to be a 4) and I ran my antenna from the back (close to the spoiler) through the headliner and down the column to the dash area. Make sure you get the best antenna you can buy because you don't want to have to replace it.
mounting the Sirius Sportster
I have an '03 4 Runner and mounted my Sirius Sportster myself...without damaging my dashboard.
Let me tell you how I did it:
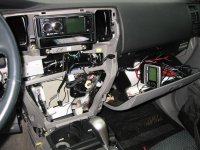
I found that the entire center instrument panel cover (from your radio down to the air control buttons) can be removed by unscrewing a single screw....and it will *pop* right out. I purchased seperately (from Best Buy) a thin metal mounting bracket is essentially a 90 degree elbow. That bracket allowed me to drill into my center console near the seam of where the center panel covering meets with the passenger side dash, install the bracket, replace the center panel covering and attach my Sportster to the bracket.
My Sportster now hangs in front of my HAZARD lights button on the right side of my center instrument panel.
No visible holes in my dashboard and easily removed if I choose to upgrade to a newer 4 Runner.
BTW - with the center instrument panel removed, you can run the wiring behind the center instrument panel to keep them hidden.
REMOVING CENTER INSTRUMENT PANEL COVERING
On your center instrument panel, there will be the lower storage bin, open that up. There will be a single screw (if memory serves me correct, it is in the upper right hand corner).
Take that screw out.
The center panel covering can now be removed in one piece, just simply work a dull bladed screw driver along the edges of the covering until you can get your fingers under it to pop it out.
Hope that helps!
I have an '03 4 Runner and mounted my Sirius Sportster myself...without damaging my dashboard.
Let me tell you how I did it:
I found that the entire center instrument panel cover (from your radio down to the air control buttons) can be removed by unscrewing a single screw....and it will *pop* right out. I purchased seperately (from Best Buy) a thin metal mounting bracket is essentially a 90 degree elbow. That bracket allowed me to drill into my center console near the seam of where the center panel covering meets with the passenger side dash, install the bracket, replace the center panel covering and attach my Sportster to the bracket.
My Sportster now hangs in front of my HAZARD lights button on the right side of my center instrument panel.
No visible holes in my dashboard and easily removed if I choose to upgrade to a newer 4 Runner.
BTW - with the center instrument panel removed, you can run the wiring behind the center instrument panel to keep them hidden.
REMOVING CENTER INSTRUMENT PANEL COVERING
On your center instrument panel, there will be the lower storage bin, open that up. There will be a single screw (if memory serves me correct, it is in the upper right hand corner).
Take that screw out.
The center panel covering can now be removed in one piece, just simply work a dull bladed screw driver along the edges of the covering until you can get your fingers under it to pop it out.
Hope that helps!
RevoRunner
New member
If you could get some pictures of that... that would be great. I'd like to see the setup.
E
Even Steven
Guest
Yes, you can get creative. Another option is the way I mounted my Parrot Bluetooth display. Since I have a Sport Edition with cloth seats, I have two switch blanks on the center console where the seat heater switches would normally be located. I popped out the switch blanks and mounted an angled bracket through the hole to mount the Parrot display. I was able to mount it without damaging the console or cutting any holes into hit, and I was also able to angle is up toward the driver and passenger for easier viewing. It's also right at my fingertips when I have my right arm on the arm rest, which makes it really convenient.

Jeffrey_VB
New member
Even Steven said:Yes, you can get creative. Another option is the way I mounted my Parrot Bluetooth display. Since I have a Sport Edition with cloth seats, I have two switch blanks on the center console where the seat heater switches would normally be located. I popped out the switch blanks and mounted an angled bracket through the hole to mount the Parrot display. I was able to mount it without damaging the console or cutting any holes into hit, and I was also able to angle is up toward the driver and passenger for easier viewing. It's also right at my fingertips when I have my right arm on the arm rest, which makes it really convenient.
That's pretty slick. I may have to try that. I just got my Sportster in the mail today. Where did you get the bracket? Can you post some pics of that install?
found online
I do not have pics of my install, but a brief google search brought up a pretty detailed install, pics are lacking though.
You can check out: http://www.metraonline.com/downloads/pdf/TurboKits/INST99-8210.pdf
Just complete Step # 7 and the center instument panel pops out - the pics that correspond are E through H.
Or for color step by step details on how to remove the center instrument panel: http://www.castulucci.com/projects/carpc/oemnaviaccess/
GOTO STEP # 4, the second picture is where to start.
Beginning with the second picture in STEP 4 and the statement below it reading:
"Next, you'll need to remove the little plastic center console storage cubby. Just pop it open and lift it up gently. It should come out pretty easily."
The flat metal bracket I purchased at BEST BUY ( www.BESTBUY.com ), but I do not see the bracket on their website. It was available in the store though, in the satellite radio section.
I will take some pics at lunch and post what my finished install looks like.
I do not have pics of my install, but a brief google search brought up a pretty detailed install, pics are lacking though.
You can check out: http://www.metraonline.com/downloads/pdf/TurboKits/INST99-8210.pdf
Just complete Step # 7 and the center instument panel pops out - the pics that correspond are E through H.
Or for color step by step details on how to remove the center instrument panel: http://www.castulucci.com/projects/carpc/oemnaviaccess/
GOTO STEP # 4, the second picture is where to start.
Beginning with the second picture in STEP 4 and the statement below it reading:
"Next, you'll need to remove the little plastic center console storage cubby. Just pop it open and lift it up gently. It should come out pretty easily."
The flat metal bracket I purchased at BEST BUY ( www.BESTBUY.com ), but I do not see the bracket on their website. It was available in the store though, in the satellite radio section.
I will take some pics at lunch and post what my finished install looks like.
Check out http://www.proclipusa.com
They make fantastic mounts for all vehicles (including the 4runner). Although I don't see a device mount specific for the sportster, I'm sure you'll be able to put something together with their products.
They make fantastic mounts for all vehicles (including the 4runner). Although I don't see a device mount specific for the sportster, I'm sure you'll be able to put something together with their products.
Jeffrey_VB
New member
statman24 said:Check out http://www.proclipusa.com
They make fantastic mounts for all vehicles (including the 4runner). Although I don't see a device mount specific for the sportster, I'm sure you'll be able to put something together with their products.
Funny you should mention them, I was just on their site. Found them thru Google.

atomic punk
New member
Jeffrey_VB
New member
RevoRunner said:If I'm understanding you... then yes, you'll need to install an antenna. I have a sporster 5 installed (used to be a 4) and I ran my antenna from the back (close to the spoiler) through the headliner and down the column to the dash area. Make sure you get the best antenna you can buy because you don't want to have to replace it.
Revo-- I'm currently trying to do the same thing with my antenna. Is the "headliner" you speak of the foam/carpet/molded ceiling that you can pop away? I was able to get the back two things to pop off and see into it (as in, see in between the molding and the actual metal ceiling, where you can see the rear light wiring taped to the topside, etc.) but then I had trouble getting it to pop off of the side... do you have to remove the plastic paneling on the left first in order to access the molding all the way to the front? Otherwise you'd really have to force it and I don't wanna rip it...
Also-- does anybody know what size damn screws those are? I'm guessing metric, but none of my 3/8" rachet set match it. It's somewhere between 3/8" and 7/16", I'm guessing 10 or 11 mm. (Of course home depot doesn't carry them individually, or the metric sized ratchets for a 3/8" wrench, so off to Sears I go, which is irritating)
If there's an easier way to do it, let me know-- as far as I can tell I'll have to remove the plastic by removing the screws from behind the handles above the door in the back seats, as well as the handle holes above the driver's door, and then I can just run it all the way from the back...
I'm going to try to mount it right in front of the dash and squeeze it down through the rubber hole that attaches to the rear door light.
Thanks!
ps: i apologize if this is listed elsewhere in the forums. i'm off to a belated valentines dinner [ugh] and need to shower, and just spent 30 minutes at homedepot trying to find a damn ratchet that matches
RevoRunner
New member
From memory... I'm pretty sure I ran it from the back down into the grommet that connects the wiring for the rear hatch/window. That brings it into the headliner. I'm pretty sure I ran it over to the plastic pieces on the passenger side and just ran it along the "top of the windows" until I came down on pillar and then into the bottom of the dash from the passenger side.
atomic punk
New member
Actually, I think there is an easier way.atomic punk said:
I'd go through the right side of the 4runner (not left). Pull the molding off a bit at a time and and tuck it between the headliner and the roof. Put electrical tape on the antenna wire where it enters the headliner.
Continue tucking the wire all the way down past the tail light. Removing the inside taillight access panel and part of the interior plastic will get the wire inside the tailgate area.
Once it's in, simply tuck it underneath the plastic all the way to the front. You might have to unbolt some pieces on the way to the front, but I did it yesterday and it's fairly easy. Your fingers and a 10mm ratchet is your friend.
When you get to the front, one screw is all you need to remove below the glove box to drop that panel. Run the wire through there and ultimately to your final destination.

majewski
New member
follow the gas door release cable...sort of
Sorry no pictures, I kind of made this one up as I went along, but basically you can follow the cable release for the gas filler door most of the way.
To get the antenna inside, make a very tiny slit in the rubber boot that the hatch wiring goes through. Gently stretch the hole open to slide the antenna jack through, and pull the rest of the wire. With just the tiny slit, the boot will close up nice and waterproof around the wire. Then remove the rubber trim that seals the inside liner to the body panel and run the antenna around to the left side where the jack is...and the gas filler door cable.
Once inside, open up the little hatch that hides the jack. Go to the left rear door, pull back the rubber gasket that seals the interior panels to the sheet metal, and slide a fishtape back to the jack area and pull the wire to that point. Once you get to the rear doorway, keep running it down to the door sill behind the inside panel. Then remove the two hard plastic threshold pieces in both the front and rear doors. You will see there channel with retainers where other rear wiring goes along with the gas door cable. Run the cable there and just up to the front seat.
At that point I noticed the stock antenna really could use another 5 feet in length, but this seemed to be the shortest accessible route. So I removed the two sections of the center console (they both just pull out with a gentle yank). There is one screw on the side that will loosen up the frame for the console so you can run the fishtape under the carpet to the threshold. Pull the antenna through to that point, and you should have enough to mount just about anywhere around the center console area.
Two things -- be gentle with the antenna and the jack if you use the fishtape. You definitely don't want to have to go buy a new one at this point. And also there are instructions posted somewhere on the net that will show you how to get to the radio to do a direct wiring or one of those modulators.
I bought a Peripheral brand interface for direct wiring at about $110. Theirs comes with several harnesses so you know you will have the right one for your vehicle. Set the dip switches for your application and plug the Y-harness in between the radio and amp. There is plenty of room in the radio cavity to fasten the brain with double side tape, and reinstall the radio. The Peripheral allows for either an 1/8 stereo jack or 2 RCA jacks for input. I ran the 1/8 line beside the AC controls down to the console, and then you can do what you want from there.
By the way, Arkon makes a great flexible goosneck mount that just attaches to the seat bolt mount on the floor, if you are someone that doesn't want to drill or mess up the dash.
Good luck, sorry for the long post.
Sorry no pictures, I kind of made this one up as I went along, but basically you can follow the cable release for the gas filler door most of the way.
To get the antenna inside, make a very tiny slit in the rubber boot that the hatch wiring goes through. Gently stretch the hole open to slide the antenna jack through, and pull the rest of the wire. With just the tiny slit, the boot will close up nice and waterproof around the wire. Then remove the rubber trim that seals the inside liner to the body panel and run the antenna around to the left side where the jack is...and the gas filler door cable.
Once inside, open up the little hatch that hides the jack. Go to the left rear door, pull back the rubber gasket that seals the interior panels to the sheet metal, and slide a fishtape back to the jack area and pull the wire to that point. Once you get to the rear doorway, keep running it down to the door sill behind the inside panel. Then remove the two hard plastic threshold pieces in both the front and rear doors. You will see there channel with retainers where other rear wiring goes along with the gas door cable. Run the cable there and just up to the front seat.
At that point I noticed the stock antenna really could use another 5 feet in length, but this seemed to be the shortest accessible route. So I removed the two sections of the center console (they both just pull out with a gentle yank). There is one screw on the side that will loosen up the frame for the console so you can run the fishtape under the carpet to the threshold. Pull the antenna through to that point, and you should have enough to mount just about anywhere around the center console area.
Two things -- be gentle with the antenna and the jack if you use the fishtape. You definitely don't want to have to go buy a new one at this point. And also there are instructions posted somewhere on the net that will show you how to get to the radio to do a direct wiring or one of those modulators.
I bought a Peripheral brand interface for direct wiring at about $110. Theirs comes with several harnesses so you know you will have the right one for your vehicle. Set the dip switches for your application and plug the Y-harness in between the radio and amp. There is plenty of room in the radio cavity to fasten the brain with double side tape, and reinstall the radio. The Peripheral allows for either an 1/8 stereo jack or 2 RCA jacks for input. I ran the 1/8 line beside the AC controls down to the console, and then you can do what you want from there.
By the way, Arkon makes a great flexible goosneck mount that just attaches to the seat bolt mount on the floor, if you are someone that doesn't want to drill or mess up the dash.
Good luck, sorry for the long post.
majewski
New member
Sirius notes...again
Sorry, forgot a few things:
1) all of the bolts that you remove to get to the radio are 10mm. That was kind of nice - recently did this on a Liberty and it took several sizes of sockets and screwdrivers.
2) If you are going to do the install and take things apart, and you only want to do it once, do the direct wiring method with the Peripheral or USA Spec or other interface module. Anyone that I have talked to that direct wired their Sirius or XM was thrilled. The ones that complain about the sound quality or dynamic range are the ones that limited themselves by the FM route.
3) Go here: http://www.castulucci.com/projects/carpc/oemnaviaccess/ for instruction on how to get to the factory radio. It looks pretty hard, but is really, really easy to remove and replace .I was worried about everything fitting back together right, but it still looks perfect.
Sorry, forgot a few things:
1) all of the bolts that you remove to get to the radio are 10mm. That was kind of nice - recently did this on a Liberty and it took several sizes of sockets and screwdrivers.
2) If you are going to do the install and take things apart, and you only want to do it once, do the direct wiring method with the Peripheral or USA Spec or other interface module. Anyone that I have talked to that direct wired their Sirius or XM was thrilled. The ones that complain about the sound quality or dynamic range are the ones that limited themselves by the FM route.
3) Go here: http://www.castulucci.com/projects/carpc/oemnaviaccess/ for instruction on how to get to the factory radio. It looks pretty hard, but is really, really easy to remove and replace .I was worried about everything fitting back together right, but it still looks perfect.
Re: Sirius notes...again
 Nice job on the instructions.
I've done this twice now and can do it in my sleep!majewski said:3) Go here: http://www.castulucci.com/projects/carpc/oemnaviaccess/ for instruction on how to get to the factory radio. It looks pretty hard, but is really, really easy to remove and replace .I was worried about everything fitting back together right, but it still looks perfect.
Nice job on the instructions.
majewski
New member
Thanks
Thanks,
Figured somebody could benefit from me sitting out in the garage and poking around for a night before I actually did it the next night.
Actually, it would be cool to run the wire directly through the headliner and mount the receiver in the little sunglass cubby. The only problem is that if you drive with it open, it would block the rearview mirror.
It would be a cool thread to see how and where people have mounted their satellite radios and other accessories.
Thanks,
Figured somebody could benefit from me sitting out in the garage and poking around for a night before I actually did it the next night.
Actually, it would be cool to run the wire directly through the headliner and mount the receiver in the little sunglass cubby. The only problem is that if you drive with it open, it would block the rearview mirror.
It would be a cool thread to see how and where people have mounted their satellite radios and other accessories.
Jeffrey_VB
New member
Re: Thanks
Mine will be installed this time tomorrow. I'll get some pics posted ASAP.
majewski said:
It would be a cool thread to see how and where people have mounted their satellite radios and other accessories.
Mine will be installed this time tomorrow. I'll get some pics posted ASAP.
