

DaPersianRug
New member
Background
I wanted a handheld radio but I wasn't committed enough for a permanent mount. I had seen a handful of radio installation tutorials but I'm not a huge fan of making mods to a car without being able to revert back to factory default/make it look like nothing was ever tampered with. Thus, I decided to do a small footprint radio install. I knew a few people ( [MENTION=102185]WODWorldWide[/MENTION] )were interested in a small footprint write-up so boom, here we go:
The Setup
Midland 75-822 40 Channel CB-Way Radio

Amazon.com: Midland 75-822 40 Channel CB-Way Radio: Electronics
Bracketron Mi-T Grip

Suction cup mount, min-max width 2-3.25"
http://www.amazon.com/Bracketron-Mi...90768773&sr=8-1&keywords=bracketron+mi-t+grip
Recommended Tools
1. Trim Removal Tool
I picked up the 2pc version of this this set from Autozone

OEM/4 pcs. plastic scraper (25513) | Molding and Trim Remover Tool | AutoZone.com
2. Clothes Hanger

Routing Procedure
I'll speed through the easy stuff:
The Mount:

Routing Under the Hatch:

Taking it inside. (Use needle nose pliers to seal the grommet after taking the cable in, makes it a lot easier than just trying to smear it back in):

Now that you're inside the cabin, remove the seat belt cover above the right taillight. I just grabbed the sliver opening where the belt comes out of the panel and it popped right out.
Leg 1: Push your cable towards the right taillight but don't worry about trying to be precise with your cable direction- If you feed enough cable the wire will start to circle around itself and push outwards, then you'll be able to stick a coat hanger into the seat belt opening (with cover removed) and retrieve the cable. Name of the game here is just feed cable into the hatchback grommet and pretty soon you'll see it peak out at the seatbelt cover.
Leg 2: After you've pulled all the slack of your cable, pull off the taillight cover with the trim removal tool and just keep feeding it down the panel towards the cargo area, gravity makes this leg of the routing pretty easy.

Leg 3: Once you've gotten your cable to the taillight cover, use that coat hanger to route the cable under the speaker towards the bottom of the seat belt. If you have 3rd row seats like me, now will be a good time to pull the seats up so you can easily grab the cable before Leg 4.

Leg 4: This part is super easy, no need for the coat hanger, just grab the head of the cable from the end of Leg 3, pull all the slack, then walk over to the passenger door. Tuck the cable under the panel as far towards the front of the car as you can, then tug/shimmy the cable so it all disappears under the panel where the arrows are. Once that part disappears, you can tuck the cable under the panels below the 3rd row seats, then tug/shimmy some more to make sure the cable hugs the wall so it doesn't make it's way back out of the crevice.

Leg 5: There are two panel screws hidden under the caps outlined below. The covers have a small notch carved into them so they're easy to pop out with your trim removal tool. Pop those suckers out and use a 10mm socket wrench to remove that step panel. Once the step panel is out, tuck your trim removal tool under the carpet and floor panel that touches the door. Wiggle that around a bit and it'll pop out too. You'll see a bundle of OEM cables already routed through some brackets, just open those routing brackets and add your antenna cable to the collection.

Leg 6: Keep feeding the cable towards the front of the car. The picture below is the front passenger area- you can see my antenna cable on the left of the bundle under the cable brackets. Once you get to the leg area panel it gets super easy because you can actually stick your hand behind the leg panel and pull your cable up towards the glove box.

Leg 7: Remove the accessory cap to the left of the cigarette lighter and feed your antenna cable through it. In the picture below I have the cap pulled, but I'm planning on using a hobby knife to carve a little opening into the cap so you don't have that ugly empty rectangle.

I popped off the far left screw cap to give my radio cable some room to squeeze out of the glove box.

Finished Product:


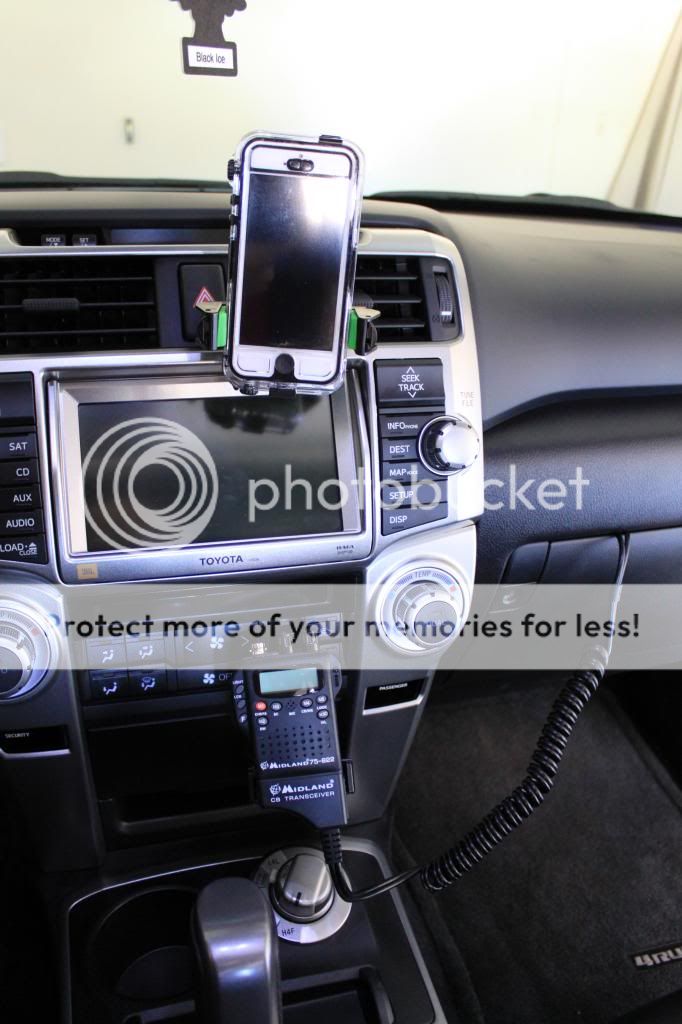
I know I didn't take pictures of each step as I was working through it myself so I do apologize for that. I'm sure there are going to be things I can help clarify so feel free to ask any questions and I'll do my best to get everything squared away for anyone interested.
I wanted a handheld radio but I wasn't committed enough for a permanent mount. I had seen a handful of radio installation tutorials but I'm not a huge fan of making mods to a car without being able to revert back to factory default/make it look like nothing was ever tampered with. Thus, I decided to do a small footprint radio install. I knew a few people ( [MENTION=102185]WODWorldWide[/MENTION] )were interested in a small footprint write-up so boom, here we go:
The Setup
Midland 75-822 40 Channel CB-Way Radio
Amazon.com: Midland 75-822 40 Channel CB-Way Radio: Electronics
Bracketron Mi-T Grip
Suction cup mount, min-max width 2-3.25"
http://www.amazon.com/Bracketron-Mi...90768773&sr=8-1&keywords=bracketron+mi-t+grip
Recommended Tools
1. Trim Removal Tool
I picked up the 2pc version of this this set from Autozone
OEM/4 pcs. plastic scraper (25513) | Molding and Trim Remover Tool | AutoZone.com
2. Clothes Hanger
Routing Procedure
I'll speed through the easy stuff:
The Mount:

Routing Under the Hatch:

Taking it inside. (Use needle nose pliers to seal the grommet after taking the cable in, makes it a lot easier than just trying to smear it back in):

Now that you're inside the cabin, remove the seat belt cover above the right taillight. I just grabbed the sliver opening where the belt comes out of the panel and it popped right out.
Leg 1: Push your cable towards the right taillight but don't worry about trying to be precise with your cable direction- If you feed enough cable the wire will start to circle around itself and push outwards, then you'll be able to stick a coat hanger into the seat belt opening (with cover removed) and retrieve the cable. Name of the game here is just feed cable into the hatchback grommet and pretty soon you'll see it peak out at the seatbelt cover.
Leg 2: After you've pulled all the slack of your cable, pull off the taillight cover with the trim removal tool and just keep feeding it down the panel towards the cargo area, gravity makes this leg of the routing pretty easy.

Leg 3: Once you've gotten your cable to the taillight cover, use that coat hanger to route the cable under the speaker towards the bottom of the seat belt. If you have 3rd row seats like me, now will be a good time to pull the seats up so you can easily grab the cable before Leg 4.

Leg 4: This part is super easy, no need for the coat hanger, just grab the head of the cable from the end of Leg 3, pull all the slack, then walk over to the passenger door. Tuck the cable under the panel as far towards the front of the car as you can, then tug/shimmy the cable so it all disappears under the panel where the arrows are. Once that part disappears, you can tuck the cable under the panels below the 3rd row seats, then tug/shimmy some more to make sure the cable hugs the wall so it doesn't make it's way back out of the crevice.

Leg 5: There are two panel screws hidden under the caps outlined below. The covers have a small notch carved into them so they're easy to pop out with your trim removal tool. Pop those suckers out and use a 10mm socket wrench to remove that step panel. Once the step panel is out, tuck your trim removal tool under the carpet and floor panel that touches the door. Wiggle that around a bit and it'll pop out too. You'll see a bundle of OEM cables already routed through some brackets, just open those routing brackets and add your antenna cable to the collection.

Leg 6: Keep feeding the cable towards the front of the car. The picture below is the front passenger area- you can see my antenna cable on the left of the bundle under the cable brackets. Once you get to the leg area panel it gets super easy because you can actually stick your hand behind the leg panel and pull your cable up towards the glove box.

Leg 7: Remove the accessory cap to the left of the cigarette lighter and feed your antenna cable through it. In the picture below I have the cap pulled, but I'm planning on using a hobby knife to carve a little opening into the cap so you don't have that ugly empty rectangle.

I popped off the far left screw cap to give my radio cable some room to squeeze out of the glove box.

Finished Product:


I know I didn't take pictures of each step as I was working through it myself so I do apologize for that. I'm sure there are going to be things I can help clarify so feel free to ask any questions and I'll do my best to get everything squared away for anyone interested.
Last edited:


