STLDAVE's build thread

STLDAVE

Member
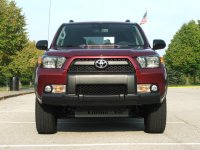
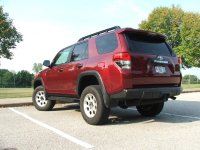
Needed to update my signature so I thought I'd share my build.

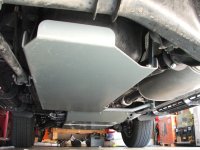
I started with a full set of BB skid plates. No instructions included, but once Bud explained where all the nuts and bolts were supposed to go this was an easy install.
 

Attachments

  • DSCF3139.jpg
    DSCF3139.jpg
    135.9 KB · Views: 2,694
Register to hide this ad
Build thread part two

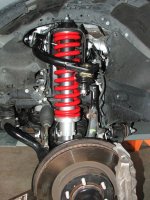
Next came the suspension. Light racing UCAs, a full set of Billy 5100s, Toytech coilovers, and SAW rear coils. I recommend installing the UCAs first. If you don't the OEM UCAs can actually contact and scratch the coils at full droop.:cry2:
Removing the UCA bolts was a one man job after removing one bracket on each side. I think re-installing the bolts could be done by one person, but it took about a minute for each side with a helping hand (and it doesn't need to be a mechanically inclined helping hand, either).

I had to disconnect the KDSS front swaybar, but supporting and strapping it so it didn't move made the reinstall easier. Notice I didn't say "easy", I said "easier". Do not attempt this if you frustrate easily. Outside of that, the front coilover install was relatively easy, but find a shop with a commercial spring compressor if you get the kit like I did. It's easier and quicker, and not that expensive.

 

Attachments

  • DSCF3129.jpg
    DSCF3129.jpg
    138.2 KB · Views: 2,646
Last edited:
Build Thread part three

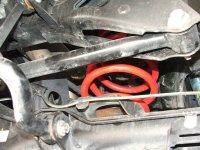
Next was the SAW coils. Using two floor jacks I was able to get these on without disconnecting anything except the panhard bar and the KDSS sway bar. I think it could be done without disconnecting the panhard bar, but I'm not sure. I ran a strap over the frame and under the swaybar to keep the piston from extending, unbolted it from the axle and let it swing out of the way. Then just swung it back up to reconnect after the coils were in. If you have a pair of spring compressors you can flex the suspension enough (be careful of the brake lines, KDSS lines, etc.) to get the coils out by using the compressors with minimal pressure. Just note the position of the compressors on the coils and place them the same on the SAW coils and compress to the same length as the coils you took out. If you got the compressors placed properly the SAWs will slide right in.
 

Attachments

  • DSCF3141.jpg
    DSCF3141.jpg
    138.2 KB · Views: 2,577
Last edited:
Results of the lift

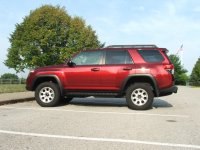
Final results are 2" higher with the SAWS in the rear and I set the coilovers at 2" to keep the factory rake. That still gives me 10"+ clearance under the lowest skid plate. I may raise the front a little bit more, but not sure yet. I did find out I will need to do the VSC zero point recalibration though (the cloverleaf exit scared me a little). Now...what to do about those runningboards...
 

Attachments

  • DSCF3132.jpg
    DSCF3132.jpg
    138.3 KB · Views: 2,561
  • DSCF3136.jpg
    DSCF3136.jpg
    137.8 KB · Views: 2,542
  • DSCF3135.jpg
    DSCF3135.jpg
    138.4 KB · Views: 2,534
Last edited:
I started with a full set of BB skid plates. No instructions included, but once Bud explained where all the nuts and bolts were supposed to go this was an easy install.

You would think after so many phone calls he would type something up :shrug:

Anyways, looks great - you will love the protection, I promise!
 
Next came the suspension. Light racing UCAs, a full set of Billy 5100s, Toytech coilovers, and SAW rear coils. I recommend installing the UCAs first. If you don't the OEM UCAs can actually contact and scratch the coils at full droop.:cry2:
Removing the UCA bolts was a one man job after removing one bracket on each side. I think re-installing the bolts could be done by one person, but it took about a minute for each side with a helping hand (and it doesn't need to be a mechanically inclined helping hand, either).

I had to disconnect the KDSS front swaybar, but supporting and strapping it so it didn't move made the reinstall easier. Notice I didn't say "easy", I said easier. Do not attempt this if you frustrate easily. Outside of that, the front coilover install was relatively easy, but find a shop with a commercial spring compressor if you get the kit like I did. It's easier and quicker, and not that expensive.

why is the coilover upside down??????????
 
why is the coilover upside down??????????

It's not. That's where the adjustable BILSTEIN clip is. If you only opted for the adjustable 5100s alone, there are 3 or 4 places to attach the bottom of the spring plate. The adjustable coil over part is attached towards the bottom of the strut. You can actually see in the pic where one would put the c clip. The threaded part you see is not a part of ge actual strut. It is a separate component. Just a different design.
 
Last edited:
Looks great. How does the Toytec pair with the SAW? Curious to see if the SAW's settle in the 1.5"-1.75" range that others have reported.
 
Looks great. How does the Toytec pair with the SAW? Curious to see if the SAW's settle in the 1.5"-1.75" range that others have reported.

Actually, in combination with the 5100s the overall ride on the street isn't much different from stock except the nose dive is reduced and it feels more planted. It does seem to be more balanced front to rear. Note that I do have the "correct" front 5100s for the 5th gen (p/n 24-196499), not the 4th gen that Toytec sells.

I've driven about 500 road miles on it so far and couldn't be happier. So far, the combination of 5100s and SAW coils is still sitting right at +2". However, I think with stock shocks you would get less, and here's why. The 5100s are nitrogen pressurized. While installing them I found I had to apply probably 40-50 lbs. pressure to compress each shock to less than full extension and hold it there. So each shock is trying to extend with an equal amount of pressure which would provide some upward force (approx 80-100 lbs total) which would lift the vehicle some.
 
Actually, in combination with the 5100s the overall ride on the street isn't much different from stock except the nose dive is reduced and it feels more planted. It does seem to be more balanced front to rear. Note that I do have the "correct" front 5100s for the 5th gen (p/n 24-196499), not the 4th gen that Toytec sells.

I've driven about 500 road miles on it so far and couldn't be happier. So far, the combination of 5100s and SAW coils is still sitting right at +2". However, I think with stock shocks you would get less, and here's why. The 5100s are nitrogen pressurized. While installing them I found I had to apply probably 40-50 lbs. pressure to compress each shock to less than full extension and hold it there. So each shock is trying to extend with an equal amount of pressure which would provide some upward force (approx 80-100 lbs total) which would lift the vehicle some.

Glad you like the ride! I don't know if you noticed but I posted right after you added the first set of pics and then deleted it so it would not interrupt the "flow" of your pictures. Looks good and glad you finally did it!
 
Glad you like the ride! I don't know if you noticed but I posted right after you added the first set of pics and then deleted it so it would not interrupt the "flow" of your pictures. Looks good and glad you finally did it!

Not to sound like some award recipient, but...Thanks for the compliments, from you and everyone else. Also, thanks to you and everyone else who gave recommendations, advice, and encouragement.
 
Last edited:

Members online

Forum statistics

Threads
278,308
Messages
3,554,058
Members
248,016
Latest member
Advally Service

Trending content

Back
Top