StormRunner Build & Adventure Thread

Haha thanks. That's what they said on Instagram as well. I didn't even see it at first but now it's all I see

This thread is phenomenal, thanks for taking us along for the ride! Between the build and the scenic pics, I'm pumped to get my '16 SR5 up to Sedona, Flag and everywhere with a bike trail.

Your build has given me a lot of ideas. Pumped to get the lift and off-road tires on this week.
 
Your truck looks amazing! Great build and im sure you love it. Im trying to get into a 2018 4runner off-road this week!
 
No 4Runner pics since I flew but just a few pics from my trip to Florida

Everglades National Park

39919419945_848c0c0484_b.jpg


40105662274_5e013671b5_b.jpg


40772744392_74361b0521_b.jpg


40105527754_2f3e8f06bb_b.jpg


40772653052_30f6bf3c68_b.jpg


Miami Beach

40772658802_16375502d6_b.jpg


40772655142_111689d423_b.jpg


40772595752_049f9508b5_b.jpg


40772593602_0a1129760e_b.jpg


40814452561_b325eea9e6_b.jpg


Biscayne National Park

39919512995_972246cb33_b.jpg


40814634821_7b6be1cd0f_b.jpg


40105583554_44b04b10d3_b.jpg


25943170547_79a0d88f52_b.jpg


Dry Tortugas National Park

40772524052_28738e58e2_b.jpg


39919167715_31fbb212a2_b.jpg


40105375604_ecbedebf7b_b.jpg


Key West

40772527362_73ac4e3c70_b.jpg


40105372294_e0df52516d_b.jpg
 
Seems like you have been to Moab a few times. What trails have you done there? I've been a couple times but with my buddies and their Rubi's. We just picked up an '18 TRD ORP and will be doing similar lift/tires as you. I am pretty sure I can do most of fins and things without getting any bumper damage, but not sure on the other trails there.

BTW, nice photography as well. I have a D750 and love shooting down in Moab as well. Looking forward to more adventures now that we have a T4R.
 
Seems like you have been to Moab a few times. What trails have you done there? I've been a couple times but with my buddies and their Rubi's. We just picked up an '18 TRD ORP and will be doing similar lift/tires as you. I am pretty sure I can do most of fins and things without getting any bumper damage, but not sure on the other trails there.

BTW, nice photography as well. I have a D750 and love shooting down in Moab as well. Looking forward to more adventures now that we have a T4R.

Thanks! I love the D750 and so glad I finally pulled the trigger and upgraded to it.

I have been to Moab like 4-5 times but only off-roaded two of those times. I have run Fins & Things multiple times and run Top of the World. I really want to run Hell’s Revenge but haven’t had time on my vacations yet. Fins & Things can absolutely be run with no damage at all. Top of the World will scrape your skid plates a lot unless you are very slow and use a spotter. I was alone and got out a LOT to choose lines and still scraped a lot on that trail but it is really fun and has an awesome payoff
 
Thanks! I love the D750 and so glad I finally pulled the trigger and upgraded to it.

I have been to Moab like 4-5 times but only off-roaded two of those times. I have run Fins & Things multiple times and run Top of the World. I really want to run Hell’s Revenge but haven’t had time on my vacations yet. Fins & Things can absolutely be run with no damage at all. Top of the World will scrape your skid plates a lot unless you are very slow and use a spotter. I was alone and got out a LOT to choose lines and still scraped a lot on that trail but it is really fun and has an awesome payoff

I'm ok with scraping skids, it's the bumpers I'm afraid of. I have ran Hells with my friends as a passenger in a Rubi and it was a blast. We had a friend bring a mildly modded F150 and he got his rear bumper hung up at one point and we had to push him off.


DSC_4501-2 by Nick Larson, on Flickr

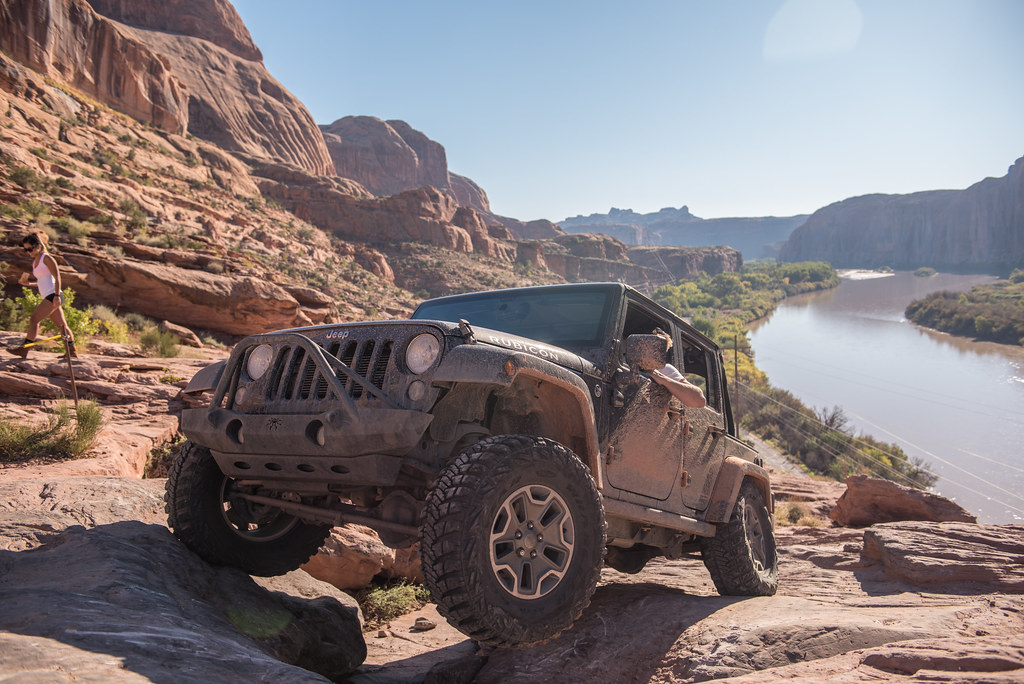
He opted to not do the Moab Rim trail, as you can see it is pretty gnarly.


DSC_4563-2 by

Nick Larson, on Flickr

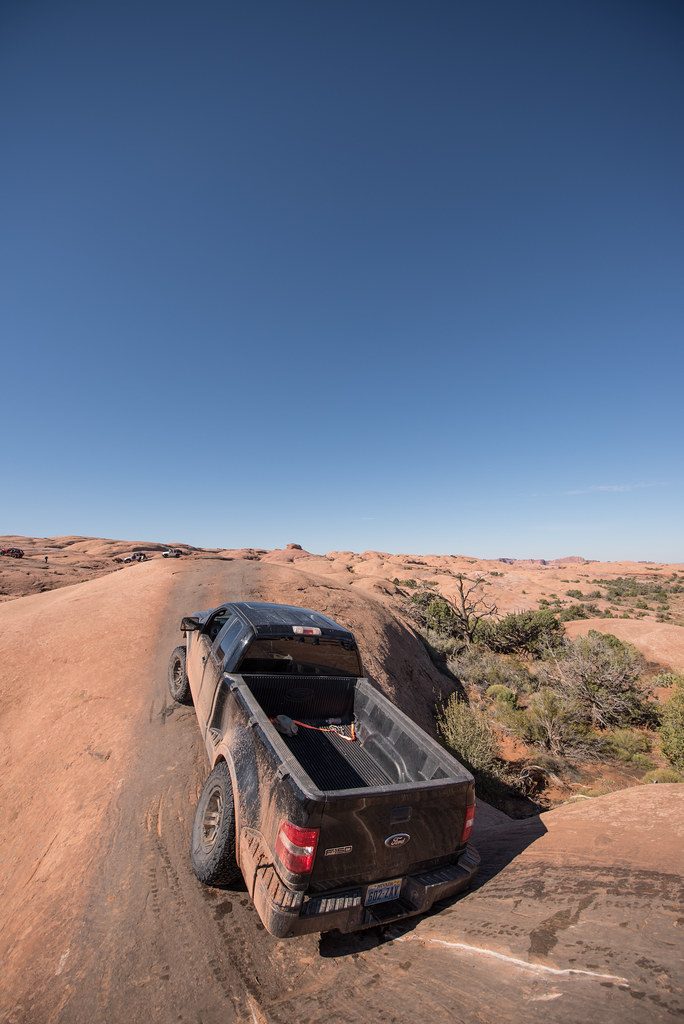
This was on Gold Spike and would be a bumper banger for sure on a 4Runner.

10947401_10205337666473679_5980039152525996142_o.jpg
 
I'm ok with scraping skids, it's the bumpers I'm afraid of. I have ran Hells with my friends as a passenger in a Rubi and it was a blast. We had a friend bring a mildly modded F150 and he got his rear bumper hung up at one point and we had to push him off.

Nice! Yeah I can imagine a long wheelbase like an F150 would have a tough time on most of the Moab trails. I really hope to get back and run some more trails soon though
 
So I decided to have my bumper valences actually painted at a body shop rather than having them plasti-dipped since it's a lot of work to keep plasti-dip looking good in an off-road rig.

The rear valence was replaced and painted black during my body shop repair a couple weeks ago (thread here). I really liked the way it turned out so I decided to pull the front valence off and have it painted as well.

I have never done a "write-up" before but I have used hundreds of them in the years I have been working on cars. Since I couldn't find a "removing the front bumper" write-up that had working, active pictures I decided to make one. So here it is and let me know if I should add/remove/change anything since this is my first.

So first thing is to open the hood and remove the radiator top cover. There are 13 pop retainers that hold this piece on. Just push down on the center and then they are loose and ready to be removed. I pop all 13 and then pull up on the cover to remove the retainers.

Front%20Bumper%2011%20of%201_zpscwqvd7ax.jpg~original


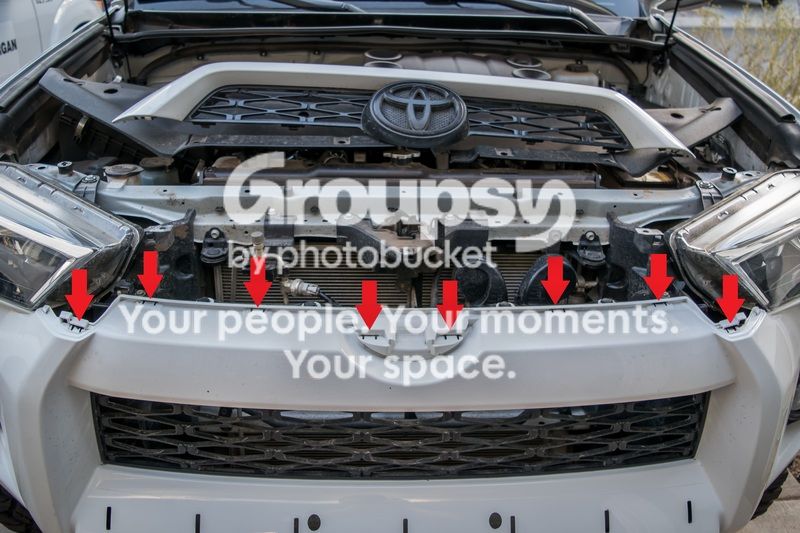
Now you need to remove two retainers and a 10mm bolt seen here. For these clips you need to raise the center portion rather than pushing it down. I use a small blade screwdriver to pop it up and then they can be pulled out.

Front%20Bumper%2010%20of%201_zpsn8b1xydg.jpg~original


Now with those three things removed you can remove the top grill from the lower IF you want to or have a need to. It is not necessary to separate the two pieces unless you have a specific need to do so. If you do want to separate them though there are eight slide-in clips that hold the two grill pieces together. These were pretty hard to separate on mine so I wouldn't do so unless you needed to.

Front%20Bumper%209%20of%201_zpsrkqfemae.jpg~original


There are then four more retainers holding the upper portion of the lower bumper to the frame. They are the type you have to raise the center portion to remove

26737031476_096f25e021_b.jpg


Next you use a 10mm wrench or socket to remove the three screws in each wheel well as seen here

Front%20Bumper%207%20of%201_zpsti2thgm8.jpg~original


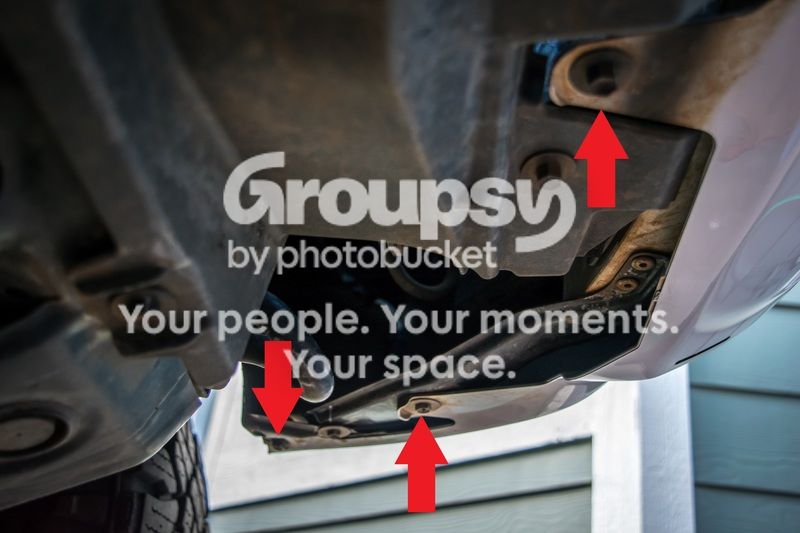
Now you need to crawl under the front bumper and you will see there are six bolts/screws holding the bumper on. This picture is looking towards the drivers side and you can see three of the bolts/screws. They are the exact same on the passenger side. Again they are all 10mm

Front%20Bumper%208%20of%201_zpsjatmxsve.jpg~original


The bumper is now loose and can be pulled off but keep in mind that on each side where it meets the fender, you need to pull out rather than pulling the entire bumper forward. So start on each side and pull the bumper out towards the sides to get it free before pulling the entire bumper off the truck. Here you can see the ledge that the bumper sits on, on each side of the truck

Front%20Bumper%205%20of%201_zpselcfbbfw.jpg~original


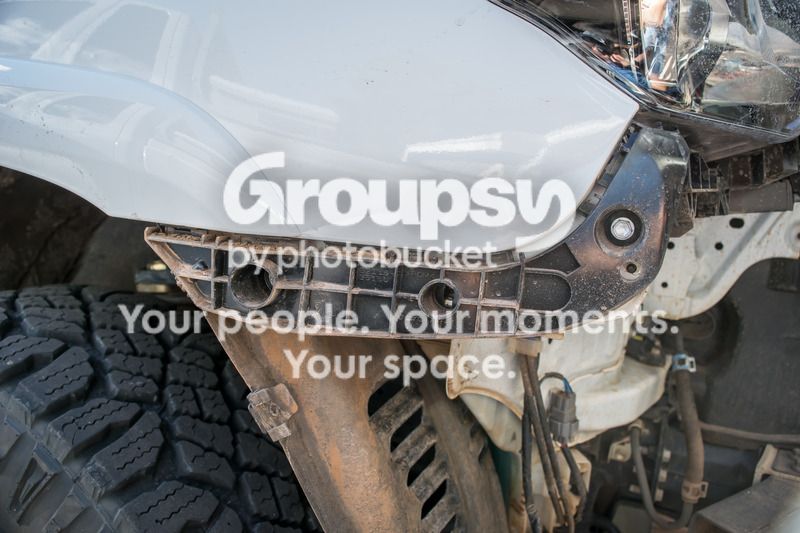
When pulling the bumper to the sides, another thing to keep in mind is the top wheel well screw, screws into a protrusion that the bumper sits around. So you need to lift the bumper over this protrusion to be able to pull the bumper out to the sides. You can see the protrusion here

Front%20Bumper%206%20of%201_zpslfig4hxx.jpg~original


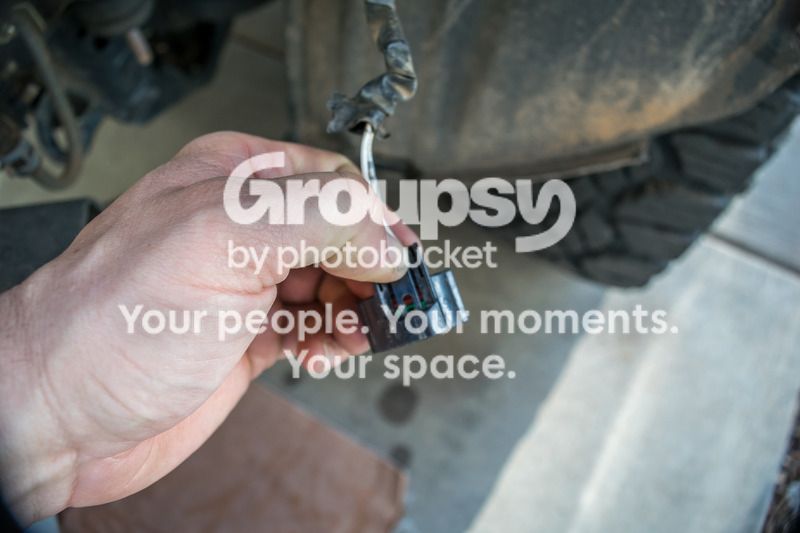
With the sides of the bumper pulled out, you can now pull the entire bumper forward and it will come off the vehicle. However, the bumper will only hang as the fog light wiring is still attached. They are simple snap connectors that you need to remove to get the bumper fully removed

Front%20Bumper%201%20of%201_zpsaplq8hly.jpg~original


Now you have the bumper completely off the vehicle

Front%20Bumper%204%20of%201_zpsxfiezhxb.jpg~original


If you also want to remove the front valence from the bumper, there are 13 retainer clips holding it onto the bumper. You just need to depress the clip and slide each one out the to side as you can see

Front%20Bumper%202%20of%201_zps2mz1eb8o.jpg~original


Front%20Bumper%203%20of%201_zpsdcfsww3r.jpg~original


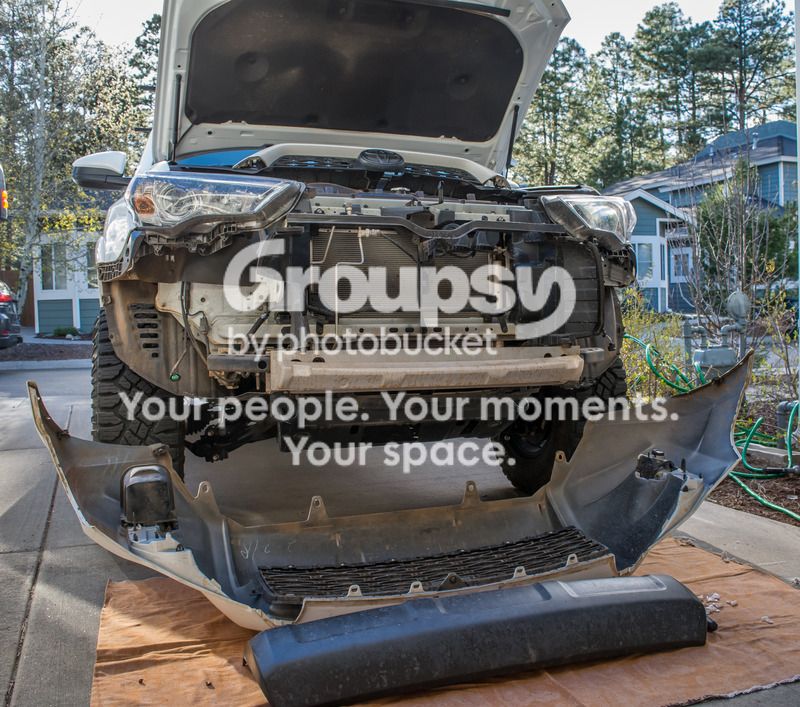
And this is what my truck will look like for the week while the valence is being painted

Front%20Bumper%2012%20of%201_zpsjj47ji8u.jpg~original


Hopefully this helps others


Thx SR....getting a TRD Valance during the Texas Jambo and will be attempting this in the coming weeks!
 
Over Memorial Day weekend I headed out to Death Valley for some off-roading, some hiking, and lots of photography. Been wanting to get back there for a long time and finally made it happen. Was an awesome trip!

41849025494_03c900146f_b.jpg


Rhyolite Ghost Town

41886314364_1b2b02fa83_b.jpg


41669657575_dec5857b9c_b.jpg


Titus Canyon

28732188788_a216f2bf62_b.jpg


27737006387_138c74d052_b.jpg


28732146688_b229da2304_b.jpg


42554838412_723f89189e_b.jpg


Teakettle Junction

40762692970_62347d05b1_b.jpg


Racetrack Playa

28697463038_3dc723c9c3_b.jpg


41849087974_2027041343_b.jpg


Lippencott Pass

41704543235_844ef73bdf_b.jpg


42554809502_e6a198f48a_b.jpg


27736933357_cc0bc58daf_b.jpg


41704524855_8028af5bf7_b.jpg


Lee Flat Joshua Trees

42571250141_548bc6ffa1_b.jpg


42554818432_e002cb5778_b.jpg


40797866730_1d126e8eab_b.jpg


Father Crowley Point

41886144074_a58baffbc3_b.jpg


Darwin Falls

28697481208_9a7c761cd7_b.jpg
 
Storm clouds coming in over the dunes

40762754870_649cd14384_b.jpg


40762763890_bd5c40210e_b.jpg


Night Photography at Badwater Basin

40762690100_755fb77982_b.jpg


42519489332_d082b1c7c1_b.jpg


Road to Natural Bridge

41886127794_c14d76c113_b.jpg


Artist's Palette

41669767735_499692fec5_b.jpg


Mesquite Flat Sand Dunes

27701482587_7b9c24e0fd_b.jpg


40762697370_11a0e1fa69_b.jpg


40762695750_15bf533bf8_b.jpg


I also did some fun pics with my Funko Batman

41849023544_8264a36e32_b.jpg


41849022154_0275bf2574_b.jpg


42571239691_d8f0c000f3_b.jpg
 
Over Memorial Day weekend I headed out to Death Valley for some off-roading, some hiking, and lots of photography. Been wanting to get back there for a long time and finally made it happen. Was an awesome trip!

Awesome place indeed. And of course, great pictures again!
 
It is an easy install in that there are no modifications necessary to install it. One of the big reasons I chose this rack is it is full-length but does not require any drilling.

It does take some time to install just because it is large and on top of the vehicle. Plus you want to have it positioned correctly so the rear hatch will not make contact when opened and also there is a procedure to tightening everything down so it lays flat and smooth. Since the initial install though I haven't had to touch it as far as adjustments. Nothing but good things to say about this rack.

I read through your whole adventure thread and really enjoyed it. I saved a bunch of "want to go" places in my google maps. Can you elaborate on the roof rack and how it attaches to the truck? Looks like it takes 5 feet per side. Do these feet attach directly to the roof or is there a roof specific rail that gets bolted down? Just trying to understand how it avoids drilling into the roof and cant seem to find any installation instructions online. Thanks!
 
I read through your whole adventure thread and really enjoyed it. I saved a bunch of "want to go" places in my google maps. Can you elaborate on the roof rack and how it attaches to the truck? Looks like it takes 5 feet per side. Do these feet attach directly to the roof or is there a roof specific rail that gets bolted down? Just trying to understand how it avoids drilling into the roof and cant seem to find any installation instructions online. Thanks!

Thanks! So many amazing places to explore in the US

For the rack, there are four factory bolt down locations and the K9 rack uses only those. It has a rail that bolts into those four location and then the five feet per side attach to that rail.

The tightening procedure I mentioned is so that rail pushes down at the front of the vehicle on that rail. The roof is obviously sloped down at the front and you want the rail to match that slope so it looks smooth. So basically you drop the middle foot all the way down and tighten and then you work your way out tightening the feet. The stiffness of the actual rack applies downward pressure to that rail. So when you are done the middle foot is pretty much as low as it will go and the front feet are pretty much extended as long as they will go. This makes that rail nice and smooth.

Once you have those adjustments done you never have to touch it again and it is very strong. I am 6'4" and 220 and I have stood at the front of the rack and it holds weight with no issues. :thumb3:
 

Members online

Forum statistics

Threads
278,309
Messages
3,554,075
Members
248,016
Latest member
Advally Service

Trending content

Back
Top