Taking apart the whole front dash

hulk311

New member
I have installed sound deadning products on the floor and doors of my 3rd gen 4unner. As you might have guessed there is still a lot of noise coming in through the front of the vehicle, from the engine. I would like to take apart the whole front dash and apply second skin's alpha damp, overkill pro and luxury liner pro on the firewall.

My question is how do I take apart the whole front dash?
I don't even know where to start with it.
Has anyone done it? How long did it take?
Should I be worried about air bags going off?

Is there anyone in MI who might want to give me some help with this (when the weather gets better of course)?

I would love to just stick a good inch or two of sound deadning products in the firewall on the inside, it would make the truck so quiet. Right now I would rate is as 8/10 on a quietness scale. I cannot even hear the exhaust or the tires when driving on the highway (I think the hundred or so pounds of sludge underneath the car helped).
 
Last edited:
Register to hide this ad
I just did this last weekend. Once you find all of the bolts it is pretty easy. To be safe disconnect your battery for 90 seconds before messing with any of the airbag stuff. Most of it is straight forward. I had some trouble with getting the dash off of the passenger airbag. There are two bolts that hold the airbag to the support. Remove these two bolts then as you pull the dash it will be easier to detach it from the dash. Once all of the bolts are removed the dash should come out pretty easily. If you like i can take some pics tomorrow.
 
Any updates? I'm looking to apply sound deadning to the firewall on the inside of the truck and need photos/instructions on how to take it apart.
 
Basically, find all the bolts, then the dash pops off.

Start with the easy stuff first. Take the center console out, like you're going to install a radio. EVERYTHING in that area needs to come off. The AC, Radio, EVERYTHING!!!! Set it all to the side.

Next, take the 4 bolts that hold the panel under the steering wheel off, make sure you disconnect the fuel door and hood latch thing-a-mabobs. Set that panel off to the side.

Next, take off your guage bezel. There are two screws on the top, Kinda tricky to get to if you only have a long screwdriver. there are also two on the bottom, under where the panel you just removed are. It's a tight fit, but it will come out with some manulpitation. Set that to the side.

Next, Unscrew your guage cluster, and unplug it. Set that to the side.

You should be able to see straight to the fire-wall now. I can't remember how manu bolts there are, but look for anything that is still connect to the dash by a bracket. Take those off.

Move on over to the passenger side, Take the glove box out. There are two screws that hold the glove in place, on the bottom. take those off, open the glove box, and the plastic piece that "Covers" the glove box will need to be manulipated a little bit to make it pop off. Set that aside.

There are some connections ontop of the glove. Make sure you loosen them from that plastic piece.

As for the airbag, you can leave that attached to the dash.

There are at least two screws on the passenger side that hold the dash to the truck. You basically just need to look for them.

The dash from there will kind of 'pop' out. It's nice to have a second set of hands, the dash is heavy and awkward. I think that when they put these things together, they put the dash in before the windshield.

I can take pics this afternoon, I need to rip mine out anyway to see if I can fix my AC selector. Damn lake.....
 
This is my first how to so let me know what I can do to make it better.

Tools Used
Philips head screwdriver
12mm Socket driver
10mm Socket driver
Flat head screwdriver

1. Even though i didn't disconnect any of the airbag connectors I played it safe and disconnected the battery and let it sit for 90 seconds so the system would not be charged at all.

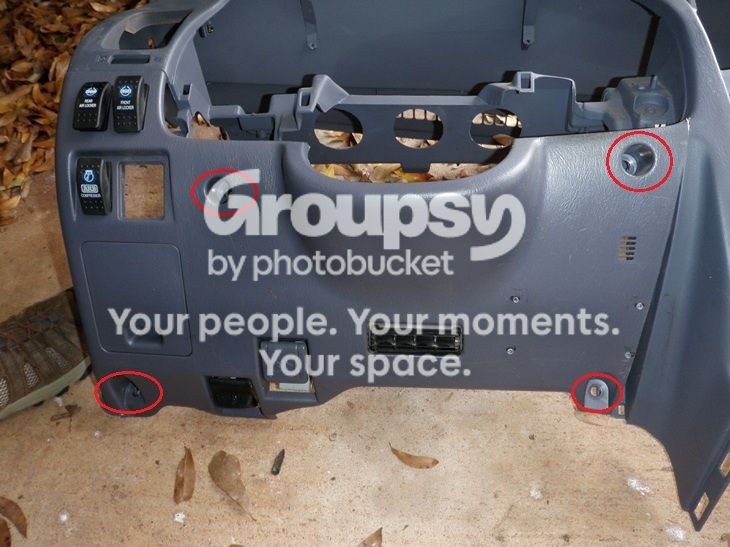
2. Starting with the Drivers side lower panel. This panel is pretty self explanatory. Remove the 4 bolts that are exposed then disconnect the hood release and fuel door release and this panel is out of your way.
Indianhenry024.jpg~original


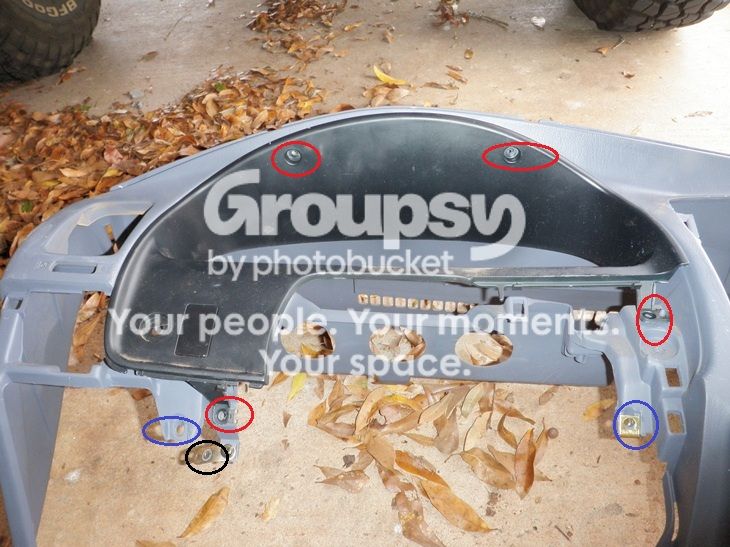
3. Next remove the trim around the instrument panel. The 4 screws marked in red are Philips head screws, remove these and the panel will come out. Also the dimmer rheostat is in the lower left corner, be sure to unplug this after detaching the panel. The two bolt holes highlighted in blue were where the lower panel attached to. The black circle highlights another Philips head screw that attached to the heater duct. Once this panel is out of the way you will have access to the 4 screws holding the instrument panel in, remove these screws and the 4 connectors on the back. With the instrument panel out of the way you will have access to a nut to remove.
Indianhenry025.jpg~original


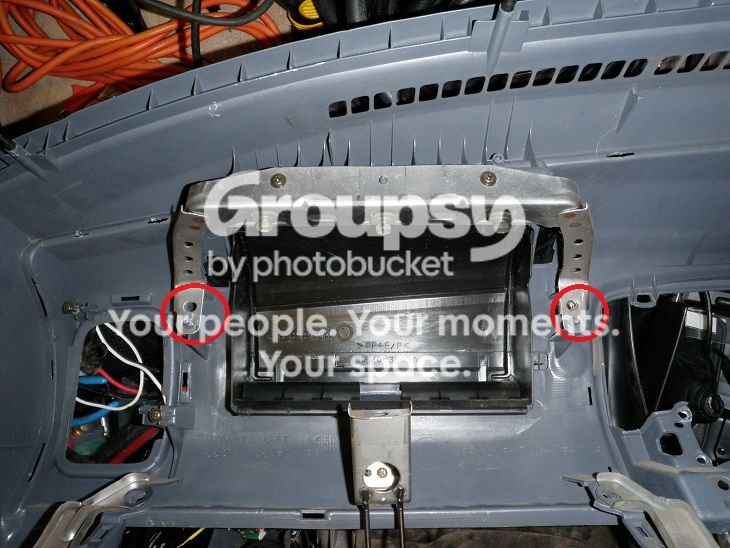
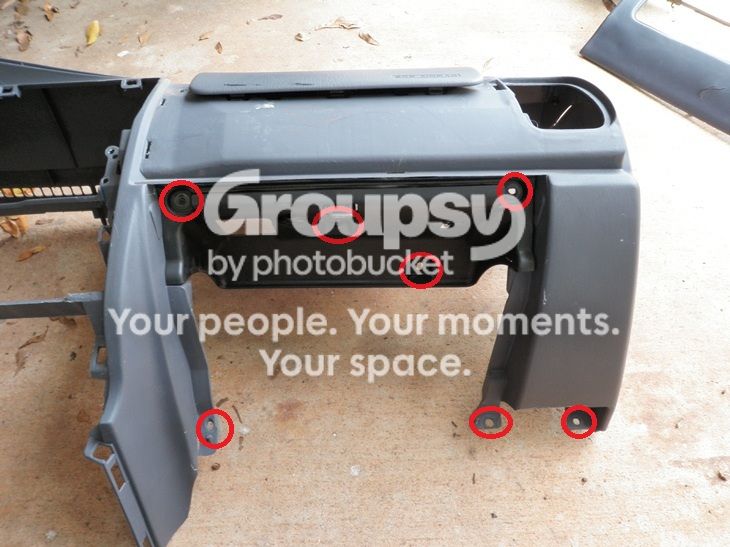
4. Now move to the passenger side. Remove the glove box by removing the bolts along the bottom hinge. Next look at the top of the glove box enclosure. There are 4 bolts to remove here. Two at the top outer edge, one about dead center, and one in the very back a little right of center. With the bolts removed you will have to pull each side in a little to get the black piece loose (we will come back to this in the next step). Now remove the three bolts across the bottom to remove the glove box support bar.
Indianhenry023.jpg~original


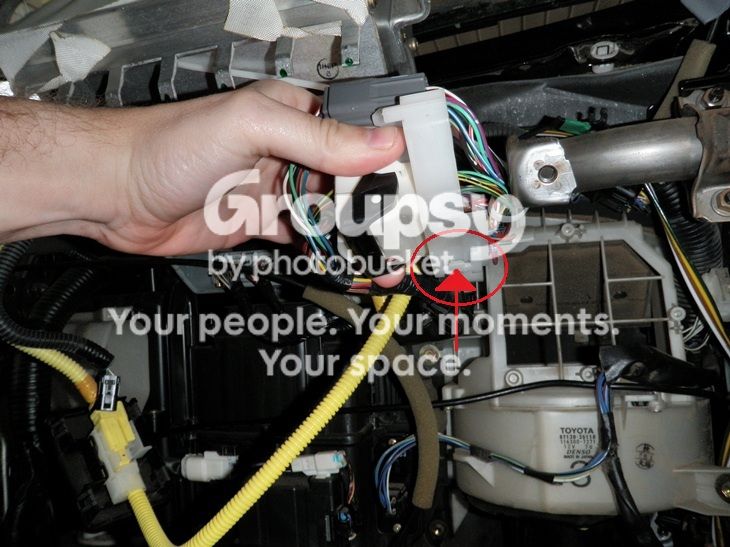
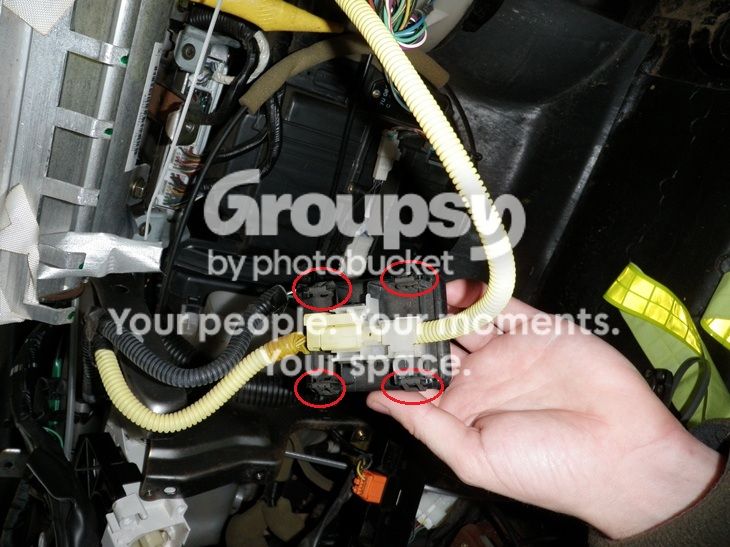
5. There are two airbag components attached to the glove box enclosure. below are pictures of each. The first is on the left and is removed by squeezing each of the 4 metal clips and pushing it down, then rotate it slightly so the panel can be pulled back through the top. The second is on the right side. When viewed from inside the glove box all you will see is the tab that the arrow points to. Take a flat head screwdriver and pry it down slightly and slide the whole assembly forward, this will release it from the enclosure.
Indianhenry031.jpg~original

Indianhenry032.jpg~original


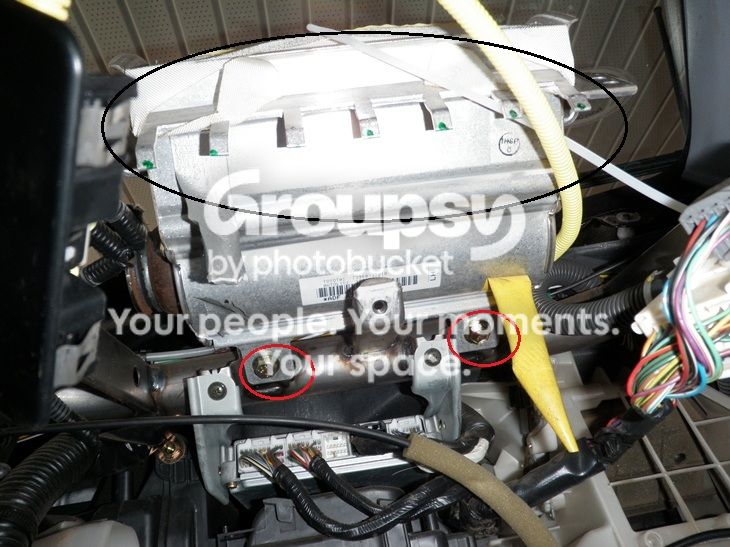
6. Once the glove box is out of the way you will need to mess with the airbag its self. There are two bolts highlighted in red. you can try just loosening them, but i removed them completely. The second photo is from the airbags point of view. The two holes highlighted show where the airbag cover is bolted to the tabs on each side of the airbag. The bolts are easily reached from the underside. The 7 tabs with the black circle are hooked into the airbag cover, lift the airbag slightly to release the dash.
Indianhenry029.jpg~original

Indianhenry033.jpg~original


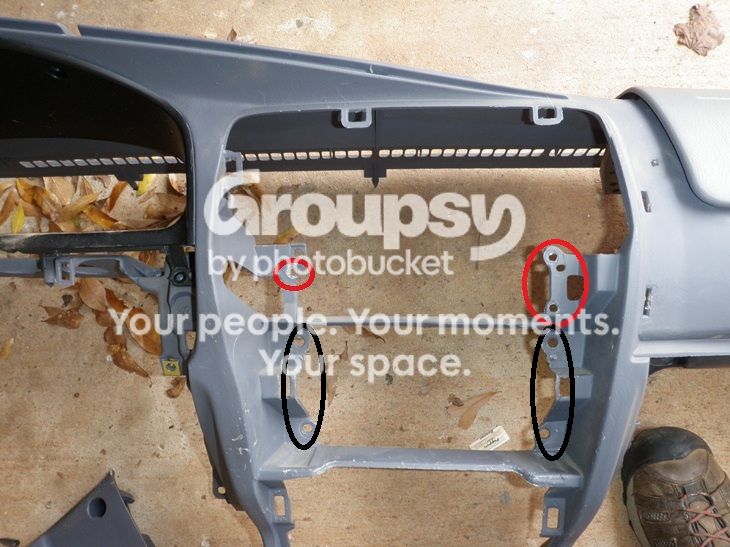
7. Remove the center trim around the radio. Remove the radio and mount(black circles). Pull each of the heater control knobs off and pop the face plate off. This will give you access to the three mounting screws(red circles). remove these and your dash will be all but free.
Indianhenry026.jpg~original


8. Give the dash a once over to be sure you haven't missed any nuts or bolts and that all the electrical connectors are disconnected. The front of the dash has pins along it that slide into receptacles at the base of the windshield. Pull the dash aft and these will separate. Make sure that the steering wheel is tilted to its lowest point. Work the dash to the passenger side over the steering column.

Here is a link to the fsm removal of the dash
http://www.ncttora.com/fsm/1996/SIL...pdf/02rmsour/2002/024runne/bo/inspan/remo.pdf

Edit: added a step i missed

maybe another useful thread
http://www.toyota-4runner.org/3rd-g...-tutroial-body-panel-removal.html#post1000973


i copy and pasted another forum members post from his thread as there was no response to it and it was kind of tough to find, i think putting the info directly into this thread makes sense, i'll take a like but if you want to give rep give it to the guy i quoted.:zoom:
 
Thank you for the photos. Would you happen to have photos of the firewall itself? I'm wondering just how much metal there is for me to apply sound deadning material.
 
Bump!

Does anyone have photos of what the actual firewall looks like from inside
the truck? I am debating if it is worth it to take the whole dash apart or not. My main concern is just how much metal is there?
 
Bump!

Does anyone have photos of what the actual firewall looks like from inside
the truck? I am debating if it is worth it to take the whole dash apart or not. My main concern is just how much metal is there?

I don't but m y guess would be you can have a look in the engine bay to get an idea of size and shape of the firewall, wish i could help more , like i said pics above are not mine,:)
 

Members online

No members online now.

Forum statistics

Threads
278,312
Messages
3,554,083
Members
248,016
Latest member
Advally Service

Trending content

Back
Top