The Quick and Easy Rear Bumper LED Cube Retrofit

What degree spread on the light works best for typical backup use. Guessing the 30's or 60's?

Thoughts?

I know TiN uses the 60's, he also says 30s should be fine.

Being that the 60s are backordered I bought the 120s… We'll see how those work :shrug:
 
Last edited:
I know TiN uses the 60's, he also says 30s should be fine as well.

Being that the 60s are backordered I bought the 120s… We'll see how those work :shrug:

Yea, that is why I was wondering :)

Now I wonder why those 60s are backordered... :censored:
 
Sprayed the housing with truck bed liner last weekend. 60deg spread lights coming this weekend. Hopefully o can find the time to install this weekend. Planning to use a switch. First attempt at wiring lights. Wish me luck.
 
For anyone interested, the 120 degree lights just don't cut it (don't throw light far enough). I returned them and was able to get the 60's now that they aren't backordered.
 
Sprayed the housing with truck bed liner last weekend. 60deg spread lights coming this weekend. Hopefully o can find the time to install this weekend. Planning to use a switch. First attempt at wiring lights. Wish me luck.

For anyone interested, the 120 degree lights just don't cut it (don't throw light far enough). I returned them and was able to get the 60's now that they aren't backordered.

Be sure to share pics of your finished products. Always interesting seeing how these things turn out!
 
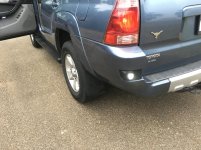
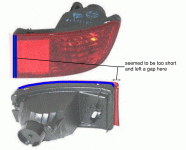
Did mine this weekend. A few headaches... But they're in. Need to repaint because the truck bed liner I put on them is shit and smeared and dented when I used clamps. Also had issues with the 3D print part not matching up with my housing (outer corner was a bit too short and radius was too small so I had a 1/4" gap on the edge to seal off. So anyway now I need to sand and shape as best I can and then tape and plasti dip to mask the poor fit up (not a big deal) and numerous flaws from clamps (bigger deal).
 

Attachments

  • image.jpg
    image.jpg
    138.7 KB · Views: 602
Last edited:
Be sure to share pics of your finished products. Always interesting seeing how these things turn out!

Will do. I have a few projects going on right now.

Your Bumper LED Cube Retrofit
The Sport Hood Scoop Rigid Light Bar Mod
and 2006+ Sport Headlights with Moritmotto D2S 3.0's & VLEDs Switchbacks
 
Thanks! I went with black partly because I was itching to try some spray-can bedliner on something, and I also wanted to maintain some contrast on the back bumper. I also figured it'd bother me that the white lights/plates wouldn't match the ever-so-slightly different "Natural White" paint on the truck.
I am just like you.. Lol. Maticulous about certain things, but bedliner is my favorite stuff to paint with and gives the best rugged look. Never, ever can go wrong with some rugged liner. Solid work, very clean. Following this thread.
 
Did mine this weekend. A few headaches... But they're in. Need to repaint because the truck bed liner I put on them is shit and smeared and dented when I used clamps. Also had issues with the 3D print part not matching up with my housing (outer corner was a bit too short and radius was too small so I had a 1/4" gap on the edge to seal off. So anyway now I need to sand and shape as best I can and then tape and plasti dip to mask the poor fit up (not a big deal) and numerous flaws from clamps (bigger deal).

Which section of the part didn't match correctly? I'm curious to see what may have caused this issue. I'll be the first to admit that while my 3D printed parts fit well, they don't have 100% perfect OEM fitment (common with aftermarket parts - amplified in this case due to the fact that my parts are 'homemade'). However, I've not had anyone mention that the fitment was problematic for them. Sorry to hear this.
 
Which section of the part didn't match correctly? I'm curious to see what may have caused this issue. I'll be the first to admit that while my 3D printed parts fit well, they don't have 100% perfect OEM fitment (common with aftermarket parts - amplified in this case due to the fact that my parts are 'homemade'). However, I've not had anyone mention that the fitment was problematic for them. Sorry to hear this.

If I recall correctly... see below...

Also, to be clear, this just meant an imperfect fitup. I filled it with black silicone and will be painting (plastii-dip this time) it after some shaping with a razor and sanding to fix the damn Rust-o-leum bedliner imperfections (never buying that crap again) so I'm sure it won't be terribly noticeable. Honestly for the 30 bucks (FYI I bought the ones someone was trying to offload because they weren't going to do the mod afterall) it's still worth it.
 

Attachments

  • CubeRetrofit.GIF
    CubeRetrofit.GIF
    97.9 KB · Views: 626
Last edited:
Is everyone removing their bumper cover completely or just unbolting the sides enough to fit your hand back there to get to the back side of the reflector?
 
Is everyone removing their bumper cover completely or just unbolting the sides enough to fit your hand back there to get to the back side of the reflector?

I got to the nut from underneath. 10mm. Need long arms and can't be wearing sleeves, but its easy.
 
For all those interested, I am still taking orders for these. I don't have any left in stock currently, but I will be doing another production run the week of 3/6.

Was thinking maybe strobe lights in that location, for safety purposes

The lights compatible with my mounts can be hooked up easily to a strobe controller if you wanted to.
 

Members online

Forum statistics

Threads
278,316
Messages
3,554,120
Members
248,016
Latest member
Advally Service

Trending content

Back
Top