"The Sequel"

got a great deal on some BFG Mud Terrain KM2's with 2k miles.

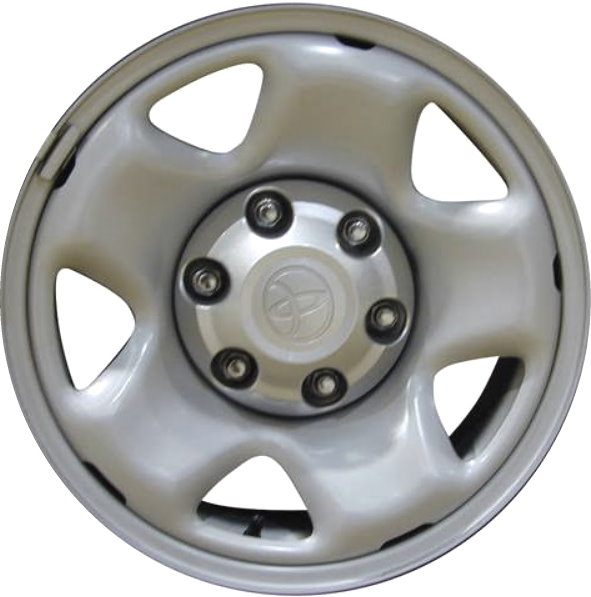
5 tires plus 4 tacoma steels wheels w/ hubcaps for $850. now I need to decide which wheels to use. these new-to-me tacoma steels, or the set of four 4runner black spare wheels I have. the tacoma wheels are in better shape, but the spoke pattern is a little boring. I cant find a picture of them on a 4runner either.

tIiTSvwl.jpg
EkTs4YLl.jpg

Mmsdah0l.jpg
7FqopIMl.jpg


LOOKING FOR GUIDANCE BELOW:

one tire has a road plug in it. I tried to have discount tire cut the plug out and patch it properly but they weren't having it. said the plug was installed a while ago and would be a pain to remove.

c5b07svl.jpg
pCZZsNTl.jpg


anyone have some idea on how to patch this better?

my thoughts
- cut the interior half of the plug out, sand it down flush, and then buy and install an "at home" patch kit.
- cut the plug out from the inside, cut it out from the outside, drill the rest of it out of the tire and go back to discount tire. (they patch tires for free)
- leave the road plug in the tire and have it be a spare.
 
Timing Belt, Water Pump, Thermostat, Cam Seals, Crank seal

I cannot say for certain if this was the original timing belt. There was no indication that it had ever been changed. (no sticker, and no history according to Toyota). If this was the original, it was not going to last much longer at 289K miles.

Very please to have this replaced, along with water pump, cam seals, crank seal and thermostat. (the cam and crank seals were leaking slightly)
mSCtzXPl.jpg


also realized I forgot to reinstall the roof rail end caps after i put the roof rack on. and it started raining....yes there is water inside the rear now. :sad: and I cant find one of the screws so I get to go to the yard and grab one. great. for now, some gorilla duct tape will have to do.
Rw9CD9Tl.jpg


and this morning, I had the codes read. fortunately there were none. but when I talked to the guy about what happened the other day (LINK:please-help-engine-shut-off) he suggested checking the alternator and battery. alternator = GOOD, battery = BAD. hence, new battery! Duralast Gold. though the altyernator is the original with 289k miles, I suspect it will fail soon.
zFCQ7E5l.jpg
 
is this safe to assume?

So I am trying to figure out if I will need wheel spacers with these new tacoma wheels I picked up. (pics below). the offset is -17. Now when I had my first 4runner, it came with the standard 2001 5 spoke steel wheels, with an offset of +15mm (please correct me if I am wrong with these numbers.)

So when I bought 285/75/16 tires for the 5 spoke steels, I had to buy 1.25" wheel spacers to keep from rubbing.

and looking at this offset comparison site (LINK) with 255/85/16 tires with the new tacoma -17mm wheels, it tells me that the inner sidewall is 47mm further away from suspension. (point B in the picture below)

Na7oNFhh.png


if thats true, and the inner sidewall is in fact 47mm further away, I should have no rubbing, and no need to buy spacers for the front tires. PLEASE CORRECT ME IF I'M WRONG.

these are the standard 5 spoke 4runner wheels. (+15mm offset as per this link.)
image-jpg.1079549


and these are the new wheels I want to put on (-17mm offset as per this link, and confirmed with other websites stating same.)
stl69459.jpg
 
Caddy Horns

Finished the install of the cadillac horns this morning. wiring came out pretty clean I think, even managed to use the cadillac wire looms.

picked up 4 cadillac horns: A C D and F. unfortunately the C note horn didnt work. but in the end that was probably for the best as I wouldnt have been able to fit them all on the drivers side of the hood latch.

AN IMPORTANT NOTE: when tapping into the existing stock horn wiring (at the horn) use the horn on the driver's side! the stock horns are daisy chained together so if you tap into the one on the left, and cut the wires for the one on the right (to remove the horn and dangling wires/plug), it will not work.

their position - the horn in the middle utilizes the stock horn mounting point. it is necessary to drill out the threads so the larger Cadillac bolt will fit though.
tPYXQq5l.jpg


My super clean wiring loom:
A - contains crossover wire from stock horn going to Relay. and contains power from relay to each horn.
B - Power from Battery to Relay (will add a 15amp fuse in near future)
C - Ground from Relay to fender ground.
ZOIsYs3l.jpg


The Relay:
A1 - Jumper from stock horn wiring - (pole #85 on the relay)
A2 - Power from Relay to each horn - (pole #87 on the relay)
B - Power from Battery to relay - (pole #30 on the relay)
C - Ground from Relay to fender ground - (pole #86 on the relay)
we9vEOMl.jpg


This is my sad excuse for a stock battery ground wire. (remedied in the later picture) I have the 2AWG wiring, terminals, and 150amp cercuit breaker on order to do the BIG 3 mod.
lEvWHfzl.jpg


This shows my battery ground remdy, wire B (red wire running alongside fender and around battery), and wire C (ground from the Relay)
1scDqsGl.jpg


and of course a video comparison.
stock


not stock (one of the stock horns is still operational, adds a sort of high pitch. can be removed later)
 
Last edited:
Hi Jake, I just found your thread and I really like what you're doing so far. I have a question about your big 3 mod though. My electrical knowledge is limited to a physics class I took a decade ago though.

I like that you added the breaker, I have materials to do the big 3 mod, but so many people just ignore the 120A fuse, and the last thing I want is a fire. You added wire #8 in parallel with wire #3 and #1. So if my understanding is right (which is no guarantee there is whatsoever, I'm just trying to figure this out), then now you've got two paths for electricity from the alternator to the battery, and two "fuses" (although one is a breaker). So now your 120A fused circuit is now a 250A (120+150) fused circuit.

Does that sound right or am I way off?
 
Hi Jake, I just found your thread and I really like what you're doing so far. I have a question about your big 3 mod though. My electrical knowledge is limited to a physics class I took a decade ago though.

I like that you added the breaker, I have materials to do the big 3 mod, but so many people just ignore the 120A fuse, and the last thing I want is a fire. You added wire #8 in parallel with wire #3 and #1. So if my understanding is right (which is no guarantee there is whatsoever, I'm just trying to figure this out), then now you've got two paths for electricity from the alternator to the battery, and two "fuses" (although one is a breaker). So now your 120A fused circuit is now a 250A (120+150) fused circuit.

Does that sound right or am I way off?

I'm not the greatest with electrical circuits and understanding them but yes that sounds right. this mod is really to help if you have a bunch of accessory items that suck power from the battery. the stock wiring (#3 + #1) travels through the stock fuse box powering all your stock components. this bypasses that, while still allowing power to those stock components.
 
255/85/16 BFG KM2's!

after receiving the 1" trail tech spacers I was finally able to install the new-to-me 255/85/16 tires with 2012 tacoma steel wheels nad I gotta say, this is the best look for these 4runners! (I will also say that the mud terrain tread is a bit loud on the highway, but its tolerable for me)

TZVdzKwl.jpg
gBXHkzhl.jpg
yGqT7Zjl.jpg
jUfSRA5l.jpg


ill get some better pictures in a couple of weeks when I go camping.

overall very pleased!
 
Window belt felt replacement write up

the last couple of times I have tried to roll my window down, the interior belt has rolled in, bending and almost tearing the rubber apart from the door panel. so I decided to try and remedie the situation...

For ONE felt replacement (there are 2 felts per door; interior and exterior) you will need:

  1. 1 yard 3/4" wide nylon felt "ribbon" (I found mine a Joanne's fabric store)
  2. plastic scraper (I used an automotive panel puller)
  3. adhesive (I used contact cement; worked like a charm and is slightly flexible.)
  4. old toothbrush or similar

First you must remove the interior belt. I will not get into removing the door panel as that has been done many times. There are 8, IIRC, metal tabs that you must bend straight in order to allow the belt to release from the door panel. these tabs look like this:
emcz6Jyl.jpg


most of us had very worn out felt that probably look a lot like this: you can clearly see the felt has hardened and chipped away from the contact area allowing the rubber to stick to the window and roll into the door.
tlHhnQYl.jpg


To get a good adhesion, you need to clean up the contact surface. this is where the plastic scraper comes in. rub/scrub/scrape away the remaining old crusty felt until you have something like this: (not all of the original felt was removed, just the worn out stuff. I glued directly on top of any remaining old felt that did not scrape off.)
6qjUks2l.jpg


then, using a toothbrush and warm water, I cleaned the best I could to remove dirt, grime and any other felt chunks.

in order to get the alignment as best as possible between the belt, and new felt, I started at one end and only did a small portion. Contact Cement on both surfaces rest 15 mins before adhering together.
XdICRrql.jpg


once that is secured, I then moved onto the remaining area. Specifically, when adhering them together, my main focus was aligning the edges together: RED and BLUE as this is the visible edge and I didnt want a bunch of felt sticking out above the top.
TLJE417l.jpg


continue down the rest of the belt until its covered, and trim the ends! DONE.

before and after for comparison:
tlHhnQYl.jpg
eSWCVxml.jpg


I can say that after installing it, the placement of the felt is perfect. smooth sliding on the window and no more rolling of the rubber!

The only thing I am unsure about is UV resistance: I dont know how long this nylon felt will last with sun exposure. thats why I am doing only one belt right now.
 
pulled the fenders off to try cause I think it made the wheel base look too narrow. with the skinny 255 tires it kinda looked like the body of the 4runner was a muffin top over the tires. not pleased.

but now, it actually looks better than I was expecting. has a bit more of a stance now and still wont throw dirt/water all over the side of my 4runner!

5juMCzpl.jpg
RSiZKQXl.jpg
 
Read the thread from back to front today..great thread, gave me a couple of things I need to do on the daughter's runner! (Fan and rear vent)
 
TRD Oil fill cap

this beauty arrived this morning. seems to be made well, the o-ring seemed to want to pop out of the groove it was resting in so had to be careful when holding it over the oil fill hole, but it secured gud'n-tight. I'll keep the original just in case.

RnXiqLsl.jpg
mjmv2E9l.jpg


------------------------ UPDATE ---------------------------

been two months and no leaks, no problems what-so-ever.
 
Last edited:
FX-R 3" HID Projector Install

Thanks to [MENTION=65101]BrianSD_42[/MENTION] for providing the already assembled FX-R Projector kit. Install was easy, placement of the ballasts was a thinker because of the length of cables. Ended up mounting the DS on the fender just outboard of the battery, and the PS is mounted on the forward side of the intake air box. both are relatively easy to get to. Mounted the Gold relay just above the DS ballast.

Parts that had part numbers:
Morimoto Microcontrol H4 Bixenon Relay Harness (H60) 85758200601
Denso Ballast harness BL100 857582006438
Morimoto XB35 Computer 851469006498

Before/during and After

80O50EMl.jpg
MeDwrGdl.jpg
0YevEQ3l.jpg

SPJLWEOl.jpg
ltfFkkwl.jpg


DS ballast + gold relay/PS ballast

F3ijy0jl.jpg
vV4FHOal.jpg
dr6C4USl.jpg


I will need to inquire with TRS about the High Beam plugs. the wires coming off the projector do not have the plug that matches the harness. Shouldn't be to much of a problem, just takes time to research.
 
Last edited:
Found some 9006 male plugs on amazon for $7 that should arrive by Tuesday, then I'll be able to plug in and test the high beams and ill be all set.
 
Hood Gas Strut install

Bought these awesome hood gas hood struts from [MENTION=198376]4Runner4Leon[/MENTION] and I cant say enough good things. the hood lifts right up with no issue.

I didnt have a 2x4 or other means to get the hood set to the right height when I installed them so I had to use the prop rod. pulled it out and wedged it up againt the hood padding and the rear side of the radiator, there is a convenient little notch in the plastic to hold it perfectly. This was the perfect height for my hood. easily reachable, and still higher than the stock height.

here is the prop rod position. and the notch I used to hold the rod.
fyCNV60l.jpg
0W1ye8nl.jpg


very clean look
IaFDqeSl.jpg


Rivets went in perfectly, no trimming/grinding needed.
feA7dzul.jpg


I ziptied the washer tubing to the ABS module AFTER I installed the struts when the hood was at full height so it wouldn't rip the hoses when opening.
uVSLzjml.jpg
 

Members online

Forum statistics

Threads
278,307
Messages
3,554,054
Members
248,016
Latest member
Advally Service

Trending content

Back
Top