

4'running'26
New member
It seems to me that more than half the time I am working on something on my 4runner, be it the previous one or the current one, I always end up asking myself something very akin to a famous Vince Lombardi quote/question:
In light of that, and in light of my deep and undying love for the Green Bay Packers (sorry, born into without a choice) as well as the fact that my latest 4runner is green, I named this the Vince Lombardi Build Thread.
Truth be told, it won’t be much of a build thread. It won’t be lifted. It won’t be sporting huge tires. It likely won’t even be armored. Hopefully it will, someday, be sporting a rear locker though…I am enamored with rear lockers! Anyways…I love these things stock, for the most part. I do have a dream of also one day throwing in a supercharger but that is a ways down the road.
General Details:
1999 SR5
184,000 at purchase
Green/Jade
5spd
Completed Maintenance/Upgrades/Mods
• New rear bearings, inner and outer seals, brake shoes (11/15/17, 185,000 miles)
• New thermostat with jiggle valve at 6 o’clock (12/16/17, 185,200 miles)
• New sway bar brackets and bushings (12/18/19, 185,200 miles)
• Steering shaft slip-joint mod to eliminate steering play (12/18/19, 185,200 miles)
Desired Maintenance/Upgrades/Mods…some are admittedly fantasies
• Rear air-locker or e-locker
• Supercharger and corollary upgrades (7th injector, etc)
• Replace hood latch cable
• Replace rocker panels, rear wheel trim and possibly front fenders due to rust
• Taco Whip Antenna
• Fog lights
• LBJs
• Rack bushings
• Tie rods
• Tundra 231mm upgrade
• I know I’m forgetting stuff…I’ll add as I remember
Every car has a story, or, maybe more accurately, every driver has a story that is heavily influenced by the car they drive. That is especially true of those of you who follow this forum religiously. I wish I could go back and document the story of the 4runner I have had for the last 5 ½ years. Suffice to say, when I bought it there was a little over 190,000 miles on it and it now has 294,000 miles. It has taken me to the Grand Canyon; through Death Valley; the Pacific Coast; New York City; high into the rocky mountains of Wyoming, Idaho, Montana and Colorado; to the US Olympic Trials for Track and Field in Eugene, OR; and I must not forget the Barney Riley jeep trail on the California-Nevada border (that was interesting!). It also served as my daily driver for a few of those years and has made countless trips from the Cleveland/Akron, OH area to SW Ohio farm country where my parents live. It has, by far, been the best vehicle I have ever owned. In the 50,000 miles of cross country traveling it has done it has had the following problems:
1. Flat tire
2. Flat tire
3. Rear u-joint going bad and replaced in Sacramento, CA this past summer.
That’s it, and, quite frankly, that’s incredible. I will miss it dearly. So dearly, in fact, that I can’t quite put it up for sale yet.
The Old Guard:
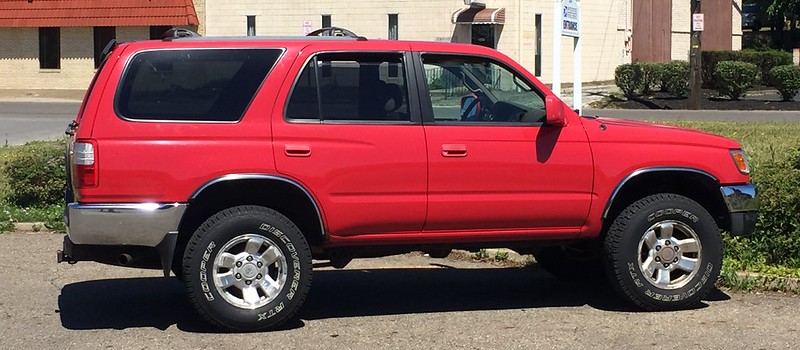 Untitled by jtolson26, on Flickr
Serving me well:
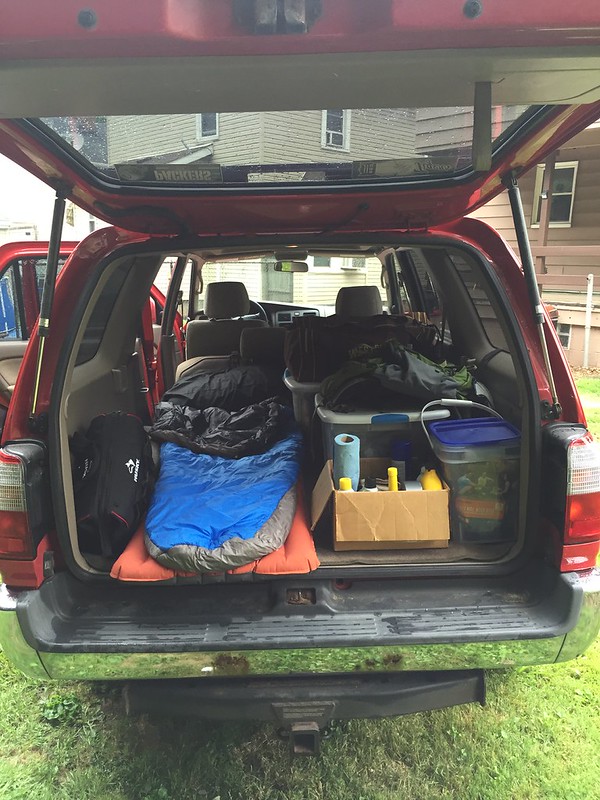 Untitled by jtolson26, on Flickr
On the open road:
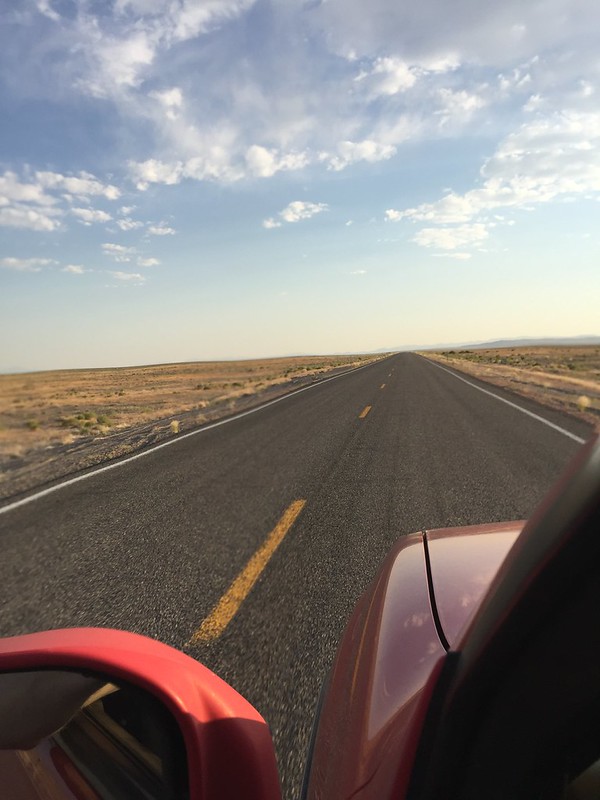 Untitled by jtolson26, on Flickr
And off the beaten path:
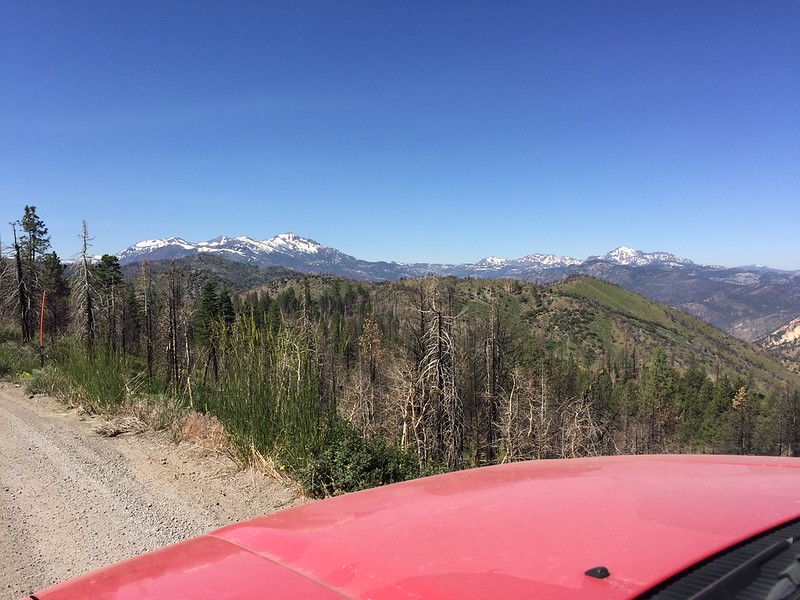 Untitled by jtolson26, on Flickr
So, why a new/different one? Quite simply, I love driving 5spds. My old one is an automatic and I often found myself yearning for a 5spd. There isn’t really any rhyme or reason to it. I guess I just like it.
So, a couple months ago I picked up a 1999, Jade 5spd with 184,000 miles and more rust than I thought (some of you have probably seen the “was it worth it” thread, but, I’ve decided to love it anyways and make it my own.
10-10-17
Here she is a couple days after purchase – sans running boards:
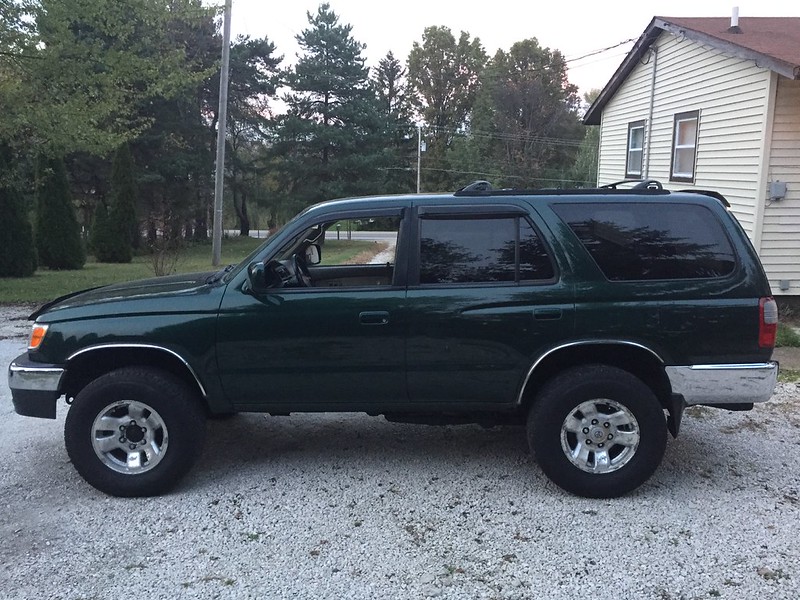 Untitled by jtolson26, on Flickr
I don’t expect the outward appearance to change a whole lot. It will be a rig designed to drive me thousands of miles across the country and then take me off road if need be. I don’t want to compromise the stellar 22 MPG
Here are some rust issues where the running/cancer boards collected crap for years:
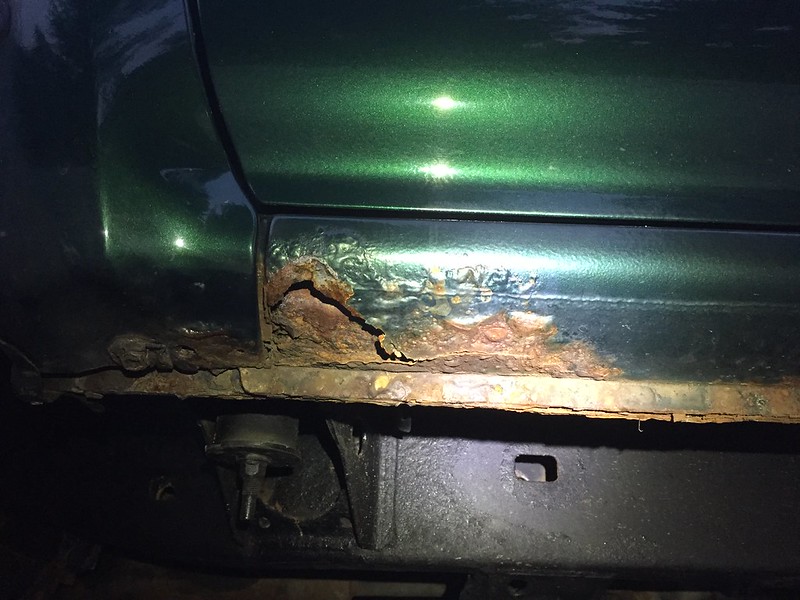 Untitled by jtolson26, on Flickr
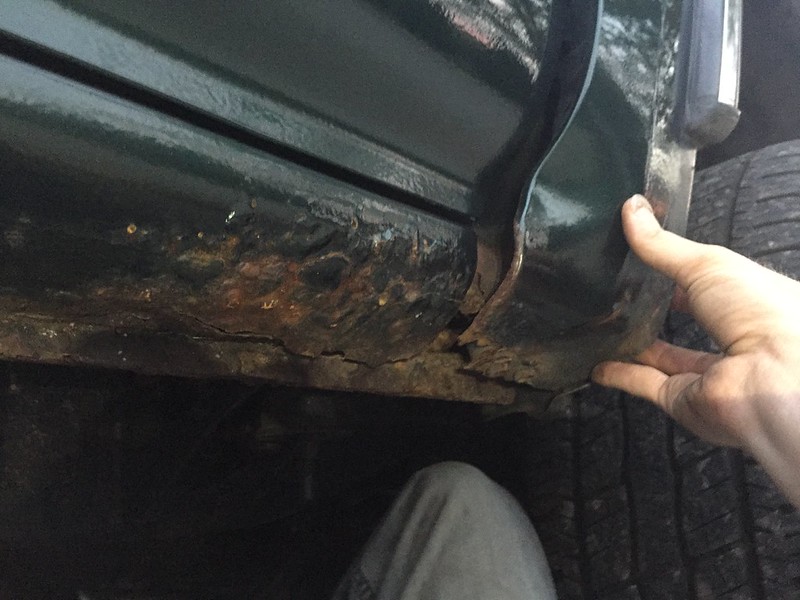 Untitled by jtolson26, on Flickr
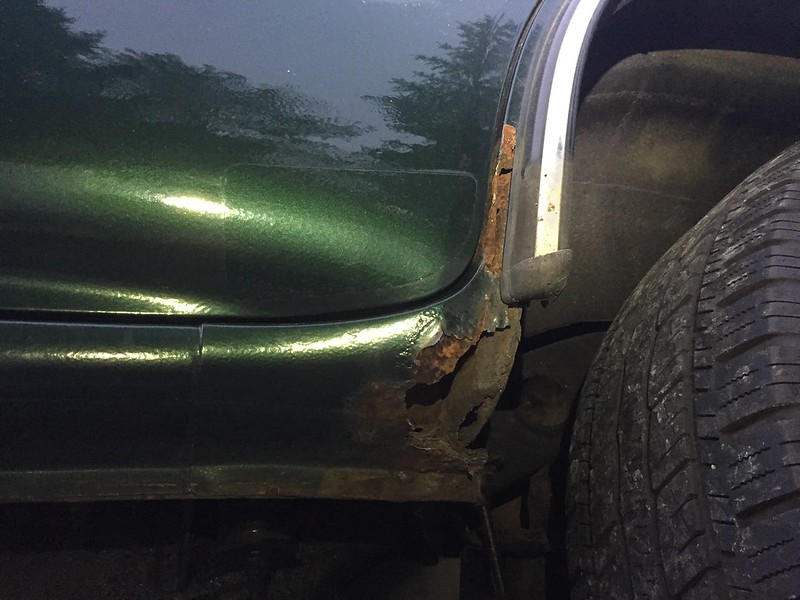 Untitled by jtolson26, on Flickr
I have an uncle who is, among many other things, good with welding. Though he lives 6 hours away I plan on taking a long weekend away from NE Ohio in February and bring the rig to him to let him do some magic. I’m leaning towards ordering the aftermarket rockers from Wolf Steel in Canada. From there I might slap some truck bed liner on it and just leave it with a rough/textured look. Any opinions on that?
11-15-17
First thing’s First – rear axle seals and bearings
Right off I smelled the unfortunate aroma of gear oil. Sure enough: blown rear seals. After a lot of research I took it to a trusty mechanic of mine who is always willing to listen to any input I have on certain jobs. I directed him to the video by [MENTION=120071]mtbtim[/MENTION] and [MENTION=102606]infamousRNR[/MENTION] and he ordered the special tool for his press, performed the grease test and now I have a brand new set of rear seals, bearings, brake shoes, etc.
I ordered most of the parts from Camelback and few from Ebay.
Evidence of the grease test he sent me:
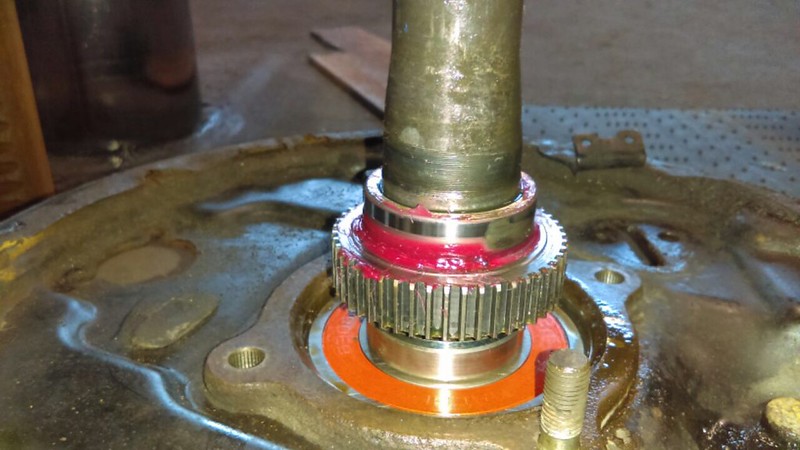 Untitled by jtolson26, on Flickr
I would have liked to tackle this on my own but without a garage and in the cold/rain/snow/wind: I didn’t want to leave it up on jackstands, be crawling around underneath, etc. while Tom (the mechanic) did the press work. Maybe next time!
An aside: Tom at Akron Auto Parts and Service is the guy to go to in NE Ohio for this job now that he’s been through it and has all the necessaries.
I figured I better not take the chance with an old breather plug on the rear differential so I replaced it with OEM. I might do the extended breather diff mod eventually but for now the regular will have to do.
Old plug:
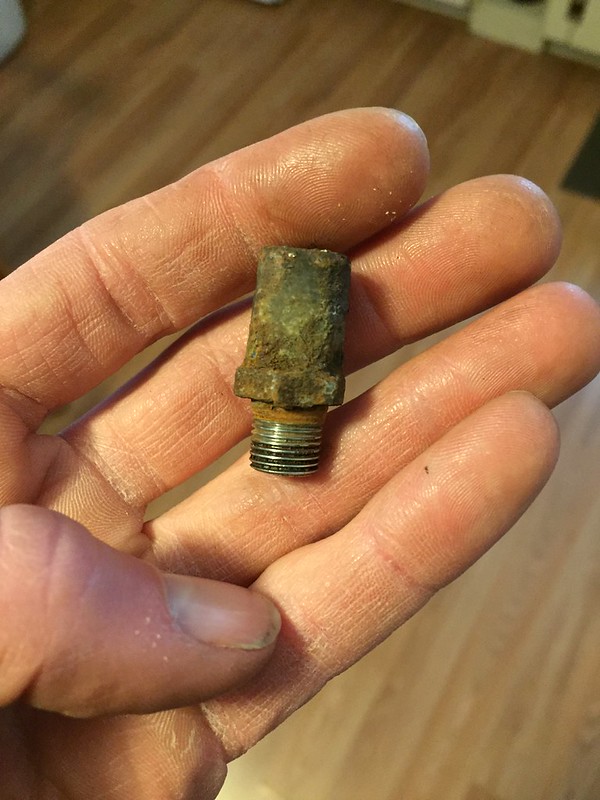 Untitled by jtolson26, on Flickr
New plug installed:
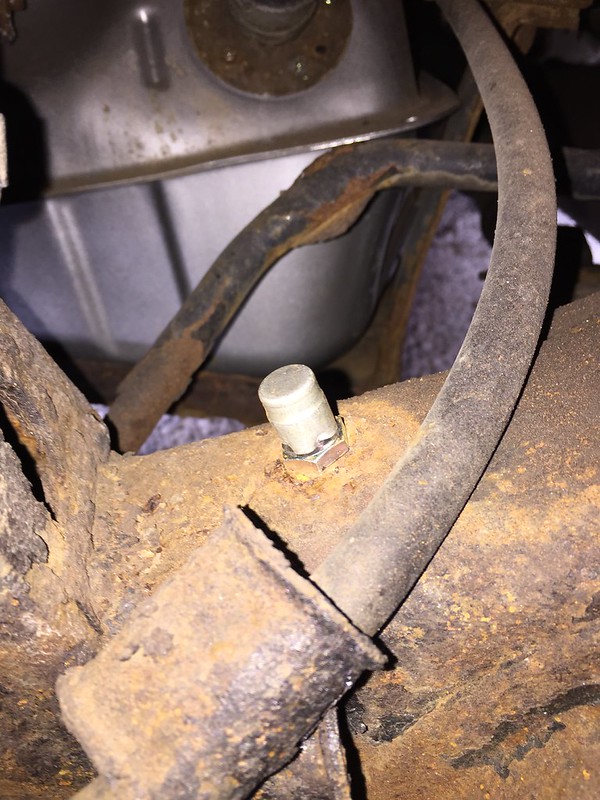 Untitled by jtolson26, on Flickr
12-16-17
New thermostat and gasket
With my Scangauge II connected I was reading temps as high as 213 °F.
Scanguage info before swapping thermostat:
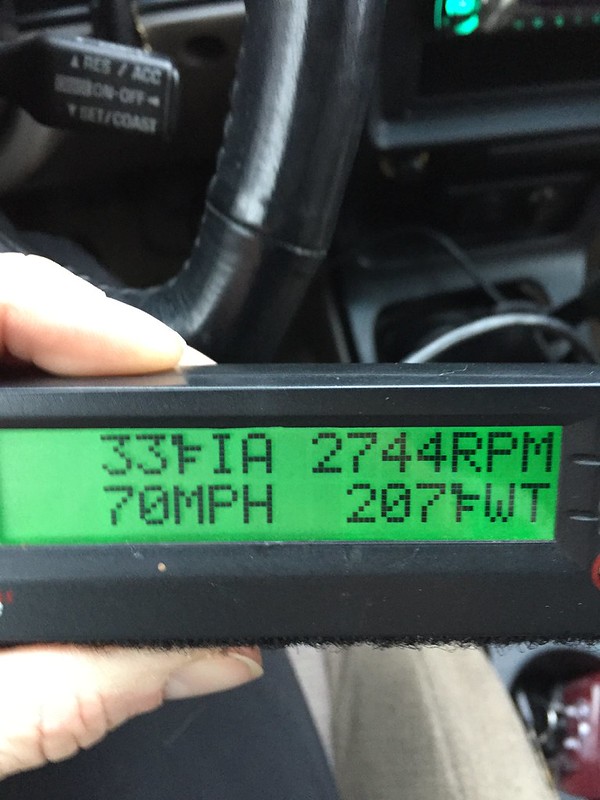 4runner by jtolson26, on Flickr
I know that wasn’t the norm as my other 4runner never, ever reached higher than 193 °F and 99% of the time ran between 188 °F and 191 °F. After some reading I figured it was the old jiggle valve causing the issue. The timing belt, etc was replaced at 166,000 miles so I thought there was a good chance they put the jiggle valve at 12 o’clock. I went ahead and ordered a new OEM thermostat and gasket. Sure enough, 12 o’clock(ish) position.
Old thermostat position:
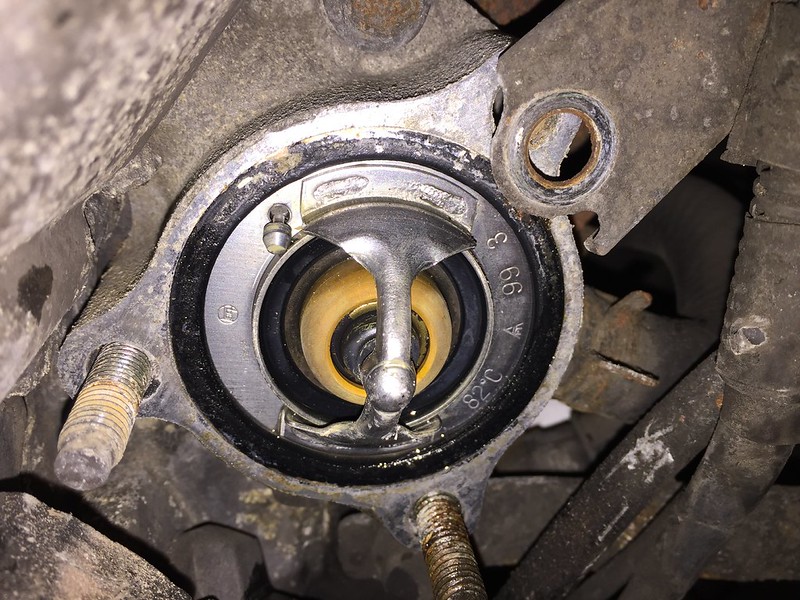 4runner by jtolson26, on Flickr
I did have one of the threaded studs come out when I was taking off the thermostat housing. The other two stayed in place. I went ahead and wire brushed away some of the crud and soaked it in penetrating oil, the with some vice grips and a ratchet it came right off. Easy as pie.
Threaded thermostat housing stud:
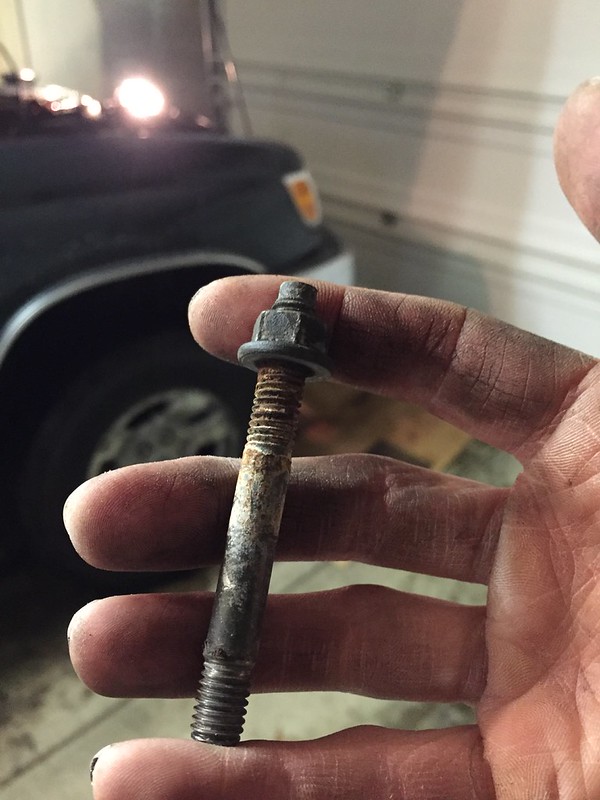 4runner by jtolson26, on Flickr
Scangauge info post thermostat swap:
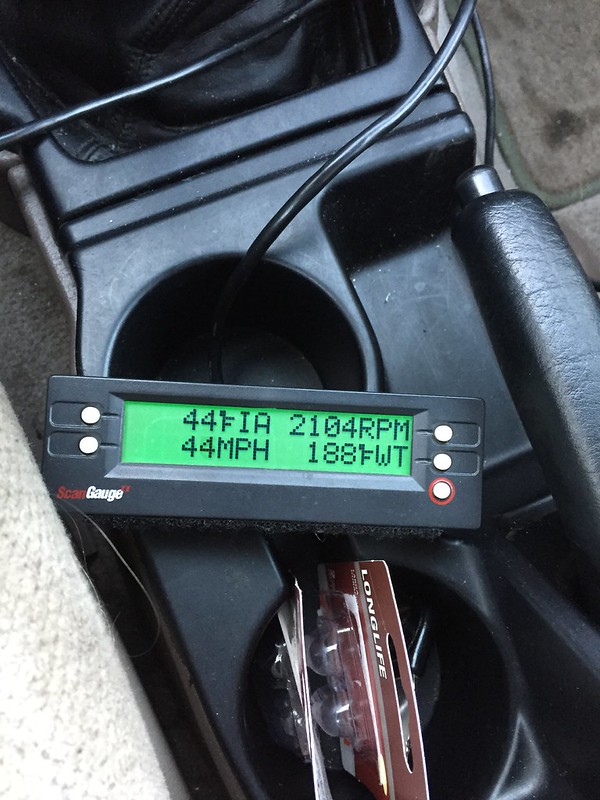 4runner by jtolson26, on Flickr
12-18-17
A little bit of steering play and wandering: sway bar bushings and steering wheel mod
From the outset I saw that the sway bar bushings were TOAST.
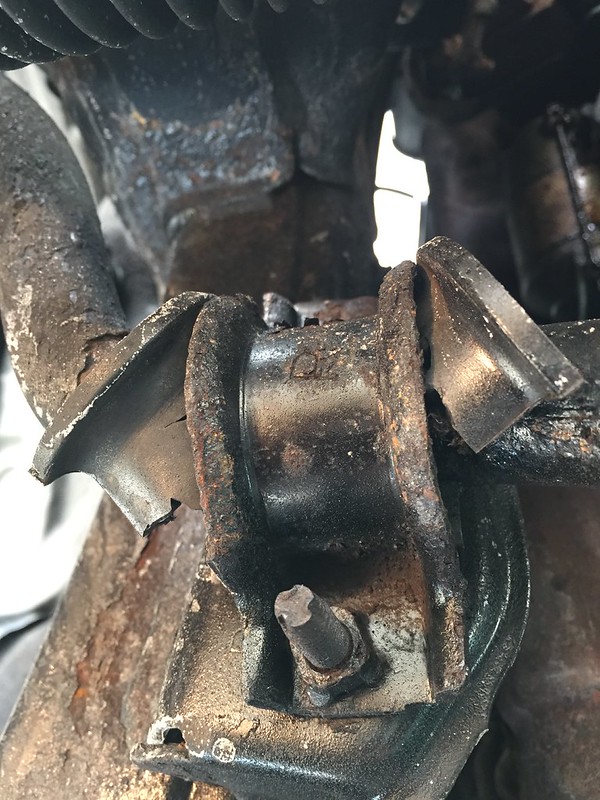 4runner by jtolson26, on Flickr
I was able to get the driver side off in about 6 minutes. The passenger side however: pure hell. I got the nut off the welded stud off just fine, but couldn’t, for the life of me, get the bolt out of the welded nut. After way too long laying on my buddies cold garage floor I gave up, took it to a trust mechanic and he torched it off for me.
Now I have new sway bar brackets and bushings. Doorman brackets. OEM bushings.
The steering wheel/shaft mod is my favorite mod so far. That play in the steering wheel was incredibly annoying and driving on the interstate at highway speeds was frustrating. Since I have a 3500-4000 mile road trip coming up in less than a week, I wanted that taken care of. I read the TTORA discussion thread about it as well as what people did here and gave it a whirl. I had some apprehension about messing with the steering column but fortunately it ended up fine. It wasn’t without headache, however.
Disassembly was a breeze.
1. Take off clam shell behind steering wheel. 3 screws. One on each side of steering wheel facing you (must turn steering wheel 90 degrees to expose) and one underneath.
2. Loosen spline bolt at the bottom of the shaft near the fire-wall. I marked where it was supposed to be flush and I’m glad I did. On mine, the splines could only go in one way because there is a flat edge.
3. Put the steering wheel tilt all the way up and removed the two top springs. I found it easiest to use vice-grips as many others have implied. Latch the grips on to the long, straight part of the spring so that the vice grips are perpendicular to the spring itself. Then use both hands with one hand around the head/pliers end of the vice grips and the other hand on the handle and pull the spring towards you (when seated facing the steering wheel). Once the hook clears the hole in the bracket, pull downward a tad to get completely clear the bracket. That probably made no sense but I tried.
4. Loosen the two 6mm Allen bolts. My right one came off pretty easily, the left one took a lot of force, but possibly because the wrench itself is so short I couldn’t create a lot of torque.
5. Careful when pulling the bolts out completely because once you do the steering wheel is free to rotate and you don’t want it to rotate all the way around as there are still springs to be careful of.
6. Pull out the steering wheel and shaft. For me, this took a bit of force and perpendicular-plane manipulation.
7. Take the shaft itself off the steering wheel.
You’re left with this:
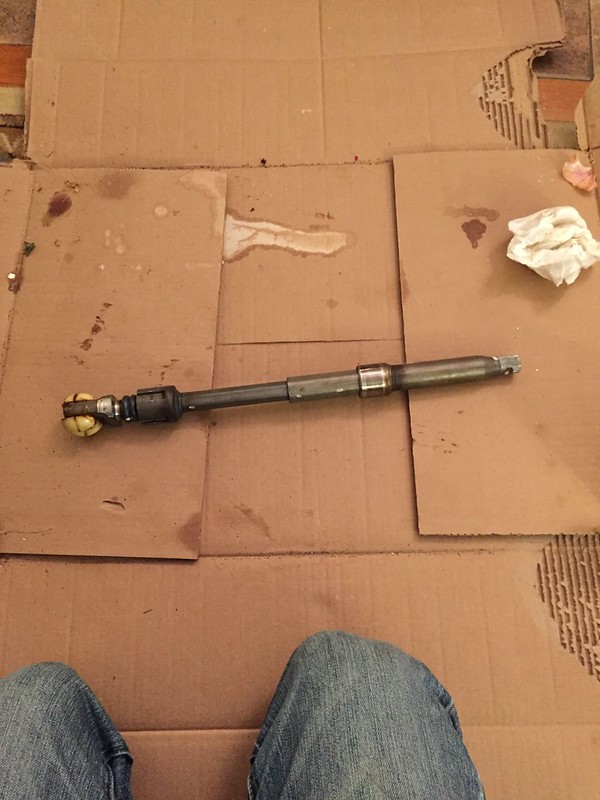 Untitled by jtolson26, on Flickr
Here’s a video in which you can clearly here the clicking sound made by the bad slip joint. The play is very minimal in terms of net rotation but the sound is quite audible.
 Video of slip joint by jtolson26, on Flickr
8. I used a 5/32 drill bit initially to drill through, stopping every so often to clear the shavings. Then I used a 3/16 drill bit.
After drilling:
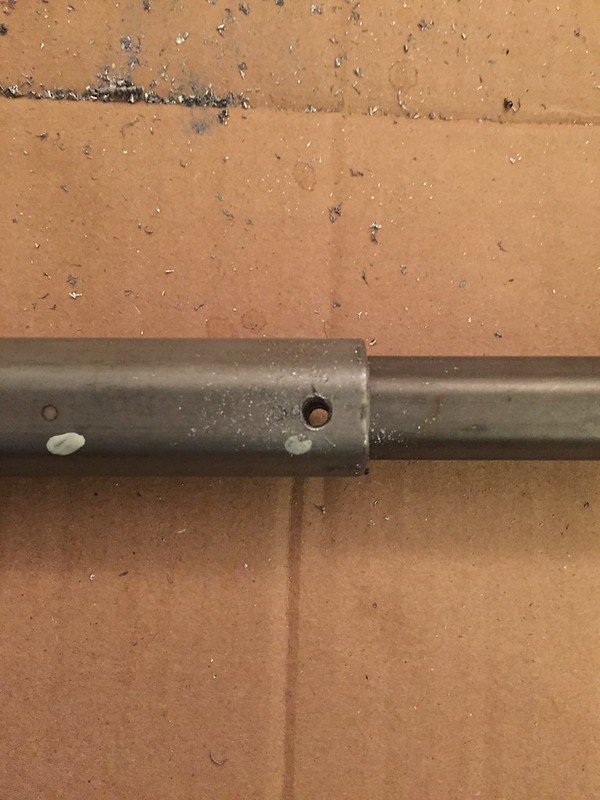 4runner by jtolson26, on Flickr
9. Pounded in a 3/16 inch tension rod. I didn’t pound it all the way through because it was starting to deform the head of the rod, so I felt to see if there was any play (there was none) so I just cut it off with a hack saw, grinded it down, and left it at that. I didn’t mean to nick up the shaft so much, but hopefully it doesn’t matter.
After pounding in the rod:
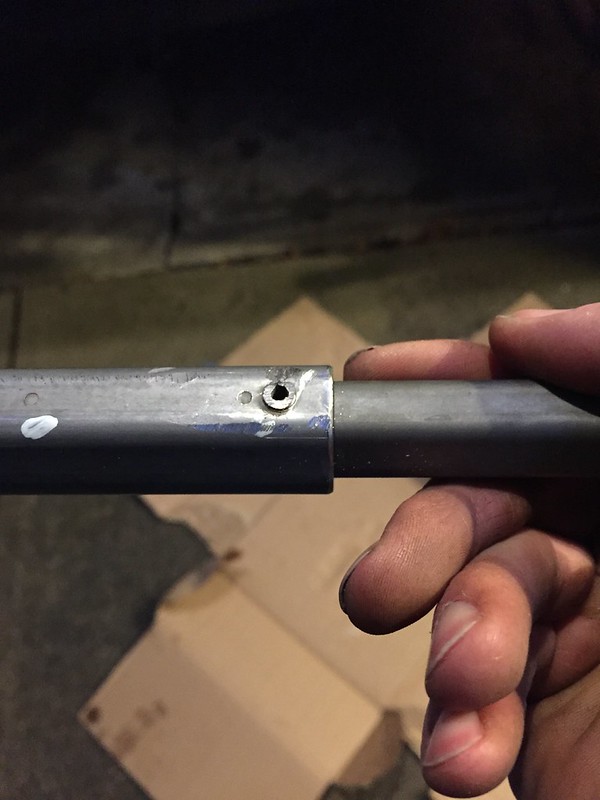 4runner by jtolson26, on Flickr
10. Reassemble. For me, this was the headache because I didn’t initially get the steering wheel lined up correctly with the housing on the dash and I didn’t realize it. I was about an eighth of an inch off so that the Allen bolts wouldn’t line up correctly and I couldn’t figure out why. Eventually I did.
The steering feels so, so, so much better. I can’t even describe how nice it is. There was barely any noticeable movement at the slip joint, but when you project that out to the circumference of our steering wheels, it becomes so much more noticeable. Now there is none. I love it.
A member recently encouraged me to start one of these threads. This will by no means be half as entertaining or informative as the countless build and adventure threads on here. I am no where near as talented as so many of you are. I’m just a regular guy with some tools who too often tackles projects that take way longer than they should and often find myself asking: “What the hell is going on out here?!”
Cheers.
JT
In light of that, and in light of my deep and undying love for the Green Bay Packers (sorry, born into without a choice) as well as the fact that my latest 4runner is green, I named this the Vince Lombardi Build Thread.
Truth be told, it won’t be much of a build thread. It won’t be lifted. It won’t be sporting huge tires. It likely won’t even be armored. Hopefully it will, someday, be sporting a rear locker though…I am enamored with rear lockers! Anyways…I love these things stock, for the most part. I do have a dream of also one day throwing in a supercharger but that is a ways down the road.
General Details:
1999 SR5
184,000 at purchase
Green/Jade
5spd
Completed Maintenance/Upgrades/Mods
• New rear bearings, inner and outer seals, brake shoes (11/15/17, 185,000 miles)
• New thermostat with jiggle valve at 6 o’clock (12/16/17, 185,200 miles)
• New sway bar brackets and bushings (12/18/19, 185,200 miles)
• Steering shaft slip-joint mod to eliminate steering play (12/18/19, 185,200 miles)
Desired Maintenance/Upgrades/Mods…some are admittedly fantasies
• Rear air-locker or e-locker
• Supercharger and corollary upgrades (7th injector, etc)
• Replace hood latch cable
• Replace rocker panels, rear wheel trim and possibly front fenders due to rust
• Taco Whip Antenna
• Fog lights
• LBJs
• Rack bushings
• Tie rods
• Tundra 231mm upgrade
• I know I’m forgetting stuff…I’ll add as I remember
Every car has a story, or, maybe more accurately, every driver has a story that is heavily influenced by the car they drive. That is especially true of those of you who follow this forum religiously. I wish I could go back and document the story of the 4runner I have had for the last 5 ½ years. Suffice to say, when I bought it there was a little over 190,000 miles on it and it now has 294,000 miles. It has taken me to the Grand Canyon; through Death Valley; the Pacific Coast; New York City; high into the rocky mountains of Wyoming, Idaho, Montana and Colorado; to the US Olympic Trials for Track and Field in Eugene, OR; and I must not forget the Barney Riley jeep trail on the California-Nevada border (that was interesting!). It also served as my daily driver for a few of those years and has made countless trips from the Cleveland/Akron, OH area to SW Ohio farm country where my parents live. It has, by far, been the best vehicle I have ever owned. In the 50,000 miles of cross country traveling it has done it has had the following problems:
1. Flat tire
2. Flat tire
3. Rear u-joint going bad and replaced in Sacramento, CA this past summer.
That’s it, and, quite frankly, that’s incredible. I will miss it dearly. So dearly, in fact, that I can’t quite put it up for sale yet.
The Old Guard:
Untitled by jtolson26, on FlickrServing me well:
Untitled by jtolson26, on FlickrOn the open road:
Untitled by jtolson26, on FlickrAnd off the beaten path:
Untitled by jtolson26, on FlickrSo, why a new/different one? Quite simply, I love driving 5spds. My old one is an automatic and I often found myself yearning for a 5spd. There isn’t really any rhyme or reason to it. I guess I just like it.
So, a couple months ago I picked up a 1999, Jade 5spd with 184,000 miles and more rust than I thought (some of you have probably seen the “was it worth it” thread, but, I’ve decided to love it anyways and make it my own.
10-10-17
Here she is a couple days after purchase – sans running boards:
Untitled by jtolson26, on FlickrI don’t expect the outward appearance to change a whole lot. It will be a rig designed to drive me thousands of miles across the country and then take me off road if need be. I don’t want to compromise the stellar 22 MPG
Here are some rust issues where the running/cancer boards collected crap for years:
Untitled by jtolson26, on FlickrUntitled by jtolson26, on FlickrUntitled by jtolson26, on FlickrI have an uncle who is, among many other things, good with welding. Though he lives 6 hours away I plan on taking a long weekend away from NE Ohio in February and bring the rig to him to let him do some magic. I’m leaning towards ordering the aftermarket rockers from Wolf Steel in Canada. From there I might slap some truck bed liner on it and just leave it with a rough/textured look. Any opinions on that?
11-15-17
First thing’s First – rear axle seals and bearings
Right off I smelled the unfortunate aroma of gear oil. Sure enough: blown rear seals. After a lot of research I took it to a trusty mechanic of mine who is always willing to listen to any input I have on certain jobs. I directed him to the video by [MENTION=120071]mtbtim[/MENTION] and [MENTION=102606]infamousRNR[/MENTION] and he ordered the special tool for his press, performed the grease test and now I have a brand new set of rear seals, bearings, brake shoes, etc.
I ordered most of the parts from Camelback and few from Ebay.
Evidence of the grease test he sent me:
Untitled by jtolson26, on FlickrI would have liked to tackle this on my own but without a garage and in the cold/rain/snow/wind: I didn’t want to leave it up on jackstands, be crawling around underneath, etc. while Tom (the mechanic) did the press work. Maybe next time!
An aside: Tom at Akron Auto Parts and Service is the guy to go to in NE Ohio for this job now that he’s been through it and has all the necessaries.
I figured I better not take the chance with an old breather plug on the rear differential so I replaced it with OEM. I might do the extended breather diff mod eventually but for now the regular will have to do.
Old plug:
Untitled by jtolson26, on FlickrNew plug installed:
Untitled by jtolson26, on Flickr12-16-17
New thermostat and gasket
With my Scangauge II connected I was reading temps as high as 213 °F.
Scanguage info before swapping thermostat:
4runner by jtolson26, on FlickrI know that wasn’t the norm as my other 4runner never, ever reached higher than 193 °F and 99% of the time ran between 188 °F and 191 °F. After some reading I figured it was the old jiggle valve causing the issue. The timing belt, etc was replaced at 166,000 miles so I thought there was a good chance they put the jiggle valve at 12 o’clock. I went ahead and ordered a new OEM thermostat and gasket. Sure enough, 12 o’clock(ish) position.
Old thermostat position:
4runner by jtolson26, on FlickrI did have one of the threaded studs come out when I was taking off the thermostat housing. The other two stayed in place. I went ahead and wire brushed away some of the crud and soaked it in penetrating oil, the with some vice grips and a ratchet it came right off. Easy as pie.
Threaded thermostat housing stud:
4runner by jtolson26, on FlickrScangauge info post thermostat swap:
4runner by jtolson26, on Flickr12-18-17
A little bit of steering play and wandering: sway bar bushings and steering wheel mod
From the outset I saw that the sway bar bushings were TOAST.
4runner by jtolson26, on FlickrI was able to get the driver side off in about 6 minutes. The passenger side however: pure hell. I got the nut off the welded stud off just fine, but couldn’t, for the life of me, get the bolt out of the welded nut. After way too long laying on my buddies cold garage floor I gave up, took it to a trust mechanic and he torched it off for me.
Now I have new sway bar brackets and bushings. Doorman brackets. OEM bushings.
The steering wheel/shaft mod is my favorite mod so far. That play in the steering wheel was incredibly annoying and driving on the interstate at highway speeds was frustrating. Since I have a 3500-4000 mile road trip coming up in less than a week, I wanted that taken care of. I read the TTORA discussion thread about it as well as what people did here and gave it a whirl. I had some apprehension about messing with the steering column but fortunately it ended up fine. It wasn’t without headache, however.
Disassembly was a breeze.
1. Take off clam shell behind steering wheel. 3 screws. One on each side of steering wheel facing you (must turn steering wheel 90 degrees to expose) and one underneath.
2. Loosen spline bolt at the bottom of the shaft near the fire-wall. I marked where it was supposed to be flush and I’m glad I did. On mine, the splines could only go in one way because there is a flat edge.
3. Put the steering wheel tilt all the way up and removed the two top springs. I found it easiest to use vice-grips as many others have implied. Latch the grips on to the long, straight part of the spring so that the vice grips are perpendicular to the spring itself. Then use both hands with one hand around the head/pliers end of the vice grips and the other hand on the handle and pull the spring towards you (when seated facing the steering wheel). Once the hook clears the hole in the bracket, pull downward a tad to get completely clear the bracket. That probably made no sense but I tried.
4. Loosen the two 6mm Allen bolts. My right one came off pretty easily, the left one took a lot of force, but possibly because the wrench itself is so short I couldn’t create a lot of torque.
5. Careful when pulling the bolts out completely because once you do the steering wheel is free to rotate and you don’t want it to rotate all the way around as there are still springs to be careful of.
6. Pull out the steering wheel and shaft. For me, this took a bit of force and perpendicular-plane manipulation.
7. Take the shaft itself off the steering wheel.
You’re left with this:
Untitled by jtolson26, on FlickrHere’s a video in which you can clearly here the clicking sound made by the bad slip joint. The play is very minimal in terms of net rotation but the sound is quite audible.
Video of slip joint by jtolson26, on Flickr8. I used a 5/32 drill bit initially to drill through, stopping every so often to clear the shavings. Then I used a 3/16 drill bit.
After drilling:
4runner by jtolson26, on Flickr9. Pounded in a 3/16 inch tension rod. I didn’t pound it all the way through because it was starting to deform the head of the rod, so I felt to see if there was any play (there was none) so I just cut it off with a hack saw, grinded it down, and left it at that. I didn’t mean to nick up the shaft so much, but hopefully it doesn’t matter.
After pounding in the rod:
4runner by jtolson26, on Flickr10. Reassemble. For me, this was the headache because I didn’t initially get the steering wheel lined up correctly with the housing on the dash and I didn’t realize it. I was about an eighth of an inch off so that the Allen bolts wouldn’t line up correctly and I couldn’t figure out why. Eventually I did.
The steering feels so, so, so much better. I can’t even describe how nice it is. There was barely any noticeable movement at the slip joint, but when you project that out to the circumference of our steering wheels, it becomes so much more noticeable. Now there is none. I love it.
A member recently encouraged me to start one of these threads. This will by no means be half as entertaining or informative as the countless build and adventure threads on here. I am no where near as talented as so many of you are. I’m just a regular guy with some tools who too often tackles projects that take way longer than they should and often find myself asking: “What the hell is going on out here?!”
Cheers.
JT


