4Runner4TW
New member
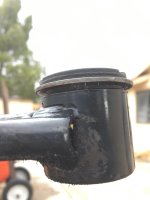
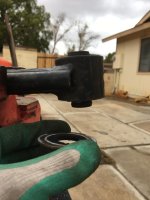
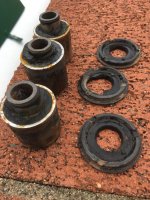
Discovered an easy way to press out your old Upper A Arm bushings INCLUDING the sleeve! Some aftermarket kits do not require this however Toyota OEM bushings do have the new sleeve.
Tools I used:
Toyota OEM part # 48632-35080
Wrench and socket set
Rent or Buy the Ball Joint Press from an auto store (I only used one adapter from the whole kit!)
Propane torch
Some washers and a large socket
Bench vice
Sawzall
1. Remove the Upper A Arm and Upper ball joint. Lots of how to's and videos on this already so I wont get into it. My advice is to go at the long bolts through the wheel well. I personally had to remove my battery and a relay that was under the battery. This aloud enough room to slide out the long bolt. Over all the removal was very simple.
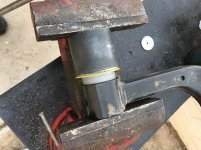
2. Use a reciprocating saw or "sawzall" to cut the busing "lip" off the old bushing. Bring the saw around the bushing to insure you have cut all the way around it. Be careful not to hit the A Arm itself. I did brush it a few times, but afterwords I hit it with some black paint. There is a small gap just large enough to get the blade in there.This gap guides the saw pretty well. I secured the A Arm in the vice so it would hold true.
3. Using the appropriate adapter set up a combo of Sleeve-->Bushing-->Washer (just small enough to fit into the bushing hole)-->socket into your vice.
Next preload the vice good and tight!
4. Heat up the A Arm. See video below. While heating the A Arm up have a friend or youself start to add load to the vice. I only had to heat each side up for about 1-2 minutes.
https://www.instagram.com/p/BfIMCkkH3C1/?taken-by=48thstateoverland
5. The same adapter you used to "catch" the old bushing can be used to press in the new bushing. The bushing goes in quite a bit by hand; you only have to finish it off about a half inch. I pressed it in until flush on the inner side.
6. Reinstall A Arms. Tighten for now. Torque to spec only when you put the tires back on and set back onto the ground.
Upper A Arm: 87ft/lbs
Upper Ball Joint: 80ft/lbs
Tools I used:
Toyota OEM part # 48632-35080
Wrench and socket set
Rent or Buy the Ball Joint Press from an auto store (I only used one adapter from the whole kit!)
Propane torch
Some washers and a large socket
Bench vice
Sawzall
1. Remove the Upper A Arm and Upper ball joint. Lots of how to's and videos on this already so I wont get into it. My advice is to go at the long bolts through the wheel well. I personally had to remove my battery and a relay that was under the battery. This aloud enough room to slide out the long bolt. Over all the removal was very simple.
2. Use a reciprocating saw or "sawzall" to cut the busing "lip" off the old bushing. Bring the saw around the bushing to insure you have cut all the way around it. Be careful not to hit the A Arm itself. I did brush it a few times, but afterwords I hit it with some black paint. There is a small gap just large enough to get the blade in there.This gap guides the saw pretty well. I secured the A Arm in the vice so it would hold true.
3. Using the appropriate adapter set up a combo of Sleeve-->Bushing-->Washer (just small enough to fit into the bushing hole)-->socket into your vice.
Next preload the vice good and tight!
4. Heat up the A Arm. See video below. While heating the A Arm up have a friend or youself start to add load to the vice. I only had to heat each side up for about 1-2 minutes.
https://www.instagram.com/p/BfIMCkkH3C1/?taken-by=48thstateoverland
5. The same adapter you used to "catch" the old bushing can be used to press in the new bushing. The bushing goes in quite a bit by hand; you only have to finish it off about a half inch. I pressed it in until flush on the inner side.
6. Reinstall A Arms. Tighten for now. Torque to spec only when you put the tires back on and set back onto the ground.
Upper A Arm: 87ft/lbs
Upper Ball Joint: 80ft/lbs