When you installed your lift what would you tell the next guy to do/not to do?

I think the most technical portion of the install will be the UCAs. There is actually a pretty good video on TC's YouTube where they install their UCAs in a Tacoma... which is essentially the same IFS setup at the 4R. I am just going to follow that and pray to the gods of jelly that nothing happens.

I paid for my lift to be installed but did the UCA's myself, with a second set of hands it was pretty darn easy. Watched that same YouTube video!
 
ANTMAN I would like to install a 10mm disc on top of the rear spring on the driver side rear to level out my 2014 4wd 4runner that is 1/2 inch low on the driver side under all conditions i.e. with a full or nearly empty gas tank. How would the best and easiest way to do this? By the way i'am going to install bilstein 5100 on the rear at the same time. You seem to know more than anyone else about this type of stuff so you would know all the tricks like not using spring compressers etc. Thank you so much.
 
Do it right the first time

I have said it before, but I'm glad my wife (and guys on this forum) pushed me to spend extra on the ICON and not mess with cheap spacer lifts. The ride is much better than stock, and I don't have to do it twice.... until I get armor and need heaver front springs :)
 
Sorry dude... Scott beat you to it. He told me all this last night ;)

dont think I dont appreciate you though. I'll send you a beer for being a standup dude how about that?

LOL- Who do you think I PM'd for most of those tips? HAHA!

Just passing on the knowledge. Scott is the man!:clap2:
 
Do's: work the day you were going to take off to install it. pay someone else to do it for you. if/when something goes wrong, drop your vehicle back off to them to fix, go back to work and continue making money. save up for the parts you really want, don't buy what you can afford now, and do it all over again later.

Dont's : don't take off work or take time away from family to install it yourself. don't cheap out thinking you will get the right stuff later on.

I'm sure i will get crap for this, but i installed mine with a friend on a day that i could've spent hanging out with my daughter, and it was a pain in the ass. I would've rather worked an extra hour a day the days i worked that week and just paid someone to do it.
 
Do's: work the day you were going to take off to install it. pay someone else to do it for you. if/when something goes wrong, drop your vehicle back off to them to fix, go back to work and continue making money. save up for the parts you really want, don't buy what you can afford now, and do it all over again later.

Dont's : don't take off work or take time away from family to install it yourself. don't cheap out thinking you will get the right stuff later on.

I'm sure i will get crap for this, but i installed mine with a friend on a day that i could've spent hanging out with my daughter, and it was a pain in the ass. I would've rather worked an extra hour a day the days i worked that week and just paid someone to do it.

If you have the experience, knowledge and tools (and backup knowledge from EVERYONE on this forum) the install isn't hard at all. Once you do it a few times it gets pretty damn straightforward and easy.
It's hard to beat the satisfaction of doing it yourself and knowing it's done correctly!

Now, if you don't have those things it makes more sense to let someone else install it.:biggrin2:
 
I got everything installed and I just finished adjusting the fronts for the mount/balance/alignment tomorrow. Post install thoughts: it was pretty fun. A few parts were challenging. If you buy the overland 3" springs from icon you pretty much have to remove the rear UCAs to drop the axle enough to fit the longer springs. Second... PRO TIP: disconnect ALL wire looms, harnesses, and line BEFORE even jacking the vehicle up. We left one side attached and disconnected the upper ball joint from the spinel...good thing nothing bad happened (no idiot lights). Doing the front and rears prior will just allow you to move quicker. Lastly, this is a 2 man job unless you are in 1) great shape (I am broken from several OTW missions for the military) 2) have great confidence and knowledge of what you're doing and 3) DONT have extended rear springs. If you have to drop the rear UCAs then it just became a 2 man job. That was tough.

I hope this thread continues. I hope it inspired people to do their own work and save a little extra cash. I'm looking at a cool 500+ in savings by doing it myself. That's money toward my unborn twin children (or beer).

Please post your experiences here and let this thread serve as a reference to those who need some of the smaller, important, yet overlooked pieces of the puzzle.

More to follow.
 
I got everything installed and I just finished adjusting the fronts for the mount/balance/alignment tomorrow. Post install thoughts: it was pretty fun. A few parts were challenging. If you buy the overland 3" springs from icon you pretty much have to remove the rear UCAs to drop the axle enough to fit the longer springs. Second... PRO TIP: disconnect ALL wire looms, harnesses, and line BEFORE even jacking the vehicle up. We left one side attached and disconnected the upper ball joint from the spinel...good thing nothing bad happened (no idiot lights). Doing the front and rears prior will just allow you to move quicker. Lastly, this is a 2 man job unless you are in 1) great shape (I am broken from several OTW missions for the military) 2) have great confidence and knowledge of what you're doing and 3) DONT have extended rear springs. If you have to drop the rear UCAs then it just became a 2 man job. That was tough.

I hope this thread continues. I hope it inspired people to do their own work and save a little extra cash. I'm looking at a cool 500+ in savings by doing it myself. That's money toward my unborn twin children (or beer).

Please post your experiences here and let this thread serve as a reference to those who need some of the smaller, important, yet overlooked pieces of the puzzle.

More to follow.

I only did 1.5" spacers in the rear and I still had to use spring compressors to get them to fit. I was working by myself though.
 
[MENTION=103396]4rnrgrl[/MENTION] - did we install extended travel rear springs on yours, or just heavy duty?

I ask because I don't understand why so many people are having trouble fitting rear lift springs easily.

Only thing I ever disconnect are the brake line brackets, shocks and the sway bar end links. Every time i've done it (4 times now) the stock springs have literally fallen out and the new, longer springs slide into place very easily.

Are you guys articulating the axle fully?
 
[MENTION=103396]4rnrgrl[/MENTION] - did we install extended travel rear springs on yours, or just heavy duty?

I ask because I don't understand why so many people are having trouble fitting rear lift springs easily.

Only thing I ever disconnect are the brake line brackets, shocks and the sway bar end links. Every time i've done it (4 times now) the stock springs have literally fallen out and the new, longer springs slide into place very easily.

Are you guys articulating the axle fully?

I'm certainly not saying that I did everything correctly. I disconnected everything I could find and it took an act of God to get the new springs in. I'm wanting to install my airbags but I really don't want to have to remove the springs again.
 
[MENTION=103396]4rnrgrl[/MENTION] - did we install extended travel rear springs on yours, or just heavy duty?

I ask because I don't understand why so many people are having trouble fitting rear lift springs easily.

Only thing I ever disconnect are the brake line brackets, shocks and the sway bar end links. Every time i've done it (4 times now) the stock springs have literally fallen out and the new, longer springs slide into place very easily.

Are you guys articulating the axle fully?

On my 4th gen I had to undo the panhard on top of the above to get the 700lbs Eibachs in easily. It wasn't that difficult to do on the lift...

[MENTION=126544]kapp_badbloodz[/MENTION]

Which brings me to, if you have a buddy who can get your truck on a hoist to the the job; bribe that sonofgun with the beer. Stuff just goes easier and quicker on a proper lift than jack stands. The universal rules I have learned from doing "shadetree mechanic" work (i.e. jackstands, in the backyard, ect.) and a proper shop are:

-It will take at minimum 2~3 times longer to do anything outside of a shop

-Something WILL go wrong, if you're lucky it will only be 1 small thing

-Alcohol is a double edged sword when working at home

-Make sure you have the right tools from the start, you're less like to half-ass it or jimmy rig something if you have the majority of the right stuff on hand, vs. when you've been busting knuckles for a couple hours in the sun and you're tired, stressed, and exhausted (which brings up another point, take a break if you're feeling THAT tired or frustrated, you're not a flat rate mechanic and a 5min break works wonders for refreshing you and keeping a clear head when working in a dangerous position like under a car.)

-Take your time and do it right the first time! Set aside a healthy amount of time (like I said at least 2~3 times what you expect it to be done in) and try not to short cut things, you'll find that more often than not you'll be doing the job over again because you tried to short cut it.

-Friends can be great to have, but even an extra set of hands can easily become a "too many cooks in the kitchen situation." So make sure you're communicating and planning with your friends on what needs to be done clearly.

I think that's a good amount of advice I can impart.

 
Just installed my Sonoran Steel 5th gen lift today. Spent 7 hours doing it as it was my first lift ever and my jack sucks. But for the rears if you articulate it correctly, undo the swaybar end links, the stock springs fall out. I installed radflo 2" rear lift springs and all I had to do was push down on the axle a little and push the spring over the hump. It took a little extra effort but wasn't bad. It does help to do the rears one side at a time with the other side having the tire on and on the ground.
 
.

Only thing I ever disconnect are the brake line brackets, shocks and the sway bar end links. Every time i've done it (4 times now) the stock springs have literally fallen out and the new, longer springs slide into place very easily.

Are you guys articulating the axle fully?

We did all that and the old springs had more than enough room to come out. Even with articulating the axle both left/right and up and down we couldn't get the larger overland springs in. It was a huge PITA. Tired the pry bar trick and couldn't get the top seated in a well enough position so the bottom wouldn't pop off.

Mind you these are the springs recommended for rear aftermarket bumpers.
 
[MENTION=66389]BlackWorksInc[/MENTION] we did everything on a lift and had access to great tools. It was done by us at the Auto Hobby Shop on the AFB I'm stationed at. I appreciate the advice though :) I wanted nothing to do with jacks and stands but it is possible to do it with those tools.
 
[MENTION=103396]4rnrgrl[/MENTION] - did we install extended travel rear springs on yours, or just heavy duty?

I ask because I don't understand why so many people are having trouble fitting rear lift springs easily.

Only thing I ever disconnect are the brake line brackets, shocks and the sway bar end links. Every time i've done it (4 times now) the stock springs have literally fallen out and the new, longer springs slide into place very easily.

Are you guys articulating the axle fully?

I just saw this.... there's a space between 4RnR and Grl..... 4Rnrgrl is my old username that needs to be deleted (can't login to that account).

We installed overland springs in the rear... I believe they are beefier/stiffer (that's what she said) and perhaps slightly taller to deal with extra weight in the rear?
 
If at all possible - and 18v impact driver and a larger air impact are enormous time savers. The 18v is great for all the little fasteners underneath for the skids and such that you'll pull off.

I also like to use a grease or paint marker for all the fasteners that are critical to safety. That way I can very quickly verify if anything has moved later.
 
Maybe I may skip the icon overland.... Let me know how they perform and pix if you have any on lift. Thx.

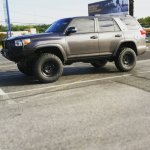
I have the overland rear springs. I am going to add some weight in the rear by way of storage, fridge, and rear bumper which is why I went with them. Here it is post lift, post alignment, with BFG KO2 285s. NOTE: there was no spare tire weighing down the rear either.
 

Attachments

  • Post lift real tires.jpg
    Post lift real tires.jpg
    89.4 KB · Views: 220

Members online

No members online now.

Forum statistics

Threads
278,315
Messages
3,554,130
Members
248,016
Latest member
Advally Service

Trending content

Back
Top