4th Gen Camping/Storage System - DIY-

Alright, stupid question time...

For those with a stove on the drawers, does your interior ever smell like the food you just cooked? I'd imagine if you had your doors open and the breeze was the right direction, it would, but what about w/ doors closed and just the hatch open with a breeze?

Not that I mind the smell of bacon.

This was a major concern of mine but I figured I'd just roll with it. The smell from cooking doesn't stick around from what I've noticed. Honestly I've smelled more from food-related items stored in the car, especially after they've been heated up from the sun.
 
This was a major concern of mine but I figured I'd just roll with it. The smell from cooking doesn't stick around from what I've noticed. Honestly I've smelled more from food-related items stored in the car, especially after they've been heated up from the sun.

Many meals cooked. just wipe it down and youre good!
 
[MENTION=172543]chewyspark47[/MENTION]
Would it be possible to get in truck pics?

Please enjoy some VERY expensive pictures. (Dropped the SO's phone while taking them and had to buy a replacement as the damage was not covered by Insurance. :Cry: Took me a better part of my spare time last week to recover these pics and the rest of her data from the broken phone. )

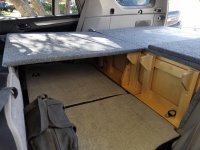
Look at Sleeping platform supports installed on front of Drawer system from Passenger Rear door both Rear Seats folded down:
http://www.toyota-4runner.org/attachment.php?attachmentid=317264&stc=1&d=1541383411

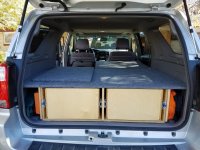
Look at Sleeping platform supports installed on front of Drawer system from Drivers Rear door with Passenger Side Platform installed. This view is similar to one of the Sketchup renders I posted earlier.:
http://www.toyota-4runner.org/attachment.php?attachmentid=317265&stc=1&d=1541383411

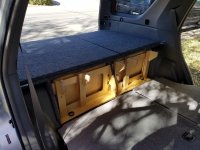
Look at Sleeping platform installed on Passenger Side Platform from rear of Truck (Drawer Fronts and side Panels removed for measuring some improvements for next year):
http://www.toyota-4runner.org/attachment.php?attachmentid=317266&stc=1&d=1541383411

Boort
 

Attachments

  • 2018_132753.jpg
    2018_132753.jpg
    135.3 KB · Views: 2,596
  • 2018_132943.jpg
    2018_132943.jpg
    134.7 KB · Views: 2,291
  • 2018_132906.jpg
    2018_132906.jpg
    135.3 KB · Views: 7,018
[MENTION=172543]chewyspark47[/MENTION]


Please enjoy some VERY expensive pictures. (Dropped the SO's phone while taking them and had to buy a replacement as the damage was not covered by Insurance. :Cry: Took me a better part of my spare time last week to recover these pics and the rest of her data from the broken phone. )

Look at Sleeping platform supports installed on front of Drawer system from Passenger Rear door both Rear Seats folded down:
http://www.toyota-4runner.org/attachment.php?attachmentid=317264&stc=1&d=1541383411

Look at Sleeping platform supports installed on front of Drawer system from Drivers Rear door with Passenger Side Platform installed. This view is similar to one of the Sketchup renders I posted earlier.:
http://www.toyota-4runner.org/attachment.php?attachmentid=317265&stc=1&d=1541383411

Look at Sleeping platform installed on Passenger Side Platform from rear of Truck (Drawer Fronts and side Panels removed for measuring some improvements for next year):
http://www.toyota-4runner.org/attachment.php?attachmentid=317266&stc=1&d=1541383411

Boort

Fantastic! Looks great. I went your route and put carpeting on the top of mine as well. I am really going to consider making these platforms as well, at least the 60 portion as I have a 4x4 piece left from the project yet...

Do you have any sort of latching mechanism? Any issues with the pieces sliding forward?

I'm sorry about your SO's phone... don't we all have those moments...
 
[MENTION=138967]Joex481[/MENTION]
Fantastic! Looks great. I went your route and put carpeting on the top of mine as well. I am really going to consider making these platforms as well, at least the 60 portion as I have a 4x4 piece left from the project yet...

Do you have any sort of latching mechanism? Any issues with the pieces sliding forward?

I'm sorry about your SO's phone... don't we all have those moments...

Thank you.

I find that I use the 60 portion most of the time as the cooler fits nicely in the 40 spot with the seat down and the 60 leaves me plenty of room to sleep when I'm out by myself.

No latching mechanism between the platform and the supports, just gravity. so far no problems with the platform sliding. Each of the supports are held upright by 1 screw just to keep them stable. It's hard to tell from the pic (2018_132943.jpg) but the supports are longer than the room the piece has to slide before hitting the back of the seat. Normally this gap is about 2 inches smaller as I move the front seats back and slightly recline them, pushing the seat bottoms rearwards, closing the gap. If I ever have to remake them I'll go buy a bigger piece of plywood and make them each 2.5"-3.5" longer front to back. These were made from the left over ply from the drawers and I did not want to go buy another sheet.

Yes we do. Sucks cause Christmas is coming and now we're out another $300 that was not in the budget on top of everything else this year.
Oh well... Life goes on. :laugh:

Boort
 
[MENTION=172543]chewyspark47[/MENTION]


Please enjoy some VERY expensive pictures. (Dropped the SO's phone while taking them and had to buy a replacement as the damage was not covered by Insurance. :Cry: Took me a better part of my spare time last week to recover these pics and the rest of her data from the broken phone. )

Look at Sleeping platform supports installed on front of Drawer system from Passenger Rear door both Rear Seats folded down:
http://www.toyota-4runner.org/attachment.php?attachmentid=317264&stc=1&d=1541383411

Look at Sleeping platform supports installed on front of Drawer system from Drivers Rear door with Passenger Side Platform installed. This view is similar to one of the Sketchup renders I posted earlier.:
http://www.toyota-4runner.org/attachment.php?attachmentid=317265&stc=1&d=1541383411

Look at Sleeping platform installed on Passenger Side Platform from rear of Truck (Drawer Fronts and side Panels removed for measuring some improvements for next year):
http://www.toyota-4runner.org/attachment.php?attachmentid=317266&stc=1&d=1541383411

Boort

Thank you for your sacrifice! It will be honored and appreciated by many!

This will give me something to do while save up for bumper/winch.
:jump:
 
From a fellow Bay Area native to another, thanks for the blueprints and the inspiration!

I followed your blueprints for the carcasses, but made slight adjustments to the drawers themselves.

I also wrapped the carcasses with some subwoofer carpeting.

G51WoS5.jpg


luVtg8s.jpg


Lastly, I chose to not build the cover for the wheel wells and instead, used a couple eye/hook turnbuckles to secure the boxes to the front anchor points.

QskzkMq.jpg


They're not perfect, but they're good enough for my first DIY woodworking project. Thanks again!
 
I had a wild idea that I feel might not be a great idea but thought I'd ask the dumb question anyways.

Is there anyway to make the sleeping platform piece slide under the drawers? Doing so we could shorten the height of the actual drawers themselves to be able to slide the platform underneath.
I was thinking if we could do that, perhaps we could make that platform a tad thicker and make it a pull out tailgate we could use to sit on as well?

Thought that would be kinda cool. Thoughts? Practicality? Overkill?

I am really looking forward to trying this with my limited wood working skills! Thank you again for the plans!
 
These plans are great! I plan on building this to use on my cross country road trip to California.
amazing, post pics!

Thanks for the DIY Free plans!

:becky:

Hey OP, thanks for the plans and the donations have gone through! Wanted to know what CAD program you used for the plans. Thanks!!

Solidworks

I had a wild idea that I feel might not be a great idea but thought I'd ask the dumb question anyways.

Is there anyway to make the sleeping platform piece slide under the drawers? Doing so we could shorten the height of the actual drawers themselves to be able to slide the platform underneath.
I was thinking if we could do that, perhaps we could make that platform a tad thicker and make it a pull out tailgate we could use to sit on as well?

Thought that would be kinda cool. Thoughts? Practicality? Overkill?

I am really looking forward to trying this with my limited wood working skills! Thank you again for the plans!

Awesome! :thumb3:

sounds cool to me, might weigh a lot to get the density you need, and it would shorten the overall height by 1/2 inch, but sure!
 
First time wood-worker

New video of how to assemble the drawer system!

Enjoy! :D


Hi Adam,

Not sure if you still frequent this thread (fingers crossed). I've been following this and dreaming about it for the last couple years. The time has come and I've cut all the wood.

I clicked and purchased all the Amazon-linked things (both allen-hex bolts were unavailable, sadly). Here's my challenge - I watched your youtube vid, also have all the plans printed out - I am not seeing which bolts/screws go into what holes. I'm assuming this is something woodworking people would say "obviously this goes here," etc. I am truly winging this. My kind friend and his wife have given me full access to his wood shop so I've got all the saws and such.

Have you come across a youtube video of someone who made your drawers and broke it down a bit more for dummies? Do you have a simpler one? I'm down to wing it but I feel like I'm already winging it quite a bit hahaha So any help would be great. Thank you again for creating these a few years ago - inspired me to try something completely new and incredibly challenging.
 

Attachments

Hi Adam,

Not sure if you still frequent this thread (fingers crossed). I've been following this and dreaming about it for the last couple years. The time has come and I've cut all the wood.

I clicked and purchased all the Amazon-linked things (both allen-hex bolts were unavailable, sadly). Here's my challenge - I watched your youtube vid, also have all the plans printed out - I am not seeing which bolts/screws go into what holes. I'm assuming this is something woodworking people would say "obviously this goes here," etc. I am truly winging this. My kind friend and his wife have given me full access to his wood shop so I've got all the saws and such.

Have you come across a youtube video of someone who made your drawers and broke it down a bit more for dummies? Do you have a simpler one? I'm down to wing it but I feel like I'm already winging it quite a bit hahaha So any help would be great. Thank you again for creating these a few years ago - inspired me to try something completely new and incredibly challenging.

Hello Ambie,

The smallest 1/4 20 and t nuts are used for the hardware with the phillips head bolts

The hex had bolts are two lengths. THe longer ones are used to secure the drawer frames to eachother (1" long) the 1/2" ones are used to mount anything you want to the drawers itself (the fridge frame for example)
and the screws are used to secure the drawer face to the drawer itself. I hope this helps sorry there is no dummies guide!
 
[MENTION=96727]bagelsjustbagels[/MENTION]

I'm looking to build this in the next month or so. It looks like the coffee table slides are no longer available on Amazon. Do you have the dimensions available by chance?
 
[MENTION=96727]bagelsjustbagels[/MENTION]

I'm looking to build this in the next month or so. It looks like the coffee table slides are no longer available on Amazon. Do you have the dimensions available by chance?

I do not but I would reccomend building your own small drawer first, and then measuring and selecting the best lfit top hinges for your own needs. :)
 

Members online

No members online now.

Forum statistics

Threads
278,306
Messages
3,554,045
Members
248,016
Latest member
Advally Service

Trending content

Back
Top