sunroof drain cleaning

VonMussa

New member
I believe my drains are plugged. I've removed the headliner to access the front two drains and unclogged with a shot from my compressor (not the safest idea in hindsight), but i think they have replugged and i still need to clean the rears. Ive looked as best I can on the internets and on here to find the location of the lower part of the drains, to clean from bottom up, to no avail. Does any one have any schematics or pictures of these (I assume) 4 locations?

 
Register to hide this ad
https://parts.camelbacktoyota.com/p...leid=420992&diagram=8418565&diagramCallOut=10

I think the rear drain hoses come out in the vicinity of the rear wheel wells.
(At least they did on the 4th gen you can see the clear hoses coming down from the headliner near the C pillar if you remove the cargo area side panels... in fact onthe 4th gen you can see the left rear one if you look inside the jack compartment, just follow the clear tube down to the exit and then look for a similiar fitting on the opposite side)

If you look in post #2 picture you can see the path the rear drains take on the 4th Gen at least... http://www.toyota120.com/forum/showthread.php?t=27317 this may help find them on your 5th gen...
 
Last edited:
Not much data on the 5th Gens

I couldn't find much info about where the 5th Gen sunroof drains come out. I knew they came down the A pillars and somehow out the rear (Just like the 4th gens, there's one run through the tool area in the rear). My sunroof was holding water so I knew I had a clogged drain. Turns out it was 1 of 4 that was clogged the others seem to drain out of the pinch welds with no access to the "exit end" - Toyota this seems like a horrible idea.

My Front Driver drain was the one that was giving me issues so I spent a while trying to track it down. I had tried the weedeater string, and even a coated braided steel cable. It seemed to run the same length down each side before bottoming out so I wasn't sure what was causing the clog.

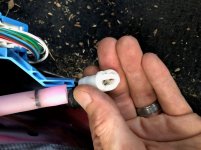
Once I stripped away some of the panels and electronics I pulled the hose out to find the small "filter plug" on the bottom. This is what was causing my tools to bottom out, and it's also what was causing the clog. Mine was packed full of debris. Figured I'd share a photo in case anyone else is having a problem tracking them down.

 
I couldn't find much info about where the 5th Gen sunroof drains come out. I knew they came down the A pillars and somehow out the rear (Just like the 4th gens, there's one run through the tool area in the rear). My sunroof was holding water so I knew I had a clogged drain. Turns out it was 1 of 4 that was clogged the others seem to drain out of the pinch welds with no access to the "exit end" - Toyota this seems like a horrible idea.

My Front Driver drain was the one that was giving me issues so I spent a while trying to track it down. I had tried the weedeater string, and even a coated braided steel cable. It seemed to run the same length down each side before bottoming out so I wasn't sure what was causing the clog.

Once I stripped away some of the panels and electronics I pulled the hose out to find the small "filter plug" on the bottom. This is what was causing my tools to bottom out, and it's also what was causing the clog. Mine was packed full of debris. Figured I'd share a photo in case anyone else is having a problem tracking them down.


Great pic. I just hit the same problem and same experience. Why the heck do they want to filter the exit water? Stupid idea IMO. My Gen 3 did not clog until it was 14 yrs old. My 2014 = 5 yrs. Not cool. Nothing worse than getting into your truck and smelling mildew.

Anyone know a good treatment for mildew smell in the headliner?

Thanks.

Thanks for sharing.
 
Last edited:
So did you just cut the filter plug off or is there a way to remove it? It does seem odd to have a plug on a drain hose.
 
The filter end is to keep animals and from going back into the drain. Next time it is clogged, take a syringe with some drain-o and let sit. Then rinse with hot water. Careful if you used one with bleach as it can stain the interior.
 
The filter end is to keep animals and dirt from going back into the drain. Next time it is clogged, take a syringe with some drain-o and let sit. Then rinse with hot water. Careful if you used one with bleach as it can stain the interior.
 
I have a 2011 SR5 4Runner with 165,000 miles and I love it! Never a problem with the exception of general maintenance, most of which I perform myself. Recently I ran into the same problem as most of you here. Mildew/Mold smell and water on my floor. I'm going to share a thorough explanation on the cause and how to fix it.

Contrary to other posts I've read, car manufacturers do expect your sunroof to leak. With the inevitable dirt/pollen corrupting the seal of any sunroof over time, the manufactures designed a drainage system to redirect the water. There will always be four holes in the sunroof connected to drain tubes directing the water out and underneath your vehicle. The cause for the water on your floor is these drain tubes get a clog and the water can't escape causing a backup that spills out of your sunroof and down onto the headliner. From here, it flows down the pillars, usually the A pillars and down under your floor's carpet where it seeps up and smells.

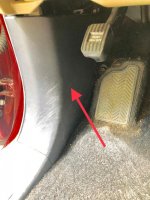
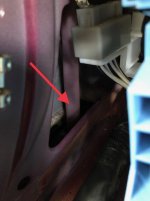
To fix it, you'll need to remove the running panel at the bottom of your doorway. Then unscrew and remove the triangular panel found to the left of the foot rest on the driver's side and under the glovebox to the right on the passenger side. You'll find a tube (each tube is color coded to reflect which sunroof hole it should be connected to during installation), driver's side is pink on my 2011 and passenger side is white. Pull it up and out of the hole where you'll find them. Pull out the white filter plug at the bottom of each front tube and clean them. Don't reinstall them yet. Open your sunroof and locate the front left hole and the front right hole. Take a sheathed 14 to 16 gauge wire, thick weed whacker line, or better yet, curtain wire (https://smile.amazon.com/Shappy-Meter-Curtain-Self-adhesive-Hooks/dp/B075LHFBVX/ref=sr_1_8?keywords=curtain+wire&qid=1566928050&s=gateway&sr=8-8[/URL]) and push it through the holes until you see it come out the bottom of the tubes. Rake it back and forth several times before pulling it out. While keeping the tube bent and pointed outside the vehicle's door, poor a couple quarts of water down the front holes in the sunroof. You may want to use a funnel for this. Replace the white drain filter plugs and reinstall the tubes back into the holes where you found them. Poor more water down the drains and ensure its emptying out the underside of your vehicle. If you have an air compressor, put an extension with a rubber tip on your blow gun and blow out the lines using around 30-40 PSI. Replace all the paneling you removed.

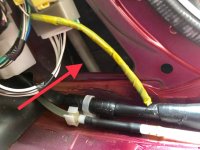
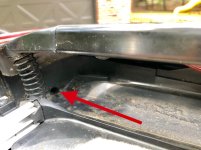
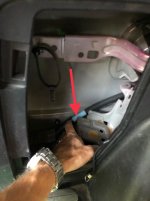
The rear drain hoses are a little more difficult. One cannot reach the drain holes to the rear of the sunroof from the sunroof opening so they have to be cleared from the exit ports. The end of the left rear hose is simple if you have a Gen 5. Its location behind the pop-out panel where you would find your truck's jack. The hose is blue and can be accessed simply by popping it out of its black fitting. Run your wire as far as you can. I actually had trouble getting it past 2' as I believe I found a significant bend in the tube and the 14 gauge wire wouldn't bend past. Curtain wire would have definitely worked better but I decided to use my air compressor to blow out the line instead.

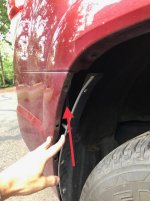
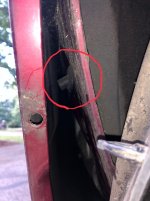
The right rear drain hose was more difficult to locate. Found it by removing the guard panel in the wheel well located adjacent to the right rear fender. After removing this, you'll find the drain hose exiting between the fender and the inside metal housing. Because of a significant bend in this hose, I once again had trouble getting more than 2' of my wire into it. I defaulted back to my compressor to blow out the line. It’s helpful to have a helper on hand who can either blow out the line while you listen at your sunroof for compressed air or have them listen while you blow it out.

Test the rear drain ports by parking on a slight incline or driving up on ramps under your front wheels. Conduct the water test on each side and ensure you have a successful flow out and under both sides of the rear of your vehicle. If you do, replace and button up all panels. Congratulations on successfully repairing your sunroof leak!

If your carpet got very wet and you can get rid of the smell, you'll need to take it a step further, as I did, and remove more paneling and seats, and pull back the carpet to dry out. Get rid of all moisture and clean any mold/mildew you find. Then clean your carpet with a good, dry auto carpet cleaner. Reinstall everything once you're satisfied with the results of your remediation treatment.

Hope this post helps!
 

Attachments

  • IMG_2871.jpg
    IMG_2871.jpg
    137.8 KB · Views: 16,567
  • IMG_2859.jpg
    IMG_2859.jpg
    120 KB · Views: 14,525
  • IMG_2861.jpg
    IMG_2861.jpg
    122.2 KB · Views: 13,846
  • IMG_2867.jpg
    IMG_2867.jpg
    130.2 KB · Views: 14,759
  • IMG_2869.jpg
    IMG_2869.jpg
    124.4 KB · Views: 16,933
  • IMG_2858.jpg
    IMG_2858.jpg
    122.1 KB · Views: 14,886
  • IMG_2856.jpg
    IMG_2856.jpg
    125.2 KB · Views: 14,828
  • IMG_2854.jpg
    IMG_2854.jpg
    126.9 KB · Views: 14,920
Interesting, never even thought about it. What in the world does a leaking sunroof even look like? Or will I know when it does it? Does it drip on your head or something?

Ah...these posters, just joined, and makes a post the equivalent of a rookie hitting a grand slam, lol.
 
Just found this in my 2012 when water started seeping up from the passenger side floorboard. By that time the channel for the cables already has an inch of standing water. This happened a long time ago in my '01 but all that ever happened was that the headliner got some water in it. Strange design.
 

Members online

No members online now.

Forum statistics

Threads
278,306
Messages
3,554,045
Members
248,016
Latest member
Advally Service

Trending content

Back
Top