CV axles

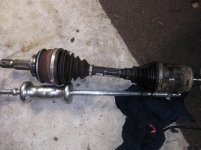
So, I've been using CVJ CV axles for almost 10 years since they're local to me. I had them in my 3rd gen, and now I use them my 4th gen. I just saw that the red silicone boot has a small tear after two years and it's starting to spit grease. I called CVJ to see if there's a warranty and there isn't since "lifted" etc.

I'm a little disappointed, since I don't even wheel this truck hard at all, and there's a 1" diff drop so the CV angles are pretty solid even with the 3" lift. I want something that's going to last longer than that, and I feel like even the ones I had on my 3rd gen tore after 4 or 5 years, but I can't recall specifically.

I was thinking of just going for OEM CV axles, but the tech there said they don't last long in lifted vehicles. Can anyone confirm this? I feel like I see a lot of new lifted 5th gens with OEM CV's and they seem just fine. I know they're spendy, but I'd rather just cry once and be done with it.

Maybe this was just dumb luck and something punctured the silicone and I should just get another one again?

It does seem ridiculous, but if you read the boots they sale, none of them are intended for offroad use... Similar to TRD OR not actually intended for offroading... litigious BS
 
Sorry to hijack the thread, but I noticed that I've got a boot that's torn as I've been working on a lift. The mechanic says to replace the whole axle since they don't know how long it's been torn. What say ye on the forum? Replace the boot or replace the axle?

I haven't rebuilt because it seems like an awful chore, but I replaced mine with a CARDONE heavy duty axle from rockauto when I was in your situation (leaky/torn boot when doing my lift). Easy job and they're only $55 and I haven't had any issues with it. That's my vote! Here is a link to the one I got:

More Information for CARDONE 665235HD
 
2UcOXmz.jpg


Finished up rebuilding both and did the boot stretch mod on both. Super easy, just messy. My Cardone Napas will be coming off later today to re-do my passenger side seal so I'm gonna give these a shot and keep the Napas for spares instead.
 
2UcOXmz.jpg


Finished up rebuilding both and did the boot stretch mod on both. Super easy, just messy. My Cardone Napas will be coming off later today to re-do my passenger side seal so I'm gonna give these a shot and keep the Napas for spares instead.
Got your work cut out for you!

Sent from my SM-G986U using Tapatalk
 
2UcOXmz.jpg


Finished up rebuilding both and did the boot stretch mod on both. Super easy, just messy. My Cardone Napas will be coming off later today to re-do my passenger side seal so I'm gonna give these a shot and keep the Napas for spares instead.

Those look great, I just picked up an OEM CV from a junkyard to replace my toasted one. Boot has been torn for too long and there's metal shavings in the grease now lol. The junkyard CV is in almost new condition, but I have a reboot kit so I'm gonna go ahead and rebuild it. I'll reboot the old CV too and keep it as a spare.

Do you recommend replacing the seals while I'm in there, or is it a ain't broke don't fix it deal? I've heard both arguments and that inserting it the correct depth is really hard.
 
Those look great, I just picked up an OEM CV from a junkyard to replace my toasted one. Boot has been torn for too long and there's metal shavings in the grease now lol. The junkyard CV is in almost new condition, but I have a reboot kit so I'm gonna go ahead and rebuild it. I'll reboot the old CV too and keep it as a spare.

Do you recommend replacing the seals while I'm in there, or is it a ain't broke don't fix it deal? I've heard both arguments and that inserting it the correct depth is really hard.

Thanks, it's not too bad to do, just takes a little work and plastic bag prep. It's always good to rebuild for unknown condition - one of mine was good (no tears, etc) but the grease was more liquid than the new stuff, can't hurt to rebuild. I pulled off the OG boots and cleaned - they're actually in good condition. I could reuse them down the line if needed. Make sure you pick up a decent pair of snap ring pliers, it makes getting the tripod C-clip off much easier.

The seals might be based off how they look and how much milage is on the diff. I changed mine out when I installed my lift in March (at around 130k) and we had to redo the pass side later since there was a small leak. 4.7mm depth (we used calipers) seems to be about right for the pass side as long as you get it square. I moved mine around prying the old CV off, so I'm diving back in later today.
 
...I sit on my garage floor, cut open a large thick trash bag and use that as destruction zone lol. When you're done, wrap up the bag and straight to the trash.


I honestly can't think of a less pleasurable way to spend my weekend. lol. After having rebuilt the front axle on my FZJ80, I will never again be spending my time doing work like that. I'll happily pay the professionals.
 
Thanks, it's not too bad to do, just takes a little work and plastic bag prep. It's always good to rebuild for unknown condition - one of mine was good (no tears, etc) but the grease was more liquid than the new stuff, can't hurt to rebuild. I pulled off the OG boots and cleaned - they're actually in good condition. I could reuse them down the line if needed. Make sure you pick up a decent pair of snap ring pliers, it makes getting the tripod C-clip off much easier.

The seals might be based off how they look and how much milage is on the diff. I changed mine out when I installed my lift in March (at around 130k) and we had to redo the pass side later since there was a small leak. 4.7mm depth (we used calipers) seems to be about right for the pass side as long as you get it square. I moved mine around prying the old CV off, so I'm diving back in later today.
Gotcha, ripping open a trash bag is a good idea. I do agree, the reassurance that the CV is going to be brand new after a rebuild is good, and I already have the parts/grease. I'll put the good inner boot from the junkyard CV on my old one. I also picked up those smooth band worm clamps from ebay. Those look much easier than the crimp ones, and I like the ability to re-tighten easily if needed.

Good to know on the seal depth. Not sure on the last time the seals were changed, but the 4runner has 210k on it. I'll make note not to knock it around to hard on removal.

That's what she said......

Yeah I've heard it's a pain, if its not leaking, leave it alone.

Sent from my SM-G986U using Tapatalk
haha ya got me! Yeah I'll evaluate when I get in there, but its not leaking at the moment. Hopefully I don't screw it up.

I'll try and get some good pictures again to pull together another tutorial. Thanks for the help guys!
 
Ok, so we're back at the same point again - disassembly was easy and fast. I can't get the damn thing off...I'm applying pretty good force with the CV lasso (as evidenced by the rope actually getting wedged and stuck) and no joy.

C4iwaFx.jpg


https://i.imgur.com/jYxoxaQ.mp4

https://i.imgur.com/0kBrnyd.mp4
I literally get the biggest flathead I can find, wedge it on the lip that the lasso just missed, and apply pressure to the diff housing, not the seal and she pops right out. That or a cold chisel on the flat nubs on that inner cup with a HEAVY hammer, I personally have used a 4lb shorty sledge, and out she falls.

Sent from my SM-G986U using Tapatalk
 
[MENTION=117203]Drift Monkey[/MENTION] I've run into this problem a few times. Mostly because My aftermarket Skid plate doesn't allow me to get a good bite on the cup with a pry bar, and being on jack stands you can't get a good angle on it because of the skid and not enough room before the floor interferes. Some Cir-clips seem to be stiffer than others as well. What I ended up doing is buying a cheap HF dent puller, and grinding down one of the attachments to mate up to the round profile of the cup, put a large hose clamp on there, and it has worked pretty well.
The other thing I noticed is that when you install the CV, they tell you to make sure the opening of the cir-clip is pointing up for an easier install. So if you rotate the cup a little after each time you snatch on it, the cir-clip will eventually find a spot that is a little less resistant, and it will pop right out. It is literally one of the most frustrating problems I've ever come across, especially when it seems people can get them out with no issues what so ever. The CV in the pic is a Toyota dealer reman, which fit really well, had no vibrations, but the inner boot only lasted 10k miles. It's WAY TOO THIN and cheap. That really pissed me off. Should have stretched it. So I feel your pain. Good Luck!!
 

Attachments

  • 20200405_093509.jpg
    20200405_093509.jpg
    137.1 KB · Views: 566
Last edited:
[MENTION=117203]Drift Monkey[/MENTION] I've run into this problem a few times. Mostly because My aftermarket Skid plate doesn't allow me to get a good bite on the cup with a pry bar, and being on jack stands you can't get a good angle on it because of the skid and not enough room before the floor interferes. Some Cir-clips seem to be stiffer than others as well. What I ended up doing is buying a cheap HF dent puller, and grinding down one of the attachments to mate up to the round profile of the cup, put a large hose clamp on there, and it has worked pretty well.
The other thing I noticed is that when you install the CV, they tell you to make sure the opening of the cir-clip is pointing up for an easier install. So if you rotate the cup a little after each time you snatch on it, the cir-clip will eventually find a spot that is a little less resistant, and it will pop right out. It is literally one of the most frustrating problems I've ever come across, especially when it seems people can get them out with no issues what so ever. The CV in the pic is a Toyota dealer reman, which fit really well, had no vibrations, but the inner boot only lasted 10k miles. It's WAY TOO THIN and cheap. That really pissed me off. Should have stretched it. So I feel your pain. Good Luck!!

72rxjMW.jpg


I got it pretty quickly after trying again with just turning and using LESS force to tap it out with the lasso.

I know all too well the skid/jack stands pry bar issue haha. I removed the middle plate to get better leverage when I used that method last time...took forever! The hose clamp/slide hammer trick looks neat, I've heard a few mention it, this this seems to work equally as well once the clip is at an angle that cooperates.

I found having the c-clip opening facing DOWN allows gravity to pull the clip down towards the groove, making it smaller and easier to pull/insert. I'm knocking out the knuckle seals before i reinsert (another pain) but I'll take a pic of how my boots sit with the stretch after I complete it all.

I'm working on the knuckle seal next:

73DNrlE.jpg
 
Last edited:
Maybe the clip is supposed to be facing down lol. I'm gettin old, can't remember. Take your time with that knuckle seal. You can damage the race taking the old one out and the new ones are a little temperamental when your tapping it back in. Glad your making progress!!

72rxjMW.jpg


I got it pretty quickly after trying again with just turning and using LESS force to tap it out with the lasso.

I know all too well the skid/jack stands pry bar issue haha. I removed the middle plate to get better leverage when I used that method last time...took forever! The hose clamp/slide hammer trick looks neat, I've heard a few mention it, this this seems to work equally as well once the clip is at an angle that cooperates.

I found having the c-clip opening facing DOWN allows gravity to pull the clip down towards the groove, making it smaller and easier to pull/insert. I'm knocking out the knuckle seals before i reinsert (another pain) but I'll take a pic of how my boots sit with the stretch after I complete it all.


I'm working on the knuckle seal next:

73DNrlE.jpg
 
Maybe the clip is supposed to be facing down lol. I'm gettin old, can't remember. Take your time with that knuckle seal. You can damage the race taking the old one out and the new ones are a little temperamental when your tapping it back in. Glad your making progress!!

Yeah, opening facing down is the way to go, confirmed yesterday haha.

73DNrlE.jpg

Before.

rl51eop.jpg

After.


The knuckle seals were a minor pain...I wedged a flat head in and hammered 'em out - that was the easy part. The "dust-cap-as-a-seal-driver" trick worked well enough (although I have some beat up dust caps now lol) but it took some decent effort to knock them completely flush.

I tried the "attach the diff seal to the CV and slide the whole thing in" method and it seemed to work, no leaking on the passenger side anymore! :rockon: Used the entire CV as a slide hammer (circlip opening facing down helps a ton here).

I got some pictures of my CV angles/corresponding boot stretch/slide mod references.

xARSAxM.jpg

ZN8dMcw.jpg

The above 2 examples here are sitting on my inclined driveway to the angles are exaggerated. Note the lack of rubbing on any of the ribs.

KOJ2vJJ.jpg

KxT9KMb.jpg

Reversed up the driveway for comparison. The ribs obviously aren't rubbing here but they also aren't super stretched at a much flatter angle.
 
It's definitely worth spending the $10 or so on a seal removal tool for next time. Takes 5 seconds to pop those seals out. This thread has me nervous now. I just threw on new CVs without stretching them and had to go with china CVs because my vehicle was down and out. Guess I should start preparing myself for another set.
 
Yeah, opening facing down is the way to go, confirmed yesterday haha.

73DNrlE.jpg

Before.

rl51eop.jpg

After.


The knuckle seals were a minor pain...I wedged a flat head in and hammered 'em out - that was the easy part. The "dust-cap-as-a-seal-driver" trick worked well enough (although I have some beat up dust caps now lol) but it took some decent effort to knock them completely flush.

I tried the "attach the diff seal to the CV and slide the whole thing in" method and it seemed to work, no leaking on the passenger side anymore! :rockon: Used the entire CV as a slide hammer (circlip opening facing down helps a ton here).

I got some pictures of my CV angles/corresponding boot stretch/slide mod references.

xARSAxM.jpg

ZN8dMcw.jpg

The above 2 examples here are sitting on my inclined driveway to the angles are exaggerated. Note the lack of rubbing on any of the ribs.

KOJ2vJJ.jpg

KxT9KMb.jpg

Reversed up the driveway for comparison. The ribs obviously aren't rubbing here but they also aren't super stretched at a much flatter angle.

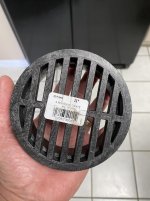
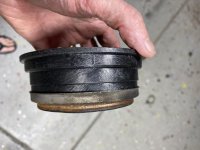
I replaced the CV joints on one of my 2005 4Runners yesterday. Hardest part was getting the first Knuckle seal in. I’d start one side and the other side would just unseat and vice versa. finally went to Home Depot and picked up a plastic 4 inch yard drain pipe cover, which for all appearances was made to fit exactly in the knuckle seal. It fits PERFECTLY inside the seal. You can then use that to hammer in the seal most of the way, followed by a punch to finish/fully seat the seal. Also found that not greasing the seal or the hub race that the seal presses into helps prevent the seesawing of the seal while trying to hammer it in.

As far as popping out the CV from the inner seal, AutoZone has a fork shaped tool called a “Popper” that you can get on loan. Just shimmy it back and forth while pushing it into the crack between the CV and the Diff housing and the CV will pop right out. Just remember to lever away from the diff seal and toward the CV to keep from damaging the inner seal.

To install the CV I used a drift and short 4 lb maul hammer. It helps to have someone pushing in on the CV while you hammer it to keep the CV from rebounding on the hammer strokes. Short, firm, RAPID hammer strikes worked quickly on both CVs. I couldn’t get anywhere with long, harder strokes. Positioning the drift over the lower control arm to achieve a shallow striking angle also helped.

Hope that helps someone.
 

Attachments

  • 3B728FBA-649E-4357-8655-C52338912E92.jpg
    3B728FBA-649E-4357-8655-C52338912E92.jpg
    135.4 KB · Views: 473
  • EEE141B7-C7F5-4539-9797-A98A1F29B7F9.jpg
    EEE141B7-C7F5-4539-9797-A98A1F29B7F9.jpg
    129.9 KB · Views: 461
I replaced the CV joints on one of my 2005 4Runners yesterday. Hardest part was getting the first Knuckle seal in. I’d start one side and the other side would just unseat and vice versa. finally went to Home Depot and picked up a plastic 4 inch yard drain pipe cover, which for all appearances was made to fit exactly in the knuckle seal. It fits PERFECTLY inside the seal. You can then use that to hammer in the seal most of the way, followed by a punch to finish/fully seat the seal. Also found that not greasing the seal or the hub race that the seal presses into helps prevent the seesawing of the seal while trying to hammer it in.

As far as popping out the CV from the inner seal, AutoZone has a fork shaped tool called a “Popper” that you can get on loan. Just shimmy it back and forth while pushing it into the crack between the CV and the Diff housing and the CV will pop right out. Just remember to lever away from the diff seal and toward the CV to keep from damaging the inner seal.

To install the CV I used a drift and short 4 lb maul hammer. It helps to have someone pushing in on the CV while you hammer it to keep the CV from rebounding on the hammer strokes. Short, firm, RAPID hammer strikes worked quickly on both CVs. I couldn’t get anywhere with long, harder strokes. Positioning the drift over the lower control arm to achieve a shallow striking angle also helped.

Hope that helps someone.

Nice job! The axle nut dust cap also fits perfectly in the knuckle seal - I had the same problem getting it to seat.

Circlip opening down and using the whole CV as a slider hammer works to insert the CV and the lasso ended up working great to remove, although it is beat up and dirty now. Attaching the seal to the axle before "slide hammering" it in also worked to seat the seal just right - I made a road trip this weekend and no leaks!
 
Nice job! The axle nut dust cap also fits perfectly in the knuckle seal - I had the same problem getting it to seat.

Circlip opening down and using the whole CV as a slider hammer works to insert the CV and the lasso ended up working great to remove, although it is beat up and dirty now. Attaching the seal to the axle before "slide hammering" it in also worked to seat the seal just right - I made a road trip this weekend and no leaks!

I'm glad you got everything together! Did you stick the seals in the freezer or no? Wondering whether that's necessary/helpful.
 
I'm glad you got everything together! Did you stick the seals in the freezer or no? Wondering whether that's necessary/helpful.

Thanks man, everyone's tips helped a ton. I didn't stick the seal in the freezer just greased it up with diff oil and slid it in with the axle just like ya said. So far so good!
 

Members online

Forum statistics

Threads
278,309
Messages
3,554,067
Members
248,016
Latest member
Advally Service

Trending content

Back
Top