2014 - 5th gen Rear view camera backup not working

F$&k it, I think I’m just going to order the Anytime dual camera kit. If I’m going to be tearing the truck apart looking for a short, I might as well upgrade! This kit looks dirt cheap for what it is, and I’ve got a big tow coming up so I don’t want to mess around with a faulty camera.
 
F$&k it, I think I’m just going to order the Anytime dual camera kit. If I’m going to be tearing the truck apart looking for a short, I might as well upgrade! This kit looks dirt cheap for what it is, and I’ve got a big tow coming up so I don’t want to mess around with a faulty camera.

Actually, I just realized that the kit utilizes the factory rear camera and harness, so it doesn't really help in this situation. The Anytime kit does look really cool, but not much point in a switch if I can't get the camera to work...
 
Any updates on a fix for this? Mine still goes out just about every time I open the rear hatch. I've gotten in the habit of wiggling the wires where they travel into the body of the 4runner at the top and I can usually get it to work again...until the hatch is opened again.
 
I have the same issue. I've read others mention the Reverse camera Initiation Switch on the passenger side of the transmission. I haven't heard anyone detail exactly where this switch is-inside or outside the vehicle? Are there screws or is there a cover to remove for access? Also, if the issue ends up being with the wiring in the hatch rubber boot, how do you identify which wire is failing? Thanks in advance.
 
Need the part name and number.

2013 T4R, SR5 - I have 3 boat trailers and a travel trailer and I really need the back up camera for hooking up. I too am having the same back up camera problem. I have read the threads. Watched the YouTube videos. I have a basic understanding of what to trouble shoot. But before I start looking for the switch on the tranny or pull the boot to see the tail gate wires, I went to my dealership. I talked to the service manager about the problem. He said he had never had anyone come in with a back up camera problem! He couldn't give me any advise as to what they could do for me. In some of the threads I read, folks said that when they took their units into dealership with camera problem, the dealership could not find any problem.....other than the camera wasn't working. I went back to the parts department and told the counter guy that I wanted a back up camera switch that is on the right side of the transmission. He looked for 15 minutes on his computer and couldn't find the switch. He called the parts dept. manager over and they have no idea what I am talking about. I also ask if i could get a section of the tail gate back up camera wire harness. They couldn't find that either. Yes, I know, (go to another dealership). I am going to, unless, someone here has some answers for me. 1. What is the proper name for that switch? 2. Do you know the part number? 3. If I pull the tail gate wire boot out of the holes, will I be able to see if there is a broken wire? 4. Will there be enough room with the boot compressed to make a repair at the break point or do I need to take the tail gate apart to splice in a wire for the broken one? 5. Will it be cheaper and easier to just buy a wireless license plate frame back up camera from Amazon?

 
Long time lurker, first time poster.

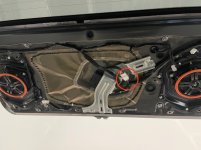
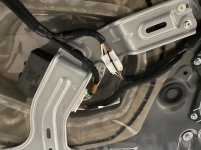
I've had this issue for quite some time but been too lazy to investigate. Finally got around to it. Long story short, I believe there is a plug that has too much tension which forced a connector to be loose in the plug. To fix, I cut tape (relieve tension) and added a zip tie (secured the plug). Been testing this about a week with my tailgate panel off. Steps & pictures below.

1. Remove both rear lights on the panel. I used a plastic pry tool to pop them out. Unclip & remove. You do not need to remove the 10mm bolt behind the lights.

2. Remove the cover from the grab handle. There is a 10mm bolt behind it. Remove the bolt.

3. Use a plastic pry tool to carefully go around the panel and pop off the panel. It should just be plastic clips along the side & bottom.

4. In the center of the door you will see a metal bracket, black box, and a few plugs. Disconnect the harness that is not directly connected the black box (see attached pictures). In my case, a few of those wires were bent and slightly loose. I pressed on them with my fingers just to straighten them out.

5. The plug above is also secured to another harness using tape. Cut that tape. This should allow the harness to not have as much pressure.

6. Plug it back in. To take it a step further, I zip-tied that plug together to ensure a solid connection.

7. Put it all back together.
 

Attachments

  • Tailgate.jpg
    Tailgate.jpg
    77.9 KB · Views: 11,719
  • PlugCloseUp.jpg
    PlugCloseUp.jpg
    86 KB · Views: 11,424
Long time lurker, first time poster.

I've had this issue for quite some time but been too lazy to investigate. Finally got around to it. Long story short, I believe there is a plug that has too much tension which forced a connector to be loose in the plug. To fix, I cut tape (relieve tension) and added a zip tie (secured the plug). Been testing this about a week with my tailgate panel off. Steps & pictures below.

1. Remove both rear lights on the panel. I used a plastic pry tool to pop them out. Unclip & remove. You do not need to remove the 10mm bolt behind the lights.

2. Remove the cover from the grab handle. There is a 10mm bolt behind it. Remove the bolt.

3. Use a plastic pry tool to carefully go around the panel and pop off the panel. It should just be plastic clips along the side & bottom.

4. In the center of the door you will see a metal bracket, black box, and a few plugs. Disconnect the harness that is not directly connected the black box (see attached pictures). In my case, a few of those wires were bent and slightly loose. I pressed on them with my fingers just to straighten them out.

5. The plug above is also secured to another harness using tape. Cut that tape. This should allow the harness to not have as much pressure.

6. Plug it back in. To take it a step further, I zip-tied that plug together to ensure a solid connection.

7. Put it all back together.

This is awesome, thanks. My dad's '16 is having this issue. Has it seemed to resolve the intermittent issues? I know you said it's only been a week, but just curious of results so far.
 
Yes, so far so good. I was originally able to reproduce the issue by opening the hatch and hitting the panel with my fist a few times making it turn on and off. That made me fairly confident that it was not linked to the wires leading from the tailgate to the vehicle nor the switch on the transmission that others had alluded too.

Once I got the panel off and started playing around, moving that connector around also made the screen flicker so I assumed I got lucky and messed with it. Was unable to duplicate after adding the zip tie and relieving the tension on the plug.
 
2013 T4R, SR5 - I have 3 boat trailers and a travel trailer and I really need the back up camera for hooking up. I too am having the same back up camera problem. I have read the threads. Watched the YouTube videos. I have a basic understanding of what to trouble shoot. But before I start looking for the switch on the tranny or pull the boot to see the tail gate wires, I went to my dealership. I talked to the service manager about the problem. He said he had never had anyone come in with a back up camera problem! He couldn't give me any advise as to what they could do for me. In some of the threads I read, folks said that when they took their units into dealership with camera problem, the dealership could not find any problem.....other than the camera wasn't working. I went back to the parts department and told the counter guy that I wanted a back up camera switch that is on the right side of the transmission. He looked for 15 minutes on his computer and couldn't find the switch. He called the parts dept. manager over and they have no idea what I am talking about. I also ask if i could get a section of the tail gate back up camera wire harness. They couldn't find that either. Yes, I know, (go to another dealership). I am going to, unless, someone here has some answers for me. 1. What is the proper name for that switch? 2. Do you know the part number? 3. If I pull the tail gate wire boot out of the holes, will I be able to see if there is a broken wire? 4. Will there be enough room with the boot compressed to make a repair at the break point or do I need to take the tail gate apart to splice in a wire for the broken one? 5. Will it be cheaper and easier to just buy a wireless license plate frame back up camera from Amazon?

Hey JayD, did you ever get any info on this? My camera just died and I'm thinking it would be this switch as well since my issue is the headunit just doesn't even acknowledge I'm in reverse. I would expect an issue with my hinge wiring to cause the black screen others are reporting.
 
If you are getting a black screen, the unit is acknowledging you are in reverse. Are you saying you do not have a black screen when in reverse?
 
Yes, so far so good. I was originally able to reproduce the issue by opening the hatch and hitting the panel with my fist a few times making it turn on and off. That made me fairly confident that it was not linked to the wires leading from the tailgate to the vehicle nor the switch on the transmission that others had alluded too.

Once I got the panel off and started playing around, moving that connector around also made the screen flicker so I assumed I got lucky and messed with it. Was unable to duplicate after adding the zip tie and relieving the tension on the plug.

Yes, I had narrowed it down to the hatch door myself. It has usually happened after had I shut the door. Opening and closing it again would fix it most of the time. Once it gets warmer I'm doing what you did or at that point upgrade to a higher quality camera. Maybe add a front one too. Thanks for the write up.
 
Yes, I had narrowed it down to the hatch door myself. It has usually happened after had I shut the door. Opening and closing it again would fix it most of the time. Once it gets warmer I'm doing what you did or at that point upgrade to a higher quality camera. Maybe add a front one too. Thanks for the write up.

Every time mine goes out I have to open the hatch again and do a push or pull on the wires where they go into the frame. I've been fixing it that way for about 3 years now. And it quits working just about every other time I open the hatch.
 
My experience was very similar. I highly suggest taking a look at my write-up a few posts back. I have not experienced any problems after implementing that fix.
 
My experience was very similar. I highly suggest taking a look at my write-up a few posts back. I have not experienced any problems after implementing that fix.

I don't know how I missed your writeup from before, I'll definitely give this a try. Thanks!
 
This post was EXACTLY what I needed to fix the intermittent camera outages on my 2012 Trail Edition.

A couple notes to add:

1. On my year there’s no interior strap/grab handle to remove.

2. Thus, after you pop out the interior hatch lights the entire plastic piece is ready to pry off.

3. There is a triangle arrow mounded in on the passenger side showing where to begin prying.

4. No special trim tool needed. I just used a stiff plastic kitchen utensil.

5. I freed up the tape, straighten out the bend like the OP did. That was enough to correct the issue when I tested. Nevertheless I used 2 zip ties to hold the wire harness straight (it parallels another wire bundle).

No telling if this is a permanent fix or not. Time will tell. However, now I know where this particular gremlin lives and can deal with him accordingly now.

Thanks guys!

Long time lurker, first time poster.

I've had this issue for quite some time but been too lazy to investigate. Finally got around to it. Long story short, I believe there is a plug that has too much tension which forced a connector to be loose in the plug. To fix, I cut tape (relieve tension) and added a zip tie (secured the plug). Been testing this about a week with my tailgate panel off. Steps & pictures below.

1. Remove both rear lights on the panel. I used a plastic pry tool to pop them out. Unclip & remove. You do not need to remove the 10mm bolt behind the lights.

2. Remove the cover from the grab handle. There is a 10mm bolt behind it. Remove the bolt.

3. Use a plastic pry tool to carefully go around the panel and pop off the panel. It should just be plastic clips along the side & bottom.

4. In the center of the door you will see a metal bracket, black box, and a few plugs. Disconnect the harness that is not directly connected the black box (see attached pictures). In my case, a few of those wires were bent and slightly loose. I pressed on them with my fingers just to straighten them out.

5. The plug above is also secured to another harness using tape. Cut that tape. This should allow the harness to not have as much pressure.

6. Plug it back in. To take it a step further, I zip-tied that plug together to ensure a solid connection.

7. Put it all back together.
 
If you are getting a black screen, the unit is acknowledging you are in reverse. Are you saying you do not have a black screen when in reverse?

Correct, in my case when I put it in reverse, nothing happens on the screen, it stays on the audio display as if I were in Drive (or Park or whatever).
 
This post was EXACTLY what I needed to fix the intermittent camera outages on my 2012 Trail Edition.

A couple notes to add:

1. On my year there’s no interior strap/grab handle to remove.

2. Thus, after you pop out the interior hatch lights the entire plastic piece is ready to pry off.

3. There is a triangle arrow mounded in on the passenger side showing where to begin prying.

4. No special trim tool needed. I just used a stiff plastic kitchen utensil.

5. I freed up the tape, straighten out the bend like the OP did. That was enough to correct the issue when I tested. Nevertheless I used 2 zip ties to hold the wire harness straight (it parallels another wire bundle).

No telling if this is a permanent fix or not. Time will tell. However, now I know where this particular gremlin lives and can deal with him accordingly now.

Thanks guys!

I finally got around to trying this fix on my 2014 Limited and it has been working flawlessly for about 3 weeks now. Thanks to GoHeels for posting this!
 

Thanks for posting that write-up. I was having an issue where if I slammed the hatch, the camera would go out. It would come back when I opened the hatch, but to get it to stay on I'd have to close the hatch real gingerly.

I didn't notice any unplugged or lose connectors, but I did take the strain off that cable like you mention and everything works fine now. No idea how long that'll last but at least now I know how easy it is to get in there if I need to mess with it again.
 
Long time lurker, first time poster.

I've had this issue for quite some time but been too lazy to investigate. Finally got around to it. Long story short, I believe there is a plug that has too much tension which forced a connector to be loose in the plug. To fix, I cut tape (relieve tension) and added a zip tie (secured the plug). Been testing this about a week with my tailgate panel off. Steps & pictures below.

1. Remove both rear lights on the panel. I used a plastic pry tool to pop them out. Unclip & remove. You do not need to remove the 10mm bolt behind the lights.

2. Remove the cover from the grab handle. There is a 10mm bolt behind it. Remove the bolt.

3. Use a plastic pry tool to carefully go around the panel and pop off the panel. It should just be plastic clips along the side & bottom.

4. In the center of the door you will see a metal bracket, black box, and a few plugs. Disconnect the harness that is not directly connected the black box (see attached pictures). In my case, a few of those wires were bent and slightly loose. I pressed on them with my fingers just to straighten them out.

5. The plug above is also secured to another harness using tape. Cut that tape. This should allow the harness to not have as much pressure.

6. Plug it back in. To take it a step further, I zip-tied that plug together to ensure a solid connection.

7. Put it all back together.

Can we get this stickied or under the write ups!!
 

Members online

Forum statistics

Threads
278,305
Messages
3,554,042
Members
248,016
Latest member
Advally Service

Trending content

Back
Top