
I own a 97 4runner 5vzfe 4x4 AUTO. I have always wanted a MANUAL 4runner. But finding a clean one in my area seemed to be very difficult and so i ended buying a auto, very very clean body and interior and frame. So as time passed i was patient and finally came across someone parting out a 97 4runner 5vzfe 4x4 Manual. I got all the goodies from transmission/t-case to driveshafts to interior pieces to all pedals and ect. The only things i did not get was Manual ECU and Manual harness. But this should not discourage anyone from swapping transmissions! So, all the parts are sitting in a garage ready to be put in whenever I'm ready and whenever i get everything, and i mean everything ready! so in mean time, i have been doing a lot of research on manual swaps. And since i live in NJ i cannot have a check engine light as it won't pass inspection! so my main goal is to have a CLEAN swap with no CHECK ENGINE LIGHT ON. And i believe this is possible since others have done so ! Im going to share some info that others may have read or not, but I'm sure many haven't. This is very helpful for those who want to keep the auto harness.
"THIS INFORMATION IS NOT WRITTEN BY ME, I DID NOT WRITE ANY OF THIS INFORMATION, THIS INFORMATION IS TO BE USED AT YOUR OWN RISK AND YOU ARE RESPONSIBLE FOR ANYTHING YOU DO TO YOUR 4RUNNER'.
As i get more info here and there, i will keep adding whatever i find and is useful.
first info i came across was of yotatech forums. And this member is ( dntsdad )
This is what dntsdad posted and shared with everyone.
Repinning an auto harness for use with a manual ECM:
Most guys that are completing this swap, or 4x4 in general, prefer a manual transmission. However, the manual harnesses are hard to find in comparison to the auto harnesses. I assume because there were many more auto vehicles built as the 4Runner turned into a soccer mom option in the 90's. New ones can be bought for about $250 direct from Toyota. The part number for a 97 Runner manual harness is 82121-3D420. This has no EGR and is 50 states legal. The matching ECM is 89661-3d310 and can usually found at car-part.com by searching "computer box-engine" for anywhere between $50-$100.
However, with the availability of auto harnesses it is relatively simple to convert the auto the manual. The key to being successful though is patience and homework. Other than the transmission functions, both motors need the same inputs and outputs to work and they both have EXACTLY the same sensors for like years when auto vs. manual is concerned. The problems are the plugs are different on an auto harness vs. the manual (up to 1998) and they do not interchange between the different ECM's. This is why the auto has to depinned and repinned into the manual plugs.
If you are going to use the manual ECM, you will need a set of plugs for the ECM. They are available from Toyota for about $20 for the set. This is the only cost involved is converting the harness so your saving about $230 over the cost of a new harness, and not having to disassemble the top of the motor to install it and the added cost of the new gaskets.
Manual plug part numbers for the above ECM.

A tip for ordering plugs from Toyota is that every plug starts with the part number 90980 and the last five numbers are located on the plug itself, albeit very small sometimes. For example, if you have a plug that you need to replace and the number on it is 12345, then the part number would be 90980-12345.
Again, each motor, manual and auto, have the SAME functions other than the transmission controls. Jeff Mosk's sticky in this forum provides a great resource to find each pin and what function is corresponds to. Then its just a matter of matching things up. If you have a vehicle that Jeff didn't cover, you can use the EWD's. After spending considerable time tracing out wires in the EWD's, I want to again give a thumbs up and thanks to Jeff for the awesome resouce. I can't imagine how long that took to do.
For example as to how the wires are the same function but in different location when comparing auto vs. manual, look at this EWD for a 97 Runner. It shows that the KNK2 function for an auto (a/t) is on the F(E10) plug, at terminal 16. For the manual (m/t), it is located in the B (E6) plug in terminal 3. To accomplish this, you simply take the terminal from the auto location and place it into the manual plug in the corresponding location. One done, and about 70 to go.

Taking some time up front to label the plugs really helps when you actually start to make the transfer of all the wires from the auto plugs over to the manual ones. I use a FINE tip Sharpie. This keeps me from getting confused when moving so many wires because it does become redundant, tedious and a mistake is simple to make. Also, there are TINY numbers, usually above the corner holes, to serve as reference point when labeling everything. With these new plugs the numbers were almost impossible to see, even with a magnifying glass. I rubbed a little dirt on the plug and that helped. A little oily grime worked best as i could now see the numbers. Also, most of the EWD's have the pinouts listed somewhere on them. Just make sure you are looking at the plug from the correct side. This is where seeing the numbers on the plugs helps.
These are the different plugs. The top row are manual plugs and the bottom are auto. Always look at the plug as if its going to plug into your eyeball. The plugs are labelled as if your eye is the receptacle for reference so again, look at them from the correct side.

A set of new manual plugs labeled and ready to go.

Auto plugs ready to be cannibalized.

Last time I did this in the cab, and there is no slack in the harness to allow for any wiggle room and made the job difficult, but doable. This time I did everything outside so I not cramping myself into the kick panel area, laying on my side, and I have plenty of room to be comfortable because I want to be focused.
Everything is here. Auto plugs labeled, manual plugs, my conversion chart, a small screwdriver to unlock the plugs, and a push pin to release the pins from the plugs.

It is very important that you DO NOT pull all the wires from the auto plugs and then try to match them up to the manual plugs. It must be done one at a time!!! There are more than one instance of the same wire colors and if you pull them all out of the auto plugs, you will not know what function a particular wire color is for and therefore, not know where it needs to go in to manual plugs. You could always trace everything down with a meter, but that is a lot of unneeded time. The key is patience.
This is another great example of why taking it ONE wire at a time is important. If you look at the screen capture of the EWD for a 1997 4Runner will notice that there are two pink wires listed. One for the O2 sensor and one for the crankshaft positioning sensor. THIS IS WRONG! The actual wire for the O2 sensor is Pink with a blue stripe (P-L). If I pulled all the wires out I would have two pink wires on my diagram with only one in the harness and a pink/blue wire that I had no idea where it went because it is NOT on the diagram. Slow and steady wins the race!!!!

To get started, first you need to unlock the plugs. Pins will not come out unless the plug is unlocked. The pins will also not go in very well either if they are still locked. So ALL the plugs, donor and receiving, need to be unlocked. To do that, you need a small screwdriver to unlock the plug and something small and sharp to actually unlock the pin.
Here is a plug that is still locked. Notice the small tab is pushed in, and the plug is is flat across here.

The tab needs to open so using a small screwdriver, it can be pried open with little effort.

When the tab is released, the wire will slide out with minimal effort. If you are having to pull on it, you are probably missing the release lever. Do not yank hard on it. That is not needed.

Follow your conversion chart and pull the first wire and then relocate it to correct hole in the manual plug that the EWD called for.
Here is a shot of my conversion chart for reference. This is not a conversion chart for every 3.4 swap out there so please don't think that you can take this and do your conversion from it. This is for the specific vehicle and ECM that I was working with. Not the one that you have.


As you can see in the first row, plug E9(E) pin 10 controls the #10 function and the wire is red. For the manual, the ECM has this function on E5(A) pin 12 and the wire is also red (all the wires are the same color when crossing over). So I will pull the red wire from E9 and move it to the E5 plug in pin 12. Easy enough and I have one completed. Double check everything and make sure its in the correct spot and then move to the next one. The is no particular order you need to go in; just as long as everything gets moved that needs to be.
You will notice that the second wire is E-12(H) pin #2 and is a V-R (violet with a red stripe)has nothing on the manual columns. This is because the manual does not need this function because it is related to the auto transmission. This wire will not be used in the manual plugs.
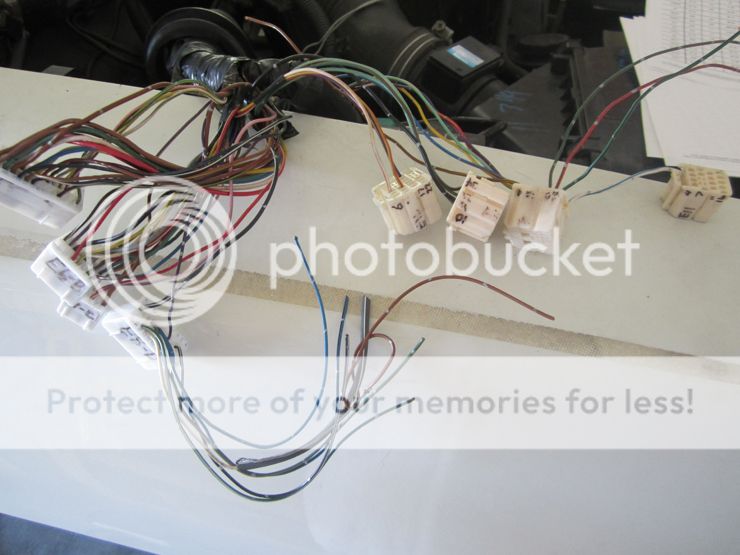
Here is a shot with the transfer completed. The wires coming from the manual plugs that are going to tie into the 3.0 harness for oil pressure, temp sender, tach, etc. The wires that are still in the auto plugs are all functions that are for the auto transmission and will not be used. These do not need to be taken out of the plugs and they have no purpose anymore. However, there is little room in the kick panel for all the plugs and the ECM to fit when you finish everything up and having an extra four plugs to hide away in there may prove very difficult, or maybe even impossible. I recommend removing the wires and capping them off with some heat shrink to save much needed space later.
As with many things, the key to doing this is the homework. Making a clear, and ACCURATE conversion sheet is where most of the time will be spent doing this. I worked on mine one night UNDISTRACTED and got everything entered into Excel. Then I went over it two more times and double and then triple checked it before every touching anything on the truck. I did find a few fat finger mistakes on my initial chart I had made that would have caused me hours of grief when a CEL (Check engine light) came on. All told, I spent about 3 hours total on the chart and about an hour to move all the pins. Take your time and its a pretty easy task to save a couple hundred dollars and you are going to learn a lot about how the electronics work for the motor for future issues that you may have. Thanks and credit given to Mosk the first time I did this and the idea!!
"ONCE AGAIN I DID WRITE ANY OF THIS, I AM ONLY SHARING THIS'.
please, lets make a sticky or something, with info relating to manual swaps and such.
here is the actual link to the thread on yotatech 3.4 Swap 101 - YotaTech Forums
"THIS INFORMATION IS NOT WRITTEN BY ME, I DID NOT WRITE ANY OF THIS INFORMATION, THIS INFORMATION IS TO BE USED AT YOUR OWN RISK AND YOU ARE RESPONSIBLE FOR ANYTHING YOU DO TO YOUR 4RUNNER'.
As i get more info here and there, i will keep adding whatever i find and is useful.
first info i came across was of yotatech forums. And this member is ( dntsdad )
This is what dntsdad posted and shared with everyone.
Repinning an auto harness for use with a manual ECM:
Most guys that are completing this swap, or 4x4 in general, prefer a manual transmission. However, the manual harnesses are hard to find in comparison to the auto harnesses. I assume because there were many more auto vehicles built as the 4Runner turned into a soccer mom option in the 90's. New ones can be bought for about $250 direct from Toyota. The part number for a 97 Runner manual harness is 82121-3D420. This has no EGR and is 50 states legal. The matching ECM is 89661-3d310 and can usually found at car-part.com by searching "computer box-engine" for anywhere between $50-$100.
However, with the availability of auto harnesses it is relatively simple to convert the auto the manual. The key to being successful though is patience and homework. Other than the transmission functions, both motors need the same inputs and outputs to work and they both have EXACTLY the same sensors for like years when auto vs. manual is concerned. The problems are the plugs are different on an auto harness vs. the manual (up to 1998) and they do not interchange between the different ECM's. This is why the auto has to depinned and repinned into the manual plugs.
If you are going to use the manual ECM, you will need a set of plugs for the ECM. They are available from Toyota for about $20 for the set. This is the only cost involved is converting the harness so your saving about $230 over the cost of a new harness, and not having to disassemble the top of the motor to install it and the added cost of the new gaskets.
Manual plug part numbers for the above ECM.

A tip for ordering plugs from Toyota is that every plug starts with the part number 90980 and the last five numbers are located on the plug itself, albeit very small sometimes. For example, if you have a plug that you need to replace and the number on it is 12345, then the part number would be 90980-12345.
Again, each motor, manual and auto, have the SAME functions other than the transmission controls. Jeff Mosk's sticky in this forum provides a great resource to find each pin and what function is corresponds to. Then its just a matter of matching things up. If you have a vehicle that Jeff didn't cover, you can use the EWD's. After spending considerable time tracing out wires in the EWD's, I want to again give a thumbs up and thanks to Jeff for the awesome resouce. I can't imagine how long that took to do.
For example as to how the wires are the same function but in different location when comparing auto vs. manual, look at this EWD for a 97 Runner. It shows that the KNK2 function for an auto (a/t) is on the F(E10) plug, at terminal 16. For the manual (m/t), it is located in the B (E6) plug in terminal 3. To accomplish this, you simply take the terminal from the auto location and place it into the manual plug in the corresponding location. One done, and about 70 to go.

Taking some time up front to label the plugs really helps when you actually start to make the transfer of all the wires from the auto plugs over to the manual ones. I use a FINE tip Sharpie. This keeps me from getting confused when moving so many wires because it does become redundant, tedious and a mistake is simple to make. Also, there are TINY numbers, usually above the corner holes, to serve as reference point when labeling everything. With these new plugs the numbers were almost impossible to see, even with a magnifying glass. I rubbed a little dirt on the plug and that helped. A little oily grime worked best as i could now see the numbers. Also, most of the EWD's have the pinouts listed somewhere on them. Just make sure you are looking at the plug from the correct side. This is where seeing the numbers on the plugs helps.
These are the different plugs. The top row are manual plugs and the bottom are auto. Always look at the plug as if its going to plug into your eyeball. The plugs are labelled as if your eye is the receptacle for reference so again, look at them from the correct side.

A set of new manual plugs labeled and ready to go.

Auto plugs ready to be cannibalized.

Last time I did this in the cab, and there is no slack in the harness to allow for any wiggle room and made the job difficult, but doable. This time I did everything outside so I not cramping myself into the kick panel area, laying on my side, and I have plenty of room to be comfortable because I want to be focused.
Everything is here. Auto plugs labeled, manual plugs, my conversion chart, a small screwdriver to unlock the plugs, and a push pin to release the pins from the plugs.

It is very important that you DO NOT pull all the wires from the auto plugs and then try to match them up to the manual plugs. It must be done one at a time!!! There are more than one instance of the same wire colors and if you pull them all out of the auto plugs, you will not know what function a particular wire color is for and therefore, not know where it needs to go in to manual plugs. You could always trace everything down with a meter, but that is a lot of unneeded time. The key is patience.
This is another great example of why taking it ONE wire at a time is important. If you look at the screen capture of the EWD for a 1997 4Runner will notice that there are two pink wires listed. One for the O2 sensor and one for the crankshaft positioning sensor. THIS IS WRONG! The actual wire for the O2 sensor is Pink with a blue stripe (P-L). If I pulled all the wires out I would have two pink wires on my diagram with only one in the harness and a pink/blue wire that I had no idea where it went because it is NOT on the diagram. Slow and steady wins the race!!!!

To get started, first you need to unlock the plugs. Pins will not come out unless the plug is unlocked. The pins will also not go in very well either if they are still locked. So ALL the plugs, donor and receiving, need to be unlocked. To do that, you need a small screwdriver to unlock the plug and something small and sharp to actually unlock the pin.
Here is a plug that is still locked. Notice the small tab is pushed in, and the plug is is flat across here.

The tab needs to open so using a small screwdriver, it can be pried open with little effort.

When the tab is released, the wire will slide out with minimal effort. If you are having to pull on it, you are probably missing the release lever. Do not yank hard on it. That is not needed.

Follow your conversion chart and pull the first wire and then relocate it to correct hole in the manual plug that the EWD called for.
Here is a shot of my conversion chart for reference. This is not a conversion chart for every 3.4 swap out there so please don't think that you can take this and do your conversion from it. This is for the specific vehicle and ECM that I was working with. Not the one that you have.


As you can see in the first row, plug E9(E) pin 10 controls the #10 function and the wire is red. For the manual, the ECM has this function on E5(A) pin 12 and the wire is also red (all the wires are the same color when crossing over). So I will pull the red wire from E9 and move it to the E5 plug in pin 12. Easy enough and I have one completed. Double check everything and make sure its in the correct spot and then move to the next one. The is no particular order you need to go in; just as long as everything gets moved that needs to be.
You will notice that the second wire is E-12(H) pin #2 and is a V-R (violet with a red stripe)has nothing on the manual columns. This is because the manual does not need this function because it is related to the auto transmission. This wire will not be used in the manual plugs.
Here is a shot with the transfer completed. The wires coming from the manual plugs that are going to tie into the 3.0 harness for oil pressure, temp sender, tach, etc. The wires that are still in the auto plugs are all functions that are for the auto transmission and will not be used. These do not need to be taken out of the plugs and they have no purpose anymore. However, there is little room in the kick panel for all the plugs and the ECM to fit when you finish everything up and having an extra four plugs to hide away in there may prove very difficult, or maybe even impossible. I recommend removing the wires and capping them off with some heat shrink to save much needed space later.

As with many things, the key to doing this is the homework. Making a clear, and ACCURATE conversion sheet is where most of the time will be spent doing this. I worked on mine one night UNDISTRACTED and got everything entered into Excel. Then I went over it two more times and double and then triple checked it before every touching anything on the truck. I did find a few fat finger mistakes on my initial chart I had made that would have caused me hours of grief when a CEL (Check engine light) came on. All told, I spent about 3 hours total on the chart and about an hour to move all the pins. Take your time and its a pretty easy task to save a couple hundred dollars and you are going to learn a lot about how the electronics work for the motor for future issues that you may have. Thanks and credit given to Mosk the first time I did this and the idea!!
"ONCE AGAIN I DID WRITE ANY OF THIS, I AM ONLY SHARING THIS'.
please, lets make a sticky or something, with info relating to manual swaps and such.
here is the actual link to the thread on yotatech 3.4 Swap 101 - YotaTech Forums


