2011 FJC TRD Springs and Coils (Easier then you thought)

DonNico

New member
BLUF (Bottom Line Up Front): It's easier then we thought.

I was bouncing back and forth between doing a 2014 Taco TRD suspension swap or an 2011 FJC TRD swap. I settled on the FJC but was unsure about drilling out my frame for the rear struts to fit as has long been assumed and spread as referenced here: http://www.toyota-4runner.org/643542-post8.html

The above post is referring to the Trail Team edition but as far as I know those are just 5100s as are the TRDs just non-adjustable. So this should be the same for both but to be clear this post is referring to the struts and coils off a 2011 TRD FJC.

I now have both rears complete, the second time is always easier. But there is no need to drill out the frame on the rear strut upper attachment, rather you can seperate the top metal plate of the bushing of the upper FJ strut bushing to allow for a non-invasive fit of the 2010+ FJ struts.
 
Last edited:
Register to hide this ad
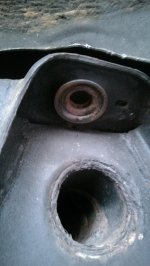
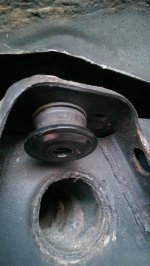
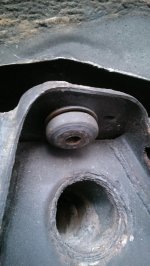
So here is the stock upper strut bushing in place. The second picture shows the bushing removed but as you can see the top metal plate is attached to the frame.
 

Attachments

  • IMAG0762.jpg
    IMAG0762.jpg
    135.2 KB · Views: 520
  • IMAG0761.jpg
    IMAG0761.jpg
    133.1 KB · Views: 526
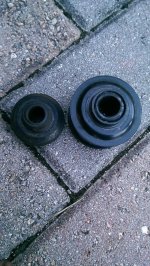
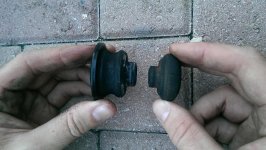
The TRD bushings however have both top and bottom plates attached to the bushing. Here is the stock and TRD bushing side by side. The second picture shows the issue when trying to put the TRD bushing in place you now have two metal plates contacting creating too much distance and metal to metal contact.
 

Attachments

  • IMAG0760.jpg
    IMAG0760.jpg
    154.5 KB · Views: 528
  • IMAG0763.jpg
    IMAG0763.jpg
    125.5 KB · Views: 520
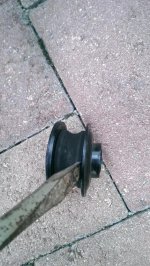
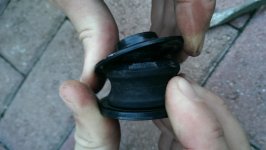
So rather than drilling out the old plate on the frame simply remove the top plate off the new bushing. The metal plates are just glued onto the rubber so with a little prying they can be separated.

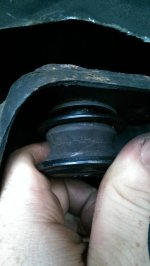
As you can see the bushings are still slightly different sizes so I found it easiest to place the bushing into the frame with some lube inside the bushing bolt hole. This way the bushing can be fully seated into the top plate then slide the upper strut bolt up through the bushing. If you try to put the bushing on the strut first the raised edge will not seat into the plate causing a gap and possibly the bolt to come into contact with the frame... no good.
 

Attachments

  • IMAG0765.jpg
    IMAG0765.jpg
    149 KB · Views: 515
  • IMAG0766.jpg
    IMAG0766.jpg
    124.4 KB · Views: 506
  • IMAG0767.jpg
    IMAG0767.jpg
    143.2 KB · Views: 508
  • IMAG0768.jpg
    IMAG0768.jpg
    133.9 KB · Views: 507
So rears are now complete with no permenant changes to the mounting structure. Hopefully this helps clear the air about using 2010+ FJC shocks. I will do fronts this weekend and see what if any modifications are required for those to fit.

Rear was lifted almost exactly 1" (we will see how it settles after driving)
 
great post. i wish i had trd rear fj coils but ended up with just the regular ones because it was free. i did end up going with tacoma trd front coils and like the ride over stock with 5100's all the way around
 
Yes just to be clear this is the top washer of the bottom bushing. Hope that helps any questions let me know.
 
BLUF (Bottom Line Up Front): It's easier then we thought.

I was bouncing back and forth between doing a 2014 Taco TRD suspension swap or an 2011 FJC TRD swap. I settled on the FJC but was unsure about drilling out my frame for the rear struts to fit as has long been assumed and spread as referenced here: http://www.toyota-4runner.org/643542-post8.html

The above post is referring to the Trail Team edition but as far as I know those are just 5100s as are the TRDs just non-adjustable. So this should be the same for both but to be clear this post is referring to the struts and coils off a 2011 TRD FJC.

I now have both rears complete, the second time is always easier. But there is no need to drill out the frame on the rear strut upper attachment, rather you can seperate the top metal plate of the bushing of the upper FJ strut bushing to allow for a non-invasive fit of the 2010+ FJ struts.

Do you have any part numbers for these struts/shocks? I found I set on Craigslist so I contacted the guy and we talked a little bit about them. Long story short, they were for his '14. So I checked trdparts4u.com and they list struts/shocks for 2007-2011 and then some for 2011-2014. I made the assumption that the set of part numbers listed for '07-'11 would fit and that the parts list for '11-'14 would need a little modification. I don't know if there's any truth to this but this is just what I've found from my research
 
Do you have any part numbers for these struts/shocks? I found I set on Craigslist so I contacted the guy and we talked a little bit about them. Long story short, they were for his '14. So I checked trdparts4u.com and they list struts/shocks for 2007-2011 and then some for 2011-2014. I made the assumption that the set of part numbers listed for '07-'11 would fit and that the parts list for '11-'14 would need a little modification. I don't know if there's any truth to this but this is just what I've found from my research

Front Part#: PTR13-35100
Rear Part#: PTR13-35101

All I can speak for is the rears so far. And it seems like the TRD's are different from the Trail Teams, I did the TRD's.
 
Front Part#: PTR13-35100
Rear Part#: PTR13-35101

All I can speak for is the rears so far. And it seems like the TRD's are different from the Trail Teams, I did the TRD's.

If I remember correctly, those were the part numbers he gave me. So maybe they are the same (or close to it) from year to year. The trd's is what I was looking at. Blue boots with red shock/strut bodies.
 
Front Complete

So I finished up the front struts and coil overs off the 2010+ FJC TRD. The only modification here was as described before... needing to take approximately 1mm off each side of the inner bolt sleeve. Hit it quick with an angle grinder and she slides in without any other modification needed. Too easy.

Couple of notes that most of you probably know since they have been posted before but I failed to re-read before hand that would have saved me time.

1. Beg, borrow or steal preferrably three bottle jacks or floor jacks, obviously jack stands are a good safety.

2. Bottle jack or Jack Stand opposite the corner being worked (i.e. working on front right lift up or block left rear) this comes in handy if you do the removal without spring compressors to keep more weight on the side you are working on as you will need that weight to compress those nice new springs and struts you are putting on.

3. BAPB: Big a$$ pry bar for getting that front lower control arm pushed out of the way. I managed to get a 2x4 wedged in there to work

4. Disconnect the sway bar from both sides before taking out either strut assembly so you can move it up out of the way, its just a lot easier.

Hope this helps.
 
Sorry for reviving an old thread though there's still some mystery behind the rod diameter between the 4th gen and 5th gen rear shocks or between the 4th gen T4R and 2010+ FJCruiser.

Looking at the washers and rubber grommets, it appears the grommets themselves have a bigger opening. Does that mean the shaft of the rear FJC struts are thicker? If so, then how would the shaft of the shock pass through the 4th gen rear washer if it's smaller?
 

Members online

No members online now.

Forum statistics

Threads
278,317
Messages
3,554,129
Members
248,016
Latest member
Advally Service

Trending content

Back
Top