2011 Trail Build Thread - Bjohnston115

bjohnston115

New member
So I bought a 2011 Trail loaded with KDSS, nav and all the goodies about a month ago and I have some plans and dreams which will be shown through this thread. This is my first 4runner but I am not new to the 4x4 world. I had a 1996 P38 Range Rover which started it all which was fantastic when it actually would start and run. After all my problems with the rover the search started for a truck that could go anywhere and would not let me down.... Enter the Land Cruiser. I got myself a 1992 FJ80 land cruiser which started my passion for Toyota Trucks. The cruiser is still kicking around today, has plenty of electrical mods, a mild build, and some scars from the trails. Now its time to build something a bit more comfortable which my wife won't mind driving and/or driving around in so queue the 5th gen 4runner.


Started off as a 2011 Trail Black on Black with KDSS. The list below will grow but it needs to start somewhere.

jfV_yjHgauoF_EHC6TNrb3cyUyGo-t-Z60mMXl9c8ZY8DI0Ogj4Q5eCSmV-HD6bpvn2yA4c4N6UYfYNJz_f2l4fDoy97wUdN7yyQfoDfhTZxB6QWWl--4X3wPfFgv6aAsaz-I4rukHVnYnleQwTXnlCp3JHWEx6BrboGr_rBFF6zxMx96z8x44QBehhfBpWcukYKXC1vNnwb9_THc61jwuEHJNQwUB5-urzh4XlEWg3LWhlvw-IGF_gMg9R-G6FvNVmsEf4DtPaQkWsimLx6ih6whuki06P70zSb9dUuYcnWbAARFdfQrTL5T6kzsOujK3bvlU9yLCTlhSMA2q8s3sbRAPltecGO5rX4kRz8W_dMLoCfIpDHq3Ru-XHJ6BfqaW6y6JL6ZvSsOIxKPrG3_jU7vpisKZbzwgOtJykX7UfIVEOLAo5fOmYN2vDNT1Lgplq0FN6Cb1hmJ3j7Vjfo3YY-wXdz_wH27p-GIrDzSSCq5Ge-KSMtHgf_v36GyHYtU-AuSuh_m7iRL78k-Ym8RuzWwXai54v2otltaNqaxTo=w493-h328-no


4yJt6KqmNOZkFRTbbamfjEp7DW5W0ALjOMl80A6SAZ31iOkZfKkM1YreVPv2AfEbgatJmTO3IhOaR5QzxFaZ8g0ICS8CvYXAyQIakUepgJ32Std_p0bGy4WBDHBbwmuTva_T6iXtL-6RAzZn9iuNBKFkZIElLtnzTaVDfYqwsBiwK9NDKjCAaX86n-re3QyE0eCd8OEi7oLydh1w2RvszG8UBKNsVd6tqWfGlwbWCiLK-7lchryjlsPcJwi2r58UVsCyGErf5zdQNjU3Z53RFEMgAg0Eqhw-OWfJF5zlcfYWvFmzpfG4iLm9IfDuOcguWxKpktGITTq77KU1-brWq8CTIsp35jgasdTclXneqIssqQTvQlFtM8dAerELnL-3zNzw9A93Jz3elFWDyvJAgNY_wVvbKQsex9YSphjKAefnwy2WxU83RlmhER6I1QrDSQ6Gljq-KDjtQMZ_GrKYkknQ6WAUZNYJa47B-bSV9MhpD3_MFEzGjg2nF_EyMRHq4KwX9c9EL8m6nE1O1_pYZSMFaOzwf_TESYSODcURvis=w1421-h947-no


Current Mods:
Factory(ish) Wiring Harness and Fuse Box for auxiliary loads
Xuji Leather Steering Wheel Cover - Xuji Steering Wheel Cover

Coming Soon:
Puma OBA - Dual Compressors if i can fit them
6112/5160 Lift
Full Length Rack
New Sneakers
"TOYOTA" Grille

So I wanted to make a harness for lights, compressor, etc but wanted to make it clean. I will be using OEM style switches in the factory locations (seat heater switch locations and left of steering wheel by your knee area).

W5sySAbbCnVAvIuFe7FE3ePOvCE4yhfZUG5IyiTzcUQaHqe4Np-a_ZV5tRvfy2sM1RQvPLS2pQhhSUUzDZ2UKLlgE3x4C71_-W2zshuvhQAy5ENvtmMmElnX7AutfRtIGc0oqEgVUjHayL8z39QkTJDFPdVnSTOvQRaqxZPqQCEjt9eSP8eNkFtY0kvv-tR9UnwLvoyacltuK7fKmsIFprStqn9419G_YTBlpngoGZLcK5IobtFookDJ-mAzTcEnNPjXeVn8PJbIxx1j5xrOm03zajil9py5iH-1qoyMkvP41WeSzRKrklQa84XSm-PswAQ7Oj1yaoUZoHuWwEPGyh2fbTpOim2hm23xcnB20metfxZ1MJNLM1rU11yr7beohxbEw3wevLTcnYkBJZ3Ur-ZQEWldmTmeTpkTRppaDT00NTLdNuAFlI6kaqMRfKgTkG_jMP8ofFWpT6Iop1OcrVs7L_XwRHkn_PBDYnNYxFsOtUIwmn83yKXcc7Z2Zu_gnOr_VaSNpmNP1YlBZhHbntUcU27egq-KHZY9aLneWpk=w1263-h947-no


The left portion of the harness runs under the center console to the seat heater switch blanks as well as to another factory wiring plug to tap into the dash light circuit. The right portion goes to the switch blanks by the left knee switches and the center portion runs all the wires through the firewall into the engine compartment where the fuse box will be mounted.


1DJBh0OPK9qvedEEGaotG_ZNKl22Eumacky_cm2apx-poy-4MA8nCRfZpxpI1WkMmG2_wU3RcB4RgBikV9C5LlNDebnoNI_XYtd1UpF4lPo55eFtZ8BuHVumSE16-cGN7Eyn-j00c6c0Zmi3y1lU6ADPcBOa0iu7zM80yYWEwXdWwE6-0jSAQAaCH8lmb36wi5YyfyTg1koutFpI_kXE6rYfKLHhgVBQj2-5qLLjWuhYq28LOUOtf74t0aYNnPiUkpALzGZgxPD2YbIZRIkJoP_XBcNePI6mYLPDdPzsXq96yIgFaA7lGVqhYpKENtD-9A4pKmeIANC9JK4cpntzEZkLfUZ6Lz70siWW1nC54_Y-KMtVUwSWSBCnYEw3GIPleJDz8O-DuUo8q9z3xcoxOg4cTy6HFg1uhc3OD1QuH8RJIHaHbWqTPgN6O2hIdCiJEfwSdOckGoblYbYGU2kLG36-d4LRFPwMW9UzE14Q8xYQDs7QR1U7H3D41BKdu2yEHqngdBP8TfQCIMGKCmjlGJ-DqlgfK3Do9CRTlXtlYNc=w1263-h947-no


This is under the center console where the harness runs to the two switch blanks. This plug is where I will be getting the illumination circuit from for the switches. The green and grey wires seen there are for the factory heated seat switches which I do not have so I will use those wires and will not have to cut or splice into any other factory wires.


mqEnFRP5c6sJwIq4X5zIklRfZ9oXvYGBldJ6ac1CiCY2Ghb-9eKNPdsbHgzKY8ooAsesC1t9Y_h1FKsxB6xno7e6XeNJ0_2doI2W1bENWc9iym-KvFDXJXzlD0ybF1jDl9KjmdsJmqS_ojWt61_w1x1j5-vTNmgQH4igqBfzrnt44qDO_Z1zqcdDP2Qql06_xQpFRG1txAu0ya0BMMCorRJOpO1RThci5Vd-QdF2CmeYayBraF_3t4uwcl6el2sUeXny01na0ter4_39nrKZ9Lj7eZ-sK2L-7twAmu1UeFea11pjmZAon5HPzt3bL_VxncyrQcsWOFxUG2FqyNxernnnbFIuIoD7MIagpDquHojV8ZIUK3tN7sq7mb5zXy_VDOtIJm8il_KN5JtJGGuPGHoayRTqrBfjwDikOe8ufzhgjn-e8VyDpZpDtnGT7cHVEuLPQSa1E61oW_5e_GzrkS_jCd0AnfMkOw-f63hTyBRewlpKUOlrcuSGLGaNooM27I-KaYWnG9ae-uumSfrlpB-S8zXQLzClyAVA0mRMwRk=w1263-h947-no


This is the harness in the engine bay where the fuse/relay box will live.


FzKLlZlkGqp7fDpgQXgV1ydZkAU7mhGBPqEufddl1EAuvxLgq8oEIydBhpF_jzuhgR-ByLuTQefdo0zxNJi7NOPCK31vNf9Ns4ShIvP3MXRp9dBxvogUxGFNLxp-Mhs2lhgXHCLEYfckNa6MpiekAfoV_pnWZXZq4ElhpnR2bOuPZMseDw8TGwDrH-J4ypC93ubL-H0975DvnKYaIiKDDSjMNFK5GMjVPFB1uuabRSxAKyVirJdFFwXs9OUTXdF0OQUXqyx4jHLVxH2pDKWFhmR-zPhFcESplsFSzXDZ5LTGfMTa1WNWitaPORQUftTKUnmhus-IJJ9XdIMmpYYeTpSVIG0Pe8S9ytQojjETCuMr7We0i62R7Ac8Q5XQbDju-zQ4LXknLf0JeQReuUxd9KAjYKyNk-oCZ9nUuvKw_25VHIX4N1SN1sR-Ibtl7GnbPzTMKhdfbiCCGvgRnlnH0147RWDgweAj3NKo2JGIqmzPGenEBA_2ZDyk8I5Jham81UhOx9YPaYl1bGyZJ-iFgBio5mhmNGTtR4waY1DmXTQ=w1263-h947-no


C5FXiJkBvfwZADZ9SphvSADpnvbjnY2bcg_mkWbGi8cwnXbl59VxOpX5o7ZpkIs23ACjhWQSBIljK3Mxku3gCbrolLGUZROnTRcNdkHgrhwHtKuVeASmg-O1Q4P_LFTP6BVRzXjtcIOlOmJXuJM6BweMCo3DKBiA-ITbo0YJRNe1YA5bUopiyL2ZlUrDjrzxUsMhal7IqJ5swMRnRGZrxmMlhr1QZmZmun0qZHAgEjPoQIg1YAv10N9fN5Cc3ElqOd1xpEDfHumomE5xiNbVLQmzrs1eevwXUkOy_IX1962OPEv3sPVIfzo5GHCmLFLa51ijS0826WdSrtsVoTsASf8hNHewjkIMkavjYc1v6-tHom6S7NfPhF9mW4zZeSVtLS97Y8w-JMmfn8SfzYnTkhNihEtNgskb3ph3DgrZkXqkx1qLd8R4PfBYCVvCVZwK5n5Ul2Sjt6Y6cutUG3lCnbOREX4WSAblVEEUQQ4Bo5GQT7Q8rkz2E7jhthIoM2Tbqz2WEeUZ85ZmaANjAAHEoX4ln23dctS63tgvdI74jJU=w1263-h947-no


Finally these are the wires for the three switches that will eventually live in the factory dash locations. All wiring is color coded with each circuit having its own color, green/gray matching the factory illumination wire colors, red obviously for 12v+, etc.

More to come on this and other mods!
 
Last edited:
Register to hide this ad
Xuji Leather Steering Wheel cover

My truck was purchased CPO and I could not get the smell of cigarettes off the steering wheel. Every time I drove the truck my hands felt filthy. So queue the steering wheel cover. I saw the threads on here and thought the finished result looked fantastic so I decided to give it a shot.

I purchased the kit from Amazon and it arrived in 2 days
Amazon.com: Hand Sewing Black Genuine Leather Steering Wheel Cover for Toyota Land Cruiser Prado 2010 2011 2012 2013 2014 Tundra Tacoma 4Runner: Automotive

The kit sat in my apartment for 2 days tempting me while I mentally prepared myself for the install. The install was not exactly hard but it does take patience and prepare to spend upwards of 3 hours on this. If asked to swap a tranny or do this again I would swap 3 tranny's...

Anyway... here are some images.

l6A7hl10cucZs5BBPNN8qJq1aFFVN5AdQ4eGHxQbvmBttOgAXvL7zMToZ1qx70w1WZFAh0t5Teg4xOICPBKJvtiHngDExFGwnajmiyq2PiDhTDjtR2FGth3foIE-FLtUGSxzxPlL4Uub2AV0ggXTQR7QyjKbJsrc-HIAeTPX2o7p-DOEIqW7HckkLn1lZYRSPPHo-mAV7CkNJwwd-7ywqjkL-AiPN6-hukVPGYTVz1v2fEaWBF53ct04aWOpc7WLkTfvNAt7LDHThRRKPAi7Ce-S_mrEPrcYhTXVIZprXektMZsdcwsZQHMnQYpfnW2qxcFDugEDmjdr6CHvY3nxeVs8WZ9AoI596fCR38wTOeTjOrfh41LSc_NegeTepiafNFe5jog_zLYVOf0RotUB8HwOQPrN8J89wHgspa3N35hYd3Oq5GQVG9q1ib_mmJ9nrUOsZ39YZ2LjBksFctrUGBZxNXCrMne9977UuVC4cIsZFQ4xQY9d-rCOI5XpKgMie8cQZutVfj0_o9rDxwKr-d_1pXoksC-___RG8iugN_8=w1263-h947-no


We all know what this is... Stock wheel.

1mZ9AJmJ8VC3vshSZoFiOxKW_JJxQkq4fbt6Cnk0FCCDbgHzwQqWLWUZ3Pb8nAX2mR26NFd9SIwNTzmB5aXbxHYclJcY-VTDG7sGQr7LfAvItPzvCu27kmsviT8ja5M7O-Q2F4SniXfRqLYrkS19MFHC4lhRUjtOFY0z034RxkAyfKReXMkaK06BuVnNtCPdLH5Wq6juzLgiIa5Dag548MhMYGAr3H28HUqBMnR5TOiMU5YYFJmTzu2QBLv8dRZ9_Vdvlx4vgr9DSUvh4Kyb_XMOEuoPP2zfN-WOx1yhtGH2cSTycX61bEtHy3amzbtcGVS34rKxc2AaLgmk13qFzorLP70U5oOZKamjXqN_fQ5vmCazp5loDBu-llp7lTo5b1dbZ2W4leWD3HPIwJOOfIA8__7EYL-wvqgAgygxtEKfVOOKdXlCI22ruDwgNvQhfFQRSNJcMnuUIZ4p-4LBRxpZ06DDirvnlNo57toAUkrBH3UN16_MzmyI7OkOgFhAXw8eDSEHiJmODEGwCHsMLFQHxQ0ou22UJAx9oAp89TI=w1263-h947-no


I gave the wheel a light rub down then stretched the cover on. It does take a bit of coaxing to get this thing around the steering wheel. Once it was on i lined it up and centered it. Using the bottom middle section and getting it situation was the easiest way to center the cover on the wheel.

ASg9wTogkoC5YuqGw2y4U3n0t_qM6iQB4NcGWiCrjWg_X9X-s4zMVF_8MLWtIlRnd8DjivQWKgbOhbCH6XLYkcoUhxiFh9LVU3ew3rjGLf1HTzGvH9FB3bcG3U61fw0qF4WgkruX_RIE3NCHUGZkKhbm5n_Blon_51_TCxY88UElGsYF81YlUWLYg7XjOm8DwyEdYuZdSUiXIk6ltlZCIlbEMbaY0bl7hD_8-lZZ-EO4eHlpF6iI5qAVeXjqmQDtbW9QB4MrTAM7-p7KOKeFWVzAxPjC3OuyK_ELBU2QkuwPMxCV_rV1kkZ4ufj8OEWyJ60Hzkawb-0H-Oe6BYW53lccXEsyyl67UGFtR9JVINV0lZt_2ASxssY25fEjyYnV6eTUoVK4sdbR4wx3lVu84IkOFlAZtMvVOTaoeH29ZquzuHOgiUjHSKWz3x2cl6DxOi2Ufsh_OhLmdC75hqDAPGqHqT4xPH05ZlREvf7xFrq4bRSmNpoQO06V_70GNnl1pBZW-QpQmjzV5fiQY_Gurm2Zguxddrn6zDxffdhD7hc=w1263-h947-no


So prior to stretching the cover over the wheel you have to apply double sided tape to the back of the leather cover. The kit comes with enough tape, just be sure to not apply it too close to the edges. I applied my about 1/4 inch from the stitched edges but if I were to do it again I would go about a 1/2 inch from the stitched edge to allow myself more material to grab and stretch. The picture above shows the cover on the wheel with the double sided tape backing peeled off and it is stuck to the wheel. This is the last step before stitching which is the part that takes up all the time.

mPxH-w7lovrylJloKhIS0Hmw0-D3pRfQhXFmWpnvtTODzhr7EZGx6i_z5xmoZvYh3_OXVucmF5y_IbokGi3sP-XWKwOOjBZT-LoGVLIacODxACAgEE4KrOS4cN5qQRRQa5RyX6N8aLhc45ioZUTr2XT10LsZVArPb6SvROxiIC719TKcIFD-JTvnCZ0GpGen_IoE9BucV6A4hKDHymX-9Nq0IiNoW_ly-pENiaKc1csmQ3z092FJQFwMkaq5kwSCG6HP7f5mBVeQcmhsj5Jtu-kHoj8wtlH06GvvPnSMlOoFFwwQnyR2wmL6XGo2ybu21QF37qUzLwrhdUZLAhhKJzh9HlRdJ58yDrvPVvcqYuDoJo9iZO5ip5_SH43zedfdex-ZAls9KQ7r3_zSgfU67XeDNpN8RJW2duPOYamOQHraEbQrvNRwDwHuOZ8MiTlRxHBcJQ6m0k0JNDvQgfmpErcF93SfILi9_UWUJB_n6SwM4HPSPI8QDgijs2VByKEgliQfgJx2A7DSaCSx6dAUwMfGctvKFjm4C4E3xAwjpME=w1263-h947-no


Well here she is. This is not 100% completed since I ran out of daylight and decided to call it quits. I just have to stitch the bottom right section which is probably another 20 minutes. As you can see, it looks great. As others have mentioned, it looks factory. I am really happy with it, definitely worth the time and money IMO. I am sure I will tweak it a bit more and add some finishing touches but it is essentially perfect.

The corner bits above the buttons were a bit tricky to get right, do not be afraid to crank on the thread when stitching to get everything tight and lined up, it is tougher than you may think. The kit comes with plenty of extra thread so don't be stingy with it. I stitched it in every loop and had plenty. I have seen others stitch in every other loop.
 
Rear Camera Dongle and Camera Switching

Added some things...

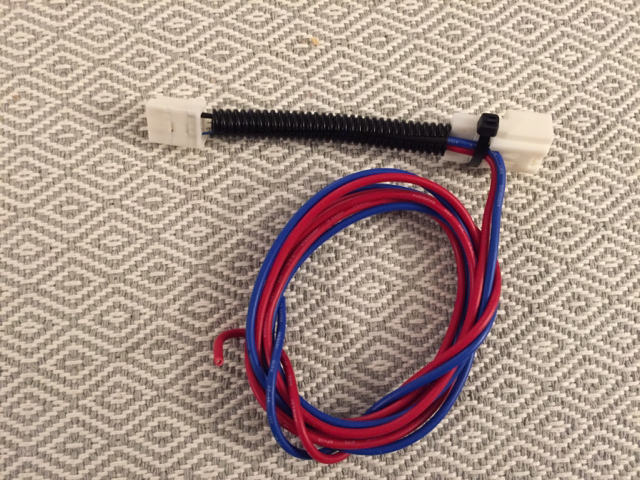
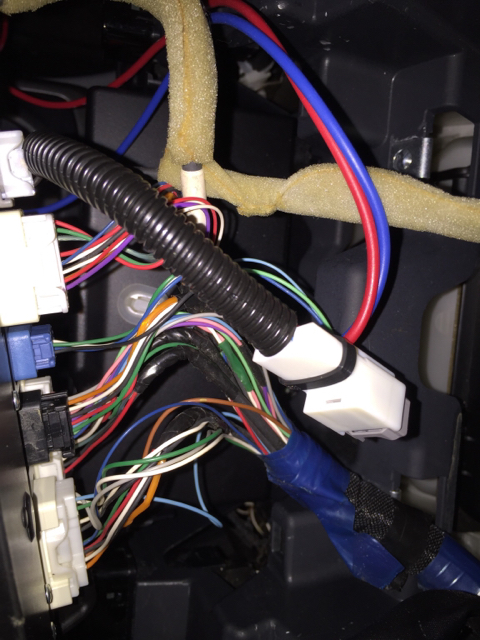
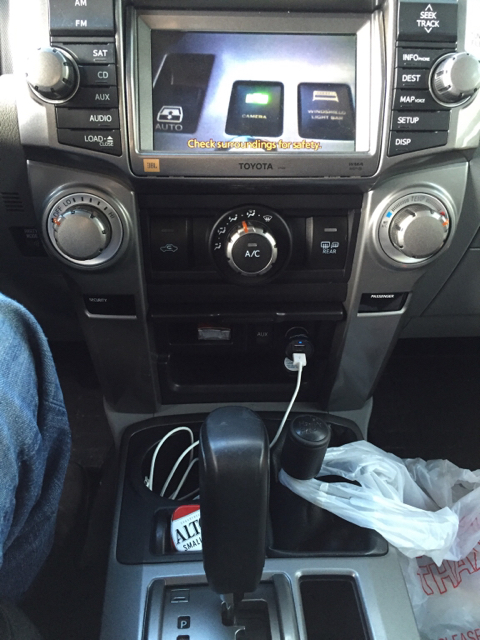
First I added a plug and play dongle I made which allows the rear camera to be activated at any time.

891b1768394855c8436b95ad0df33ed5.jpg


b019e57738428b44017b4c87fa44aa62.jpg


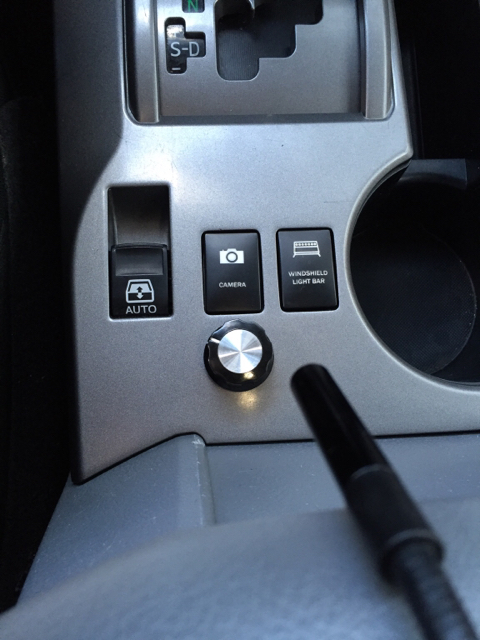
The red and blue wires go to my AOB "camera" switch located where the factory seat heater switches would be. When the switch is pushed it displays the camera on the screen.


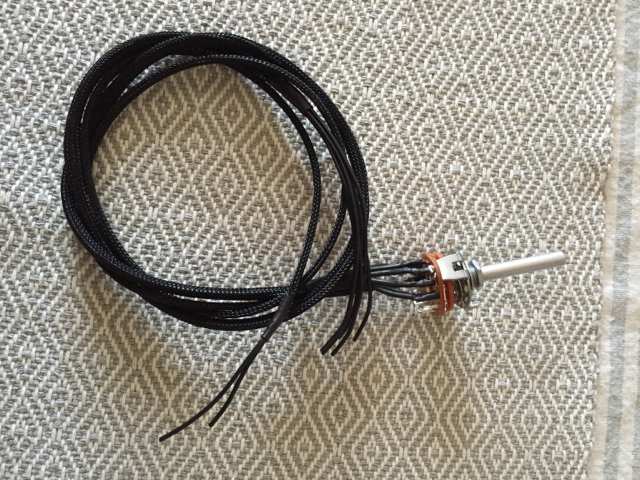
Now that just was not enough for me...! I made another wire which allowed me to add a RCA input to the back of my nav unit. After setting that up I created a 6 way switch which allows me to select 6 separate video inputs.

c6c56bee82789f51754b07a732feacbe.jpg


d8d5447874925add77a6272665dc2ec5.jpg


The switch has 6 RCA inputs. One is dedicated to the rear camera and the other 5 are for whatever I would like. My plan is to add a camera on each side of the truck and then have extra slots for "secret" cams.

da7d4d05f04dd6f73b620b7017375ab0.jpg


https://vimeo.com/157327893

More to come!!
 
Last edited:
Welcome! Nice to have another electrical guy here. Is this a hobby or vocation?

Thanks. Technically this is just a hobby. I am a mechanical engineer but don't get to do fun stuff like this at work. I need to keep on top of this build thread, I have a few more items i need to add.
 
That leather steering wheel cover is SICK. My 2011 TE has the stock wheel which is peeling everywhere. I'll have to do that too!
 

Members online

Forum statistics

Threads
278,306
Messages
3,554,045
Members
248,016
Latest member
Advally Service

Trending content

Back
Top