2015 project thread (week 1 spod and CBI rear bumper)

Tengu

New member
Since Christmas I have been accumulating items to add to The Kraken, aka my 2010 5th gen trail edition. I have not installed everything as I was waiting for items to come in. Here is a list of orders and arrivals as of week 1 of projects. (last Friday)

ARB onboard air compressor
Spod
CBI Rear Bumper
x Vision LEDs for the under carriage
Engo 10000s wench
Rigid Dually LEDs for the holes in the rear bumper

Still on order

Shrockworks Front bumper
OPOR 1.5 spacers

Weather forecasted to be gorgeous, check, rear bumper arrived and taking up space, check, I’m off to the races. Arriving home from work, after making a margarita, I figured I’d start some light prep work. So I decide I’d put the rigid lights in the bumper before installing it. Immediately I was foiled.

There are grooves where nuts drop down in that align with the bolt that retains the light to the bracket. Three of the four nuts dropped in fine, but one of the little wells was not shaped right, so the bolt and nut would not align, thus making it impossible to mount the light to the bracket. I called Rigid warranty, being the weekend, no joy. So do I dremel the well out and potentially void the warranty? No, I figured I had enough to, do so I returned it.

Two margaritas, and the sun down, I decided apply more margaritas to my face, and to punt bumper prep to the next day. The next morning I wake up to my son texting to say that he was helping grandpa clean and repair the whaler in prep for it’s new motor. SO… there goes my helpers for the day. Drat, foiled again.

On to Plan B

Not wanting to waste the beautiful day that it was, I decided to install the Spod. What is an Spod do you say? Say you want to run lights, air compressor, air lockers, and etc. With each item you have switches, wiring and wiring harnesses to deal with. That means every item has to go through the firewall. With the Spod, you wire it to your battery, you wire your component to the spod, and you only run one set of wires through the firewall for in my case 6 switches. It also contains a circuit with relays, and a fuse bank in one neat tidy package. What you see below is one spod with it’s wires you run through the firewall on the left, 6 switch bank with a “modular” mounting bezel in the center, grey switch removal tool, spod, sticker labels, and mounting stuff. If I’m not being clear enough, youtube spod. Sure it is spendy, but it is quality, and simplicity.

tengu-albums-my+runners+n+stuff-picture30861-s-0.jpg


Why do I say “Modular” mounting bezel? When I bought the Spod, I went with the barebones FJ model that did not come with a face plate like most of the other models. So I was thinking I’d run three of the switches to existing oem switch holes in the dash, and use the handy dandy “modular” mounting bezel for three of the switches. Looking at the site you see a template for 1, 2, 3, and 6 slot cut holes. Also a picture of the bezel apart and you it would fit together. So I thought I’d get a few pieces that I could make into the number of slots I needed. Well it came in it was a solid 6 piece block. Apparently, if you want a 3 piece, you have to call. The web site doesn’t give you an option, and it doesn’t tell you that modular is only if they set it up for you. Had I known that, I would have gotten the Tundra version so the plate would at least be metal. Cinde over at Spod was very friendly, and she Jedi mind tricked me into looking at the slot on the center console under the lighter which frankly I forgot was even there. I liked the idea of that slot as I would be less prone to flipping switches with my knee.

Step one

I started by going to my parents house to do the job, and to jack with my son and dad while they weren’t helping me with my bumper. I figured I’d run a coat hanger through the firewall to pull the wiring into the engine bay. Step one, find a wire hanger… coat closet, no wire hanger. Guest closet, no wire hanger, Master closet, not accessible yet due to sleeping mother, Other closets, storage, aka no hangers. What? No wire hangers anywhere? What is this, Mommy dearest house? Modified step one, drive back home to pick up two coat hangers. (as they say in the teams, two is one, one is none) Drat, foiled again.

Having returned, I poke the straightened hanger through the rubber cover thingee into the driver’s area. I looped the end around the white plug end of the cable and taped the hell out of it. Back in the engine bay I pulled like hell on the wire until the bushing gave birth to the plug with braided covered wires.

tengu-albums-my+runners+n+stuff-picture30829-s-1.jpg


I did that first because I thought the SPod was going on the side wall by the fuse box. Upon eyeballing the location and the mounting base, I realized the location would not work and I started doubting it could really fit anywhere I wanted it. Drat, foiled again? Just then my son shows up in his FJ. So I immediately query him as to where the FJ guys were putting it and look under his hood. The FJ guys put them on the passenger side firewall, but the space is a lot bigger, and the firewall a lot flatter under that hood.

tengu-albums-my+runners+n+stuff-picture30830-s-2.jpg


I ended up putting it there but it is quite an awkward fit. Like I said before, the firewall isn’t as flat. To find a place flat enough I had to go kind of high, which I’m hoping it leaves me a big enough space below for the compressor. Keep in mind the spod has a lid that has to open. The area makes that tight. Luckily if placed right it fits, and you won’t need in there often. So, maybe you can see where I tapped into the firewall, and mounted the mount above, (I know bad lighting) but you should better see it below. BTW, self tapping screws? Pfffffft, whatever, I drilled it.

tengu-albums-my+runners+n+stuff-picture30831-s-3.jpg


Back in the cab, we have to get to the part we are mounting the switches to. Start by pulling the two side pieces off. As Antman says, pull to you. They come straight back. Once you see the type of clips they have, you’ll not be as fearful to pull them, and other panels off. I had better luck on the bottom first.

tengu-albums-my+runners+n+stuff-picture30832-s-4.jpg


Next pull the a/c section out. It pulls even easier. I didn’t bother unplugging it, I just flopped it over to the side. Next the center console part has to come out. This is easy as well, just pull it up. You will need to take your shifter knobs off. I also put it the vehicle in neutral. Then there is a piece that goes between the console cover and the piece we are after. There are two screws to get that part out. Finally, disconnect the lighter and mp3 connectors, and out it goes.

tengu-albums-my+runners+n+stuff-picture30833-s-5.jpg


I used a dremel disk to cut a hole in the rear of the pocket for the cable to exit, and a part of the pocket.

tengu-albums-my+runners+n+stuff-picture30834-s-6.jpg


Keeping in mind the angles, this is what I ended up with. Remember, most of it will be covered so it does not have to be too pretty. (although it did clean it up some)

tengu-albums-my+runners+n+stuff-picture30835-s-7.jpg


Here is what I ended up with

tengu-albums-my+runners+n+stuff-picture30836-s-8.jpg


Back in the cab, pulled the other part of the dash down to aid in the wiring. (I’m not small and cramming myself under the dash wasn’t happening. This part just pulls forward from the top. (again thanks Antman)

tengu-albums-my+runners+n+stuff-picture30837-s-10.jpg


tengu-albums-my+runners+n+stuff-picture30838-s-11.jpg


I then used the second coat hanger to help run the other end of the cables to the connectors. I replaced all the stuff in the reverse order, after a good cleaning fo sho, and viola! Spod in place.

tengu-albums-my+runners+n+stuff-picture30839-s-12.jpg


tengu-albums-my+runners+n+stuff-picture30840-s-13.jpg


Back in the engine bay the three cables are connected and run along the firewall. The tree cables consist of the one from the dash to the Spod, and the positive and negative leads to the battery.

tengu-albums-my+runners+n+stuff-picture30863-s-15.jpg


tengu-albums-my+runners+n+stuff-picture30841-s-14.jpg


Switches on (but nothing connected to spod yet)

That ends day one.
 
Last edited:
Register to hide this ad
One hell of a start!

Well thank you, thank you very much.

Where the hell did all that dirt come from, lol!

That red clay dirt is found in every nook and cranny after a trip to barnwell off road park. (Texas Toyota Jamboree) I think it is why my sunroof died and my cd player is on the fritz while ejecting. Had I known how easy it was to pull all that stuff apart, I would have had it cleaned better a long time ago. I'd probably still be too lazy to vacuum the ceiling though.
 
Day Two
No help to be had. Drat, foiled again? Nope, I don’t care if I don’t have a rear bumper for a week, I am starting the bumper damn it! So I started with removal of bumper cover. Note, you do not have to totally remove it. In fact, it is probably easier to not do so. But I knew I had damage on the passenger side and I wanted to assess that. So the whole thing came off.

tengu-albums-my+runners+n+stuff-picture30815-b1.jpg


Mud flaps gone. This is 4? And screws and 3? Push pin clip thingees. Note passenger side, the one piece fell off. The screws/pins held them in place. The clips were broken. And how do you like the tacky texture to the guards. It looks like when the previous owner wrecked it (insurance company told me, not Carfax) they must have tried to… well, that mokes no sense. Maybe they just tried bed liner on it. I need to do something about that.

tengu-albums-my+runners+n+stuff-picture30816-b2.jpg


These are the clips that were broken

tengu-albums-my+runners+n+stuff-picture30817-b3.jpg


But a few pins and screws later, I got no ass at all! Next goes the the trailer hitch, tow hooks, and two other cover pieces, I forgot what were called.

tengu-albums-my+runners+n+stuff-picture30818-b4.jpg


Bust out your sawzall, because these guys had to go. Notice, this one is bent. This was me coming off a ledge. I can’t blame the previous owner on that one.

tengu-albums-my+runners+n+stuff-picture30819-b5.jpg


Now the prelim cuts. Time to make it for real.

tengu-albums-my+runners+n+stuff-picture30820-b6.jpg


Now it is for real

tengu-albums-my+runners+n+stuff-picture30821-b7.jpg


I rehung the trim stuff, utilizing Keemonrunnin’s 5.5”/ 9.75” measurement. (a special shout out to you, without your tread this would have been much more of a daunting task)

tengu-albums-my+runners+n+stuff-picture30822-b8.jpg


Speaking of daunting, I was at full stop staring at this damn thing. After a mentos moment, I decided to look at youtube. Two minutes later, the thing is off it’s hanger.

tengu-albums-my+runners+n+stuff-picture30823-b9.jpg


Finally, son and dad show up, so I put them to work… sort of. I started the bolts while they lifted. But I put his little ass down there to tighten. Dad left and the bumper was out of place, but I developed a special pelvic thrust. Just get behind it and push like your pumping the last of yourself into the women of your dreams. Sure, go ahead and say, “AAaaaaaaaahhhhh” as it fits into place, you hear it from your helper, but you know it, because it feels riiiiight. Yes it does, yes it does….

tengu-albums-my+runners+n+stuff-picture30825-b11.jpg


As for the door gate, I used the freeze the copper bushings method and had little problem with the rubber mallet getting them in. Hanging the thing proved a little challenging. At first it went on fine, but getting the dong through the second brace fitting, alignment was slightly off. So I went all Russian cosmonaut on it and beat it with the rubber mallet like it was an authentic Russian space station. (Note the special Antman cup holder mod is still in place)

tengu-albums-my+runners+n+stuff-picture30826-b12.jpg


The biggest problem with the written instructions was my lack of knowledge of what bolt, screw, piece was for what.

But it came together

tengu-albums-my+runners+n+stuff-picture30827-b13.jpg


tengu-albums-my+runners+n+stuff-picture30828-b14.jpg


BTW, how go you like the special dark earth toned tire?
Finishing touches to come, as well as done photos.

After a week of driving it, it is obvious I am going to have to make an order on over to MetalTech for some of those Icon overland springs. My current one's are creaky as hell. I have slight Cali lean, as my son calls it, particularly after going to Costco and picking up 3 cases of paper and loading her down.
 
Where the hell did all that dirt come from, lol!

Also the last time I went following the FJ guys around "down south off road" I thought I had blown the fuse on the window functions so I was stuck with most everything open half the day. It wasn't until two gas stations later, and finding they don't sell our interior fuses, did I realize I somehow hit the no window control switch...

I know, here's my sign.
 
Well thank you, thank you very much.


That red clay dirt is found in every nook and cranny after a trip to barnwell off road park. (Texas Toyota Jamboree) I think it is why my sunroof died and my cd player is on the fritz while ejecting. Had I known how easy it was to pull all that stuff apart, I would have had it cleaned better a long time ago. I'd probably still be too lazy to vacuum the ceiling though.

I went to the Toyota jamboree last year at Lone Star and got the same dust all over! I still had 30 day tags on the damn thing. They said that it was the driest Jamboree for a long time.
 
It doesn't help that *******s will just go blasting by the camp grounds and the pavilion area knowing that you are standing there loading or unloading your truck with the doors open. It doesn't bother them, they have their windows up.
Meanwhile they are blasting by in a train kicking it up in clouds.

I did have to have my cd player replaced, and sunroof fixed. Luckily, warranty took care of it. The technician asked my service my dude, "what does he do? Drive it upside down?"

This year I'm opening the roof to a minimum, and putting electrical tape over the the cd ejection port.

Now if I can figure out a filtration system for my snoz.
 
Hey OP why did you decide to go with a CBI rear bumper and a shrockworks front bumper? i was looking at those options as well but went with shrockworks since i'm local to the guy and i can pick it up and save a few $$.

where did you mount your ARB compressor? i'm wanting to mount it where you have your spod and move the spod somewhere else. mighty nice set up, good work.
 
Switch Plate Install

Hey.

Looking to get some info about how you mounted the switch panel in that lower console location. I see it fits really nice, however, how did you mount it in securely?

Thank you for your help.

zak
 
Hey OP why did you decide to go with a CBI rear bumper and a shrockworks front bumper? i was looking at those options as well but went with shrockworks since i'm local to the guy and i can pick it up and save a few $$.

where did you mount your ARB compressor? i'm wanting to mount it where you have your spod and move the spod somewhere else. mighty nice set up, good work.

Hit up [MENTION=125603]bandi[/MENTION]
 
sPOD installation

On to Plan B

Not wanting to waste the beautiful day that it was, I decided to install the Spod. What is an Spod do you say? Say you want to run lights, air compressor, air lockers, and etc. With each item you have switches, wiring and wiring harnesses to deal with. That means every item has to go through the firewall. With the Spod, you wire it to your battery, you wire your component to the spod, and you only run one set of wires through the firewall for in my case 6 switches. It also contains a circuit with relays, and a fuse bank in one neat tidy package. What you see below is one spod with it’s wires you run through the firewall on the left, 6 switch bank with a “modular” mounting bezel in the center, grey switch removal tool, spod, sticker labels, and mounting stuff. If I’m not being clear enough, youtube spod. Sure it is spendy, but it is quality, and simplicity.

tengu-albums-my+runners+n+stuff-picture30861-s-0.jpg


Why do I say “Modular” mounting bezel? When I bought the Spod, I went with the barebones FJ model that did not come with a face plate like most of the other models. So I was thinking I’d run three of the switches to existing oem switch holes in the dash, and use the handy dandy “modular” mounting bezel for three of the switches. Looking at the site you see a template for 1, 2, 3, and 6 slot cut holes. Also a picture of the bezel apart and you it would fit together. So I thought I’d get a few pieces that I could make into the number of slots I needed. Well it came in it was a solid 6 piece block. Apparently, if you want a 3 piece, you have to call. The web site doesn’t give you an option, and it doesn’t tell you that modular is only if they set it up for you. Had I known that, I would have gotten the Tundra version so the plate would at least be metal. Cinde over at Spod was very friendly, and she Jedi mind tricked me into looking at the slot on the center console under the lighter which frankly I forgot was even there. I liked the idea of that slot as I would be less prone to flipping switches with my knee.

Step one

I started by going to my parents house to do the job, and to jack with my son and dad while they weren’t helping me with my bumper. I figured I’d run a coat hanger through the firewall to pull the wiring into the engine bay. Step one, find a wire hanger… coat closet, no wire hanger. Guest closet, no wire hanger, Master closet, not accessible yet due to sleeping mother, Other closets, storage, aka no hangers. What? No wire hangers anywhere? What is this, Mommy dearest house? Modified step one, drive back home to pick up two coat hangers. (as they say in the teams, two is one, one is none) Drat, foiled again.

Having returned, I poke the straightened hanger through the rubber cover thingee into the driver’s area. I looped the end around the white plug end of the cable and taped the hell out of it. Back in the engine bay I pulled like hell on the wire until the bushing gave birth to the plug with braided covered wires.

tengu-albums-my+runners+n+stuff-picture30829-s-1.jpg


I did that first because I thought the SPod was going on the side wall by the fuse box. Upon eyeballing the location and the mounting base, I realized the location would not work and I started doubting it could really fit anywhere I wanted it. Drat, foiled again? Just then my son shows up in his FJ. So I immediately query him as to where the FJ guys were putting it and look under his hood. The FJ guys put them on the passenger side firewall, but the space is a lot bigger, and the firewall a lot flatter under that hood.

tengu-albums-my+runners+n+stuff-picture30830-s-2.jpg


I ended up putting it there but it is quite an awkward fit. Like I said before, the firewall isn’t as flat. To find a place flat enough I had to go kind of high, which I’m hoping it leaves me a big enough space below for the compressor. Keep in mind the spod has a lid that has to open. The area makes that tight. Luckily if placed right it fits, and you won’t need in there often. So, maybe you can see where I tapped into the firewall, and mounted the mount above, (I know bad lighting) but you should better see it below. BTW, self tapping screws? Pfffffft, whatever, I drilled it.

tengu-albums-my+runners+n+stuff-picture30831-s-3.jpg


Back in the cab, we have to get to the part we are mounting the switches to. Start by pulling the two side pieces off. As Antman says, pull to you. They come straight back. Once you see the type of clips they have, you’ll not be as fearful to pull them, and other panels off. I had better luck on the bottom first.

tengu-albums-my+runners+n+stuff-picture30832-s-4.jpg


Next pull the a/c section out. It pulls even easier. I didn’t bother unplugging it, I just flopped it over to the side. Next the center console part has to come out. This is easy as well, just pull it up. You will need to take your shifter knobs off. I also put it the vehicle in neutral. Then there is a piece that goes between the console cover and the piece we are after. There are two screws to get that part out. Finally, disconnect the lighter and mp3 connectors, and out it goes.

tengu-albums-my+runners+n+stuff-picture30833-s-5.jpg


I used a dremel disk to cut a hole in the rear of the pocket for the cable to exit, and a part of the pocket.

tengu-albums-my+runners+n+stuff-picture30834-s-6.jpg


Keeping in mind the angles, this is what I ended up with. Remember, most of it will be covered so it does not have to be too pretty. (although it did clean it up some)

tengu-albums-my+runners+n+stuff-picture30835-s-7.jpg


Here is what I ended up with

tengu-albums-my+runners+n+stuff-picture30836-s-8.jpg


Back in the cab, pulled the other part of the dash down to aid in the wiring. (I’m not small and cramming myself under the dash wasn’t happening. This part just pulls forward from the top. (again thanks Antman)

tengu-albums-my+runners+n+stuff-picture30837-s-10.jpg


tengu-albums-my+runners+n+stuff-picture30838-s-11.jpg


I then used the second coat hanger to help run the other end of the cables to the connectors. I replaced all the stuff in the reverse order, after a good cleaning fo sho, and viola! Spod in place.

tengu-albums-my+runners+n+stuff-picture30839-s-12.jpg


tengu-albums-my+runners+n+stuff-picture30840-s-13.jpg


Back in the engine bay the three cables are connected and run along the firewall. The tree cables consist of the one from the dash to the Spod, and the positive and negative leads to the battery.

tengu-albums-my+runners+n+stuff-picture30863-s-15.jpg


tengu-albums-my+runners+n+stuff-picture30841-s-14.jpg


Switches on (but nothing connected to spod yet)

That ends day one.

[MENTION=7957]Tengu[/MENTION] great work with the sPOD installation looks incredibly clean! Im planning to run my switches in the exact location and I have a couple questions before I do so.

1.) Did you have to glue the switches or bezel to secure it into place?
2.) Is there a gap at all between the switch bank (sPOD) and the pocket it which its housed?
3.) Would you do anything differently now that you know what you know?
4.) What threads did you follow (if any) to accomplish this build?
 
[MENTION=7957]Tengu[/MENTION] great work with the sPOD installation looks incredibly clean! Im planning to run my switches in the exact location and I have a couple questions before I do so.

1.) Did you have to glue the switches or bezel to secure it into place?
2.) Is there a gap at all between the switch bank (sPOD) and the pocket it which its housed?
3.) Would you do anything differently now that you know what you know?
4.) What threads did you follow (if any) to accomplish this build?


I'll Try to address these ASAP, it probably requires some Pictures so that is the hold up. I'll give you a brief reply now, and give you a better one later with pics.

1. no glue, It seems stable enough without it. Besides, If I have to take it apart again I'd have to unplug too much.
2. Have the pictures to show, but no cable to plug into the computer at the time. Return later.
3. Maybe a few things now that I think about it. More detail later. Or tomorrow morning.
4. Nothing to follow at the time other than instructions, and suggestions from the helpful people at Spod. (Including the placement selection)

I apologize for the delay, but Family and Margaritas are screaming for attention.
 
It is possible to get an sPOD without the switches and just the pigtail connectors for all six circuits. From there you could use your blank switch locations to the left of the steering wheel and wire some AOB switches to the sPOD. Very clean install.
 
It is possible to get an sPOD without the switches and just the pigtail connectors for all six circuits. From there you could use your blank switch locations to the left of the steering wheel and wire some AOB switches to the sPOD. Very clean install.

Hell man, they have a bluetooth app for your I phone, or a touch screen option now. They'll do just about anything if you ask. Go check out their site.
 
[MENTION=7957]Tengu[/MENTION] great work with the sPOD installation looks incredibly clean! Im planning to run my switches in the exact location and I have a couple questions before I do so.

1.) Did you have to glue the switches or bezel to secure it into place?
2.) Is there a gap at all between the switch bank (sPOD) and the pocket it which its housed?
3.) Would you do anything differently now that you know what you know?
4.) What threads did you follow (if any) to accomplish this build?

Okay, part two

It stays in place just fine without glue. I probably wouldn't in case you need to remove or replace it or the part of the console.

tengu-albums-my+runners+n+stuff-picture39187-no-need-neat.jpg


As you can see, it doesn't have to be pretty. And it comes out easily if you lift it up and out.

With the flap open it pretty much looks like that. I'm surprised I haven't made a facade piece for over the top.

tengu-albums-my+runners+n+stuff-picture39188-fits-like-1.jpg


But I ride with the flap down most the time, so out of site is out of mind.

And you really have to look at the thing with it down, and in the right lighting situation for it to be visible. Even black electrical tape would cover it up.

tengu-albums-my+runners+n+stuff-picture39189-fits-like-2.jpg


That should sum it up for questions one, and two. As for three. There weren't as many choices at the time. So I went with an FJ version with a universal 6 switch block. Looking now I'd probably go a different route. It looks like Taco has single switch options. The Tundra version looks like it has an angle to it.

If you look at where I mounted mine, you can see that unless they are switched on, they have a slight downward tilt. When I was messing with it yesterday, I was thinking, should I mess with bringing bottom of these out so I can give them a tilt upward? (I probably won't due to how little I actually used them.) You can see them all anyway so no biggee either way.

When I bought mine I used the FJ version, and the bracket that came with (new one's looks different) fit in a specific spot without that utilizes existing holes and screws on the vehicle to attach the bracket to it. Had I read the instructions at the time I might have not have to drill as many holes, and my Spod might be more stable. Realistically, I don't believe that because I helped my son install his in his FJ, he has more friendly angles and tons more space. So I am good with it. it will angle down a bit, which bugged my son more than me, so he decided to make me a brace, shown below. (sorry, I should have rotated it)

tengu-albums-my+runners+n+stuff-picture39190-bracket.jpg


From that I learned look at all the options, and all the install instructions to see the things you miss by looking at the sale pictures. The tundra angled switch bank might be a better fit, so look at the pictures in the instructions. It's a circuit switch bank, it knows not what it is going into.

I also see they have new bluetooth, and touch screen options. Maybe, you skill the switchbank totally. In doubt, call them up. They are extremely helpful.

Another install tidbit. When you are making your pull through the rubber seal, wrap the hanger or whatever around the cable. Installing mine I did it right. I thought I was smart when I was doing my son's by attaching it to the white part where the pins go in thinking it wouldn't be as hard as it would be smaller surface to pull. When the pins pull out it requires a special tool, and about two weeks to get back. Now that I thing about it I wonder if I was supposed to detach the leads from the spod and pull from the other side. Maybe I should have read instructions. :faint:

I'm pretty sure I didn't have any threads to go by except maybe a jeep forum, and taco or fj forum, but spod has a couple of install videos. The people at spod are again, extremely helpful. The rest of the way when I find I was bind I just made some :toilet: up.

Theme song for that last sentence. If you ever watched Star Trek you'll like this even more. https://www.youtube.com/watch?v=xwhAq3F8NCE

Okay, going forward, I'm probably going to put something over the top of the switch block to make it not stand out with the flap open. The bluetooth option would be okay if I didn't plan on keeping the vehicle until It dies. I trust switches more than the likelyhood that software updates will be around in 20 years, or the touch screen won't get lost or broken when not in use.

I may not make any changes, because it looks and works for the most part just fine.

Thanks for your compliments, and interest. If I can think of anything else. I'll let you know. If you have anymore questions, you know where to find me.

Apparently I thought of two things.

To open the flap, push on the top.

At first I was concerned I would constantly be hitting switches. I think maybe
twice did an end switch get flipped. So no biggee unless it is a light bar or ejection seat.
 
sPOD Installation Center Console 2012 T4R

[MENTION=7957]Tengu[/MENTION], thank you for submitting pictures! I can't tell you how much a lifesaver it is to actually see what right looks like.

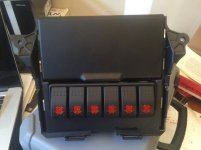
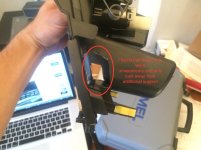
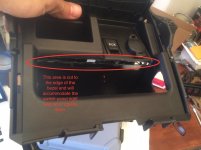
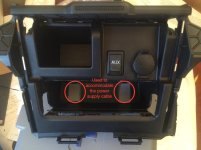
I went ahead and included some of my own to show others what mistakes or changes I would make if I had to do it again. I wouldn't cut as much without really trying to fit the modular switch in its place. Go slow, and be meticulous about the fitting and placement-save yourself $80-100 buying a new center console. Additionally, I found with the modular switch upside down-they seemed to secure easier. This doesn't effect its use and still function as off/on, they're only upside down and you avoid seeing the white light otherwise if it were opposite (until you have a plastic piece widdled).
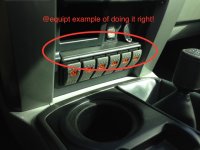
[MENTION=99965]m(a)ce[/MENTION] did a great job with his setup and included an additional plastic piece to cover the switch panel. I have yet to hear back, but he mentions [MENTION=94975]Equipt[/MENTION] on expedition portal about the process. I feel it completes the look and adds overall better aesthetic features, it potentially could offer more function over form as well (added the photo as reference-anyone know where to this plastic piece?)

Outside of that Tengu did a great job explaining how to route everything and dissemble the dash. Thank you again brother... now to actually set up lights, lockers and anything else!
 

Attachments

  • IMG_7699 copy.jpg
    IMG_7699 copy.jpg
    52.6 KB · Views: 740
  • IMG_7689 copy.jpg
    IMG_7689 copy.jpg
    66.2 KB · Views: 615
  • IMG_7688 copy.jpg
    IMG_7688 copy.jpg
    64 KB · Views: 764
  • IMG_7686 copy.jpg
    IMG_7686 copy.jpg
    60.6 KB · Views: 1,210
  • IMG_7687 copy.jpg
    IMG_7687 copy.jpg
    72.5 KB · Views: 669
  • photo 10.JPG
    photo 10.JPG
    110.8 KB · Views: 708
[MENTION=7957]Tengu[/MENTION], thank you for submitting pictures! I can't tell you how much a lifesaver it is to actually see what right looks like.

hey guys- sorry for slow reply. my T4R is gone so I'm not really on here anymore.

looks like you guys did it up right! as for my install Id just reiterate to go slowly & keep test fitting. it will wedge in there & remain stable from what I remember.

the trim piece was cut & carved to fit from some old plastic salvaged from one of those big TVs before they went flat screen. I think that it helped cleanup the visible edge.

I highly recommend talking to Cinde or John at sPOD if you have requests/questions. super knowledgeable & helpful.

in the end I liked the look of the rocker switches & was happy with the install. for those less inclined to dremel their new rig you could check out their digital touchpad switches.

hope this helps & see you on the trails!
 
I went ahead and included some of my own to show others what mistakes or changes I would make if I had to do it again. I wouldn't cut as much without really trying to fit the modular switch in its place. Go slow, and be meticulous about the fitting and placement-save yourself $80-100 buying a new

LOL, Yeah I kind of just went to town on it. :bravo:


the trim piece was cut & carved to fit from some old plastic salvaged from one of those big TVs before they went flat screen. I think that it helped cleanup the visible edge.

Looks like I'm going to have to keep an eagle eye open for a plastic piece suitable. That looks good.
 

Members online

Forum statistics

Threads
278,315
Messages
3,554,104
Members
248,016
Latest member
Advally Service

Trending content

Back
Top