Jcmeadows82
Member
So this will be my first (hopefully of many) post about some of the things that I am doing with my 4Runner. This idea started with the desire to add several wired accessories into my 4Runner and I needed a solution that appeased my OCD'ness. The idea for this came from this video I watched on youtube:
https://www.youtube.com/watch?v=BvFHA1xY10w
I liked his idea, but I didn't like not having all of the electronics not in some sort of enclosure. I didn't need a waterproof enclosure, just something that would provide a minimum level of protection.
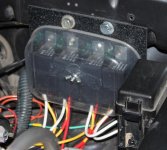
Here are some links to the Relay's, Fuse block, breaker, and Ground block I used, a well as the waterproof connectors I will be using:
Breaker for Accessory Box direct feed:
https://www.amazon.com/gp/product/B00JFBY2OU/ref=oh_aui_detailpage_o07_s00?ie=UTF8&psc=1
Relays with harness:
https://www.amazon.com/gp/product/B00RWWZ7P2/ref=oh_aui_detailpage_o05_s06?ie=UTF8&psc=1
Ground Terminal:
https://www.amazon.com/gp/product/B0763D87ZG/ref=oh_aui_detailpage_o05_s05?ie=UTF8&psc=1
Fuse Block:
https://www.amazon.com/gp/product/B01AFQRLG4/ref=oh_aui_detailpage_o05_s02?ie=UTF8&psc=1
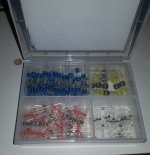
Cool waterproof solder connectors: (these things are awesome! no solder gun needed and they are SOLID)
https://www.amazon.com/gp/product/B07C3NBTJ9/ref=oh_aui_detailpage_o09_s00?ie=UTF8&psc=1
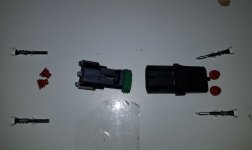
great waterproof plugs: (these come in all sorts of shapes and sizes)
https://www.amazon.com/gp/product/B01FP1HXJ4/ref=oh_aui_detailpage_o07_s03?ie=UTF8&psc=1
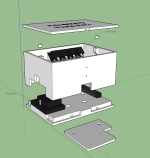
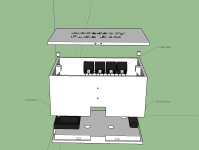
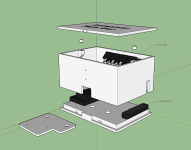
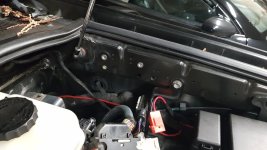
Basically I created this 3d model in sketchup, and will be printing it on a prusa i3 mk2 in ABS filament. The base will attach to the 4runner via all thread and washers between the firewall and the airbox (I will be drilling a few holes in the wheel well and treating the allthread and nylock nuts with a high grade sealant and paint), the walls of the fuse box attach to the base using a few convex/concave bumps to secure it, the top will attach to the walls with a couple latches and some guide pins.
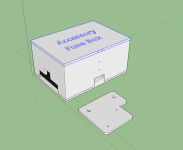
I am thinking that I will use some sticky insulating foam strips between the cap and the walls to create a bit of tension between the lid and walls as well. Anyway here are the pictures of the Design. If you want to see more of it let me know, I can post pics of it from any angle.
The small funky shaped plate in front of the box is the mount I am printing to attach the breaker to the 4runner. I will also post pics of where that will be going. I am using Rivet nuts to attach the breaker plate to the car as there were two nice holes already there.
https://www.youtube.com/watch?v=BvFHA1xY10w
I liked his idea, but I didn't like not having all of the electronics not in some sort of enclosure. I didn't need a waterproof enclosure, just something that would provide a minimum level of protection.
Here are some links to the Relay's, Fuse block, breaker, and Ground block I used, a well as the waterproof connectors I will be using:
Breaker for Accessory Box direct feed:
https://www.amazon.com/gp/product/B00JFBY2OU/ref=oh_aui_detailpage_o07_s00?ie=UTF8&psc=1
Relays with harness:
https://www.amazon.com/gp/product/B00RWWZ7P2/ref=oh_aui_detailpage_o05_s06?ie=UTF8&psc=1
Ground Terminal:
https://www.amazon.com/gp/product/B0763D87ZG/ref=oh_aui_detailpage_o05_s05?ie=UTF8&psc=1
Fuse Block:
https://www.amazon.com/gp/product/B01AFQRLG4/ref=oh_aui_detailpage_o05_s02?ie=UTF8&psc=1
Cool waterproof solder connectors: (these things are awesome! no solder gun needed and they are SOLID)
https://www.amazon.com/gp/product/B07C3NBTJ9/ref=oh_aui_detailpage_o09_s00?ie=UTF8&psc=1
great waterproof plugs: (these come in all sorts of shapes and sizes)
https://www.amazon.com/gp/product/B01FP1HXJ4/ref=oh_aui_detailpage_o07_s03?ie=UTF8&psc=1
Basically I created this 3d model in sketchup, and will be printing it on a prusa i3 mk2 in ABS filament. The base will attach to the 4runner via all thread and washers between the firewall and the airbox (I will be drilling a few holes in the wheel well and treating the allthread and nylock nuts with a high grade sealant and paint), the walls of the fuse box attach to the base using a few convex/concave bumps to secure it, the top will attach to the walls with a couple latches and some guide pins.
I am thinking that I will use some sticky insulating foam strips between the cap and the walls to create a bit of tension between the lid and walls as well. Anyway here are the pictures of the Design. If you want to see more of it let me know, I can post pics of it from any angle.
The small funky shaped plate in front of the box is the mount I am printing to attach the breaker to the 4runner. I will also post pics of where that will be going. I am using Rivet nuts to attach the breaker plate to the car as there were two nice holes already there.

 Probably would have been cheaper as well. Ahh well, at this point I am in the middle of the process, so I will just keep building. I will post pics this week when I start the printing.


![20181210_102155[1].jpg](/data/attachments/279/279423-a72f2170822c1849ea84d11cb167d5d3.jpg?hash=wFFVmXwPU6)
![20181210_102145[1].jpg](/data/attachments/279/279432-2eddc79c2b7f0f092958f5fe3da28eb9.jpg?hash=-h-EPfiaEx)
![20181210_131522[1].jpg](/data/attachments/279/279665-757d9b7ce45c02a74f42db968920ae2e.jpg?hash=ixD7nJhRF_)
![20181210_131600[1].jpg](/data/attachments/279/279674-b4e0bb4e490aa40f45cf0e07af8d2453.jpg?hash=rWcmLknho2)
![20181210_131610[1].jpg](/data/attachments/279/279678-23029aa13d75fa192353c10c98f4809f.jpg?hash=IFNie5MD5o)