

JRZEE2000TR4LTD
Senior Member
I recently had to replace a wheel bearing on the passenger side of my rig. Had a metallic groan coming from that side that appeared right after a wheeling trip. I only did one side because both bearings were replaced last year as a preventative maintenance measure and because I had the spindles off and was switching the backing plates. I think the reason this bearing went bad so fast because I had the bearing pressed in and realized I forgot to install the backing plate so I "tried" pressing it off again and I thought I was OK but apparently not. Lasted about 6000 miles. I wish I had thought of notching the plate and putting it on. Anyways, lesson learned.
There are several "tools" you need to do this. Obviously, the most important is a hydraulic press. The one I used was rated for 25 tons. Pretty sure the press doesn't have to be that big but I will say that the 1st bearings I did were in there pretty good so at least a 10 ton would be needed.
TOOLS NEEDED:
1. 14mm socket (for 4 LBJ to LCA bolts and 2 caliper bolts)
2. 12mm socket (for backing plate installation)
3. 12mm wrench (ratcheting is faster) for removal of the backing plate
4. 10mm socket (for ABS sensor mounting bolts/brackets)
5. 17mm socket ( for tie rod end nut )
6. tie rod removal tool or the equivalent
7. ball joint removal tool or gear puller (for UBJ)
8. 14oz hammer
9. 1/2" drift pin tool (for removal of the spindle seals)
10. 35mm socket ( for the CV axle nut)
11. Heavy rubber mallet
12. Slip joint locking pliers (to remove the cir clip)
PARTS NEEDED
I only used four parts. Purchased from Camelback Toyota. The more expensive seal (the one between the hub and the spindle "may" be able to be reused if you can carefully tap it out using the pin drift. Even the first time I did this on my rust bucket 2000 I was able to get the seal off in one piece. It is just a dust seal. I just love new OEM parts
1- 90369-54002 BEARING $67.42
1- 90521-99114 WHEEL BEARING SNAP RING $5.27
1- 90316-69001 WHEEL BEARING OIL SEAL $36.04
1- 90312-95001 WHEEL SEAL $15.12
Subtotal: $123.85

TORQUE SPECS
Brake caliper mounting bolts: 90 ft-lbs
Steering spindle to lower ball joint: 59 ft-lbs ***WITH RED LOCTITE***
Outer tie-rod to lower ball joint: 67 ft-lbs
Upper ball joint to upper control arm: 80 ft-lbs
Axle shaft hub nut (ADD): 174 ft-lbs
Lug nuts: 83 ft-lbs
STEP 1 - Removal of the spindle
I didn't take any pictures of this step. Honestly, it's very easy and there's a few writeups of this on the forum but the basics are as follows:
1. Jack up the LCA and put a jackstand under the frame but don't lower it onto the jackstand.
2. Remove wheel.
3. Disconnect tie rod end from LBJ.
3. Disconnect 2 brackets and retaining bolt from spindle and UCA and "carefully" remove the ABS sensor. This may fight you but keep turning and pulling up with a good pair of pliers and try to get some lube in there.
4. Disconnect brake bracket on spindle and remove 2 caliper bolts and disconnect caliper from spindle and hang from the coil with a bungee. Remove the rotor.
5. Remove axle nut cover and remove CV axle nut. Hit the CV axle shaft with a heavy rubber mallet or a good sized hammer and a piece of wood just to make sure the axle is "loose" in the hub.
6. Remove 4 bolt connecting the LBJ to the LCA.
7. Disconnect the UBJ from the UCA. This was easy for me as I have SPC LR UCAs but if your OEM then you need to press the UBJ from the UCA. The spindle assembly should slide out off the CV axle splines. This is a good time to check the condition of your LBJs, UBJs, ITREs and OTREs and control arm bushings.
STEP 2 - PRESSING THE BEARING OUT AND IN
Using a press can be a little unnerving. There's are "tons" of force being applied so caution is paramount. Just go slow and if something doesn't seem to be moving make sure nothing is inhibiting movement. Also, you will need thick metal bar stock and the metal press plates. Furthermore, at my shop, we have a variety of pipe, couplings, and fittings. Where I used these, I will mention the proper sizes, which can be purchased at any plumbing store or maybe Home Depot although HD's selection of pipe fittings over 1.5" is limited.
1. Remove the inner seal. No photo of this but just tap it out using a hammer and pin drift tool.
2. Press the hub from the bearing. First, remove the 4 bolts holding the backing plate into the hub. Using the press plates sideways, insert the bar stock between the hub and spindle catching two opposing lips where the backing plate bolts were. Make sure there's enough room for the hub to move about 4-5" under the spindle. I used a 1.5" pipe nipple against the inner part of the hub. If you have the appropriate bearing press tools then use those. I didn't have them so I improvised. The cir clip (one of the parts being replaced) is going to hold the bearing in. It might get deformed a little which is why I replace it. Also, the ABS rotor and spacer will be free from the hub as well as the backing plate.
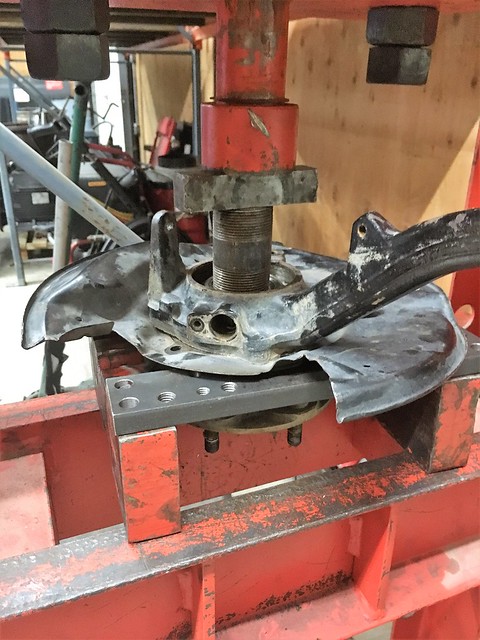

3. Remove the cir clip and press out the bearing. The cir clip might be tight in its groove from the previous step. Using the pin drift tool, hit it down, against the bearing face. Then using a pair of slip joint locking pliers, grab and squeeze the two ears and pull it out. Be careful not to break the ears off or this step will become infinitely more difficult. Once the clip is out, flip the spindle and using just the metal press plates, again catching at least 2 opposing spots where the backing plate was bolted, press out the bearing. To accomplish this, I used a 3" pipe plug and the appropriate bearing press tool. The idea here is to NOT press solely on the inner sleeve of the bearing as is might only press the inner part of the bearing and leave the outer sleeve of the bearing in place. If you look at the picture, the pipe plug is off-center, and pushing down on the outer sleeve along with the inner race of the bearing. Again, if you have the correct bearing press tools, use those. Do not discard the old bearing as it will be used for the next step.
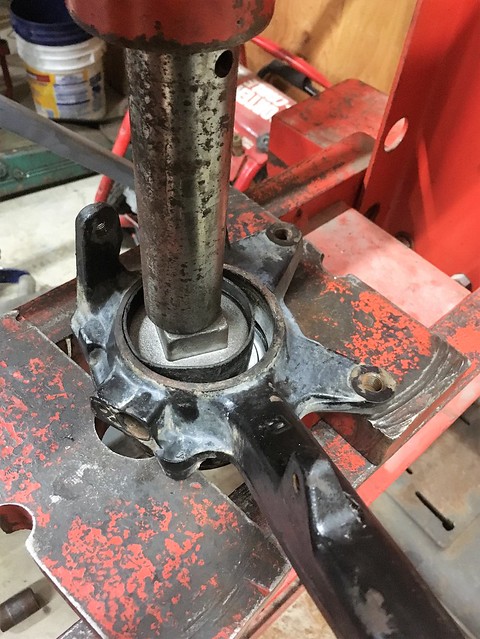
You now have everything apart and are ready to press in your new bearing. The picture below shows the bearing and outer seal still in place but you get the idea.

4. Pressing the bearing in Before doing this clean up the ID of the spindle and spray a little lube in there and on the OD of the bearing. In the picture below, I stack the press plates up only so I didn't have to keep adjusting the shelf height. I'm just lazy like that. The bearing has two different sides - a black side and a shiny metallic side. The shiny side goes inside where the ABS rotor is and the black side goes where the cir clip is. Using the old bearing on top of the new bearing, SLOWLY press the bearing in until it stops and is resting on the little ridge on the ID of the spindle bore. Go slow especially when first starting so the bearing goes in straight. If it does get crooked, offset the bearing press over the high side and press it until it goes straight. None of this should be necessary because the bore is beveled a little where the cir clip goes so it should self center but as I said just go nice and slow in the beginning. Oddly, in the picture below, I have the backing plate in place which is unnecessary in this step. I think I was so paranoid about forgetting to put it on, I put it on here. Go figure. :noidea:

5. Install the circlip, outer seal and the backing plate. DON'T FORGET THIS STEP!
6. Press the hub in. This is a critical step. You have to support the back of the inner sleeve of the bearing while pressing the hub in. If you don't do this, you could ruin the bearing. To accomplish this, I once again delved into my piping inventory and grabbed a 2" pipe coupling. This work perfectly because it clears the diameter of the hub shaft but has a nice lip on it to support the inner sleeve of the bearing. I centered it underneath the bearing and got everything in position. Then pressed the hub in. When you feel like you've got it in about 2/3 of the way, go slow to make sure the hub shaft doesn't get hung up on the pipe coupling. Might have to back the press off just a smidgen just to re position the coupling. Once your sure the hub shaft is going through the middle of the coupling, press the hub on the rest of the way slowly until it stops. You're are now done the press work!

Picture of the pipe coupling I used

6. Tap in the ABS rotor (open side facing you) then the spacer (beveled side out) then tap on the inner seal
Your spindle assembly is now ready to be reinstalled. Obviously, installation is reversal of removal. The LBJ bolts "should" line right up as long as nothing moved. Hope this can help someone. Feel free to comment/add to my 1st writeup.
There are several "tools" you need to do this. Obviously, the most important is a hydraulic press. The one I used was rated for 25 tons. Pretty sure the press doesn't have to be that big but I will say that the 1st bearings I did were in there pretty good so at least a 10 ton would be needed.
TOOLS NEEDED:
1. 14mm socket (for 4 LBJ to LCA bolts and 2 caliper bolts)
2. 12mm socket (for backing plate installation)
3. 12mm wrench (ratcheting is faster) for removal of the backing plate
4. 10mm socket (for ABS sensor mounting bolts/brackets)
5. 17mm socket ( for tie rod end nut )
6. tie rod removal tool or the equivalent
7. ball joint removal tool or gear puller (for UBJ)
8. 14oz hammer
9. 1/2" drift pin tool (for removal of the spindle seals)
10. 35mm socket ( for the CV axle nut)
11. Heavy rubber mallet
12. Slip joint locking pliers (to remove the cir clip)
PARTS NEEDED
I only used four parts. Purchased from Camelback Toyota. The more expensive seal (the one between the hub and the spindle "may" be able to be reused if you can carefully tap it out using the pin drift. Even the first time I did this on my rust bucket 2000 I was able to get the seal off in one piece. It is just a dust seal. I just love new OEM parts
1- 90369-54002 BEARING $67.42
1- 90521-99114 WHEEL BEARING SNAP RING $5.27
1- 90316-69001 WHEEL BEARING OIL SEAL $36.04
1- 90312-95001 WHEEL SEAL $15.12
Subtotal: $123.85
TORQUE SPECS
Brake caliper mounting bolts: 90 ft-lbs
Steering spindle to lower ball joint: 59 ft-lbs ***WITH RED LOCTITE***
Outer tie-rod to lower ball joint: 67 ft-lbs
Upper ball joint to upper control arm: 80 ft-lbs
Axle shaft hub nut (ADD): 174 ft-lbs
Lug nuts: 83 ft-lbs
STEP 1 - Removal of the spindle
I didn't take any pictures of this step. Honestly, it's very easy and there's a few writeups of this on the forum but the basics are as follows:
1. Jack up the LCA and put a jackstand under the frame but don't lower it onto the jackstand.
2. Remove wheel.
3. Disconnect tie rod end from LBJ.
3. Disconnect 2 brackets and retaining bolt from spindle and UCA and "carefully" remove the ABS sensor. This may fight you but keep turning and pulling up with a good pair of pliers and try to get some lube in there.
4. Disconnect brake bracket on spindle and remove 2 caliper bolts and disconnect caliper from spindle and hang from the coil with a bungee. Remove the rotor.
5. Remove axle nut cover and remove CV axle nut. Hit the CV axle shaft with a heavy rubber mallet or a good sized hammer and a piece of wood just to make sure the axle is "loose" in the hub.
6. Remove 4 bolt connecting the LBJ to the LCA.
7. Disconnect the UBJ from the UCA. This was easy for me as I have SPC LR UCAs but if your OEM then you need to press the UBJ from the UCA. The spindle assembly should slide out off the CV axle splines. This is a good time to check the condition of your LBJs, UBJs, ITREs and OTREs and control arm bushings.
STEP 2 - PRESSING THE BEARING OUT AND IN
Using a press can be a little unnerving. There's are "tons" of force being applied so caution is paramount. Just go slow and if something doesn't seem to be moving make sure nothing is inhibiting movement. Also, you will need thick metal bar stock and the metal press plates. Furthermore, at my shop, we have a variety of pipe, couplings, and fittings. Where I used these, I will mention the proper sizes, which can be purchased at any plumbing store or maybe Home Depot although HD's selection of pipe fittings over 1.5" is limited.
1. Remove the inner seal. No photo of this but just tap it out using a hammer and pin drift tool.
2. Press the hub from the bearing. First, remove the 4 bolts holding the backing plate into the hub. Using the press plates sideways, insert the bar stock between the hub and spindle catching two opposing lips where the backing plate bolts were. Make sure there's enough room for the hub to move about 4-5" under the spindle. I used a 1.5" pipe nipple against the inner part of the hub. If you have the appropriate bearing press tools then use those. I didn't have them so I improvised. The cir clip (one of the parts being replaced) is going to hold the bearing in. It might get deformed a little which is why I replace it. Also, the ABS rotor and spacer will be free from the hub as well as the backing plate.
3. Remove the cir clip and press out the bearing. The cir clip might be tight in its groove from the previous step. Using the pin drift tool, hit it down, against the bearing face. Then using a pair of slip joint locking pliers, grab and squeeze the two ears and pull it out. Be careful not to break the ears off or this step will become infinitely more difficult. Once the clip is out, flip the spindle and using just the metal press plates, again catching at least 2 opposing spots where the backing plate was bolted, press out the bearing. To accomplish this, I used a 3" pipe plug and the appropriate bearing press tool. The idea here is to NOT press solely on the inner sleeve of the bearing as is might only press the inner part of the bearing and leave the outer sleeve of the bearing in place. If you look at the picture, the pipe plug is off-center, and pushing down on the outer sleeve along with the inner race of the bearing. Again, if you have the correct bearing press tools, use those. Do not discard the old bearing as it will be used for the next step.
You now have everything apart and are ready to press in your new bearing. The picture below shows the bearing and outer seal still in place but you get the idea.
4. Pressing the bearing in Before doing this clean up the ID of the spindle and spray a little lube in there and on the OD of the bearing. In the picture below, I stack the press plates up only so I didn't have to keep adjusting the shelf height. I'm just lazy like that.
The bearing has two different sides - a black side and a shiny metallic side. The shiny side goes inside where the ABS rotor is and the black side goes where the cir clip is. Using the old bearing on top of the new bearing, SLOWLY press the bearing in until it stops and is resting on the little ridge on the ID of the spindle bore. Go slow especially when first starting so the bearing goes in straight. If it does get crooked, offset the bearing press over the high side and press it until it goes straight. None of this should be necessary because the bore is beveled a little where the cir clip goes so it should self center but as I said just go nice and slow in the beginning. Oddly, in the picture below, I have the backing plate in place which is unnecessary in this step. I think I was so paranoid about forgetting to put it on, I put it on here. Go figure. :noidea:
5. Install the circlip, outer seal and the backing plate. DON'T FORGET THIS STEP!
6. Press the hub in. This is a critical step. You have to support the back of the inner sleeve of the bearing while pressing the hub in. If you don't do this, you could ruin the bearing. To accomplish this, I once again delved into my piping inventory and grabbed a 2" pipe coupling. This work perfectly because it clears the diameter of the hub shaft but has a nice lip on it to support the inner sleeve of the bearing. I centered it underneath the bearing and got everything in position. Then pressed the hub in. When you feel like you've got it in about 2/3 of the way, go slow to make sure the hub shaft doesn't get hung up on the pipe coupling. Might have to back the press off just a smidgen just to re position the coupling. Once your sure the hub shaft is going through the middle of the coupling, press the hub on the rest of the way slowly until it stops. You're are now done the press work!
Picture of the pipe coupling I used
6. Tap in the ABS rotor (open side facing you) then the spacer (beveled side out) then tap on the inner seal
Your spindle assembly is now ready to be reinstalled. Obviously, installation is reversal of removal. The LBJ bolts "should" line right up as long as nothing moved. Hope this can help someone. Feel free to comment/add to my 1st writeup.
Last edited:


