• If you plan to post to Classified forums, you must follow these rules, or your post will be deleted.

    1. Thread title must include at a minimum: FS or FT, Item(1st, 2nd, 3rd, 4th or 5th gen), Price and Location. For Example: FS: 4th GEN Carpet Floor Mats - Tan, $50 Denver, CO.
    2. All Threads must contain the following information
      • What is for sale/trade (model, specs, etc.)
      • Condition
      • Price/What you want to trade for
      • Location of item
      • At least one picture of the item for sale or for trade
    3. No "Feeler" Threads - Its either for sale or it isn't.
    4. Moderators lock Classified Threads that have not had any activity in 90 days or when the part is announced SOLD.
    5. Threads not complying with the rules will be deleted without notice.

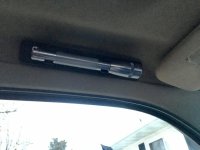
3rd Gen Maglite Mounts! Ellis Precision - $30 SHIPPED

Do you happen to have one that shows how the metal clips attached to the roof are secured?

It's probably not clear from the pictures so let me see if I can't explain it.

If you look at the metal clips, on the body you'll notice flares that come out from the top and bottom. If you were to push the clip into the opening of the liner those flares will pop in behind the metal wall. That first picture of the handle with one of the clip inserted is a good one for reference.

With all the pieces taken off, here's the sequence for putting it all back together. Again, using that first picture as reference, you put the clips into the handle first just as pictured. Then you take the entire handle, with clips inserted, and push each side into the openings on the liner. Each side should click in as those flares set behind the metal wall of the liner. OK, with just the clip and handle inserted, the handle is very loose and moves around.

What keeps the clips in are those plastic caps. I deliberately took a picture where I slipped the clips over the cap to show you how the profile of the body of the cap lines up with the clips. So back to the last step of the installation. The cap ends have this "hook" which requires you to start the install side way to make sure the hook goes in first, then the rest of the cap will align properly. After that it's just pushing the cap in until you hear another "click" and the cap is flushed with the handle. Once those caps are in, they keep the metal clips opened so that the flares on the clips stay behind the metal wall on the liner. When both clips are in, the handles feel solid and won't budge.

There's one picture where I dry-fitted all the parts. In that picture you can see the handle, the clip inserted in the handle, and the cap almost fully inserted. You also see the cap's plastic "hook" in between the metal clip.

Hope this helps. Let me know if you have more questions.

Edit: I formatted my earlier post a bit and added a couple of comments related to the steps above.
 
Last edited:
It's probably not clear from the pictures so let me see if I can't explain it.

If you look at the metal clips, on the body you'll notice flares that come out from the top and bottom. If you were to push the clip into the opening of the liner those flares will pop in behind the metal wall. That first picture of the handle with one of the clip inserted is a good one for reference.

With all the pieces taken off, here's the sequence for putting it all back together. Again, using that first picture as reference, you put the clips into the handle first just as pictured. Then you take the entire handle, with clips inserted, and push each side into the openings on the liner. Each side should click in as those flares set behind the metal wall of the liner. OK, with just the clip and handle inserted, the handle is very loose and moves around.

What keeps the clips in are those plastic caps. I deliberately took a picture where I slipped the clips over the cap to show you how the profile of the body of the cap lines up with the clips. So back to the last step of the installation. The cap ends have this "hook" which requires you to start the install side way to make sure the hook goes in first, then the rest of the cap will align properly. After that it's just pushing the cap in until you hear another "click" and the cap is flushed with the handle. Once those caps are in, they keep the metal clips opened so that the flares on the clips stay behind the metal wall on the liner. When both clips are in, the handles feel solid and won't budge.

There's one picture where I dry-fitted all the parts. In that picture you can see the handle, the clip inserted in the handle, and the cap almost fully inserted. You also see the cap's plastic "hook" in between the metal clip.

Hope this helps. Let me know if you have more questions.

Edit: I formatted my earlier post a bit and added a couple of comments related to the steps above.

Ah ok. I think I get it now... It doesn't look like the handle spot is truly flat anyway (there is a "dent" into the roof for hand relief), so this probably isn't going to be the best fit.

Shoot me your order number and quote your username to [email protected] and I'll send you the refund.

Thanks for trying!

Joel
 
Ah ok. I think I get it now... It doesn't look like the handle spot is truly flat anyway (there is a "dent" into the roof for hand relief), so this probably isn't going to be the best fit.

Shoot me your order number and quote your username to [email protected] and I'll send you the refund.

Thanks for trying!

Joel

[MENTION=139559]Ellis Precision[/MENTION]
I've sent the email. I just forwarded my order confirmation email and added my forum handle.
If you develop a version of the mount for the 5th gen down the road, I'd love to be notified. Thank you.
 
[MENTION=139559]Ellis Precision[/MENTION]
I've sent the email. I just forwarded my order confirmation email and added my forum handle.
If you develop a version of the mount for the 5th gen down the road, I'd love to be notified. Thank you.

PM'd
 
So I ended mounting it on the door pocket. Easily accessible but a little tricky putting the flashlight back. Still, I like it. Couldn't find any black hardware so I might just paint the bolt heads.
765fb37d732a3692b2824731d5c118bb.jpg
 

Hi Tom,

Anodizing is naturally a lighter aluminum color, but it microscopically looks like honeycomb, so we can dye it certain cool metallic colors.

Clear anodize just has not been exposed to dye, and instead the pores are sealed in their natural, clear state.

Hope this helps!

Joel
 
Got mine mounted up the other day and it's an instant hit. Sorry for the low quality pic, but it was getting dark as I was installing it (took all of 5 minutes); it's also kind of hard to photograph a black object in a dark corner. Craftsmanship and materials are A+ though, and the Maglite snaps in with a very satisfying and sturdy feeling.
 

Attachments

  • FullSizeRender.jpg
    FullSizeRender.jpg
    145.1 KB · Views: 639
Got mine as a Secret Santa gift for my 4th Gen. Picture shows it installed backwards and I have since switched it around. Great practical piece to add to any vehicle.

25347d625640e733d1806b1e8d435577.jpg
882fedcf0e98b621480aae548c7d4e0c.jpg
 

Members online

Forum statistics

Threads
278,316
Messages
3,554,107
Members
248,016
Latest member
Advally Service

Trending content

Back
Top