4Runner Interior LED Light Swap

Thought this might answer questions you may have about the process.
We upgraded our wimpy interior lights to LEDs. This is simple do it yourself project that is inexpensive, takes very little effort and time to do, and will give immediate, gratifying results.

Couldn't agree more & with how little cost is associated in doing this. It's such a clean look & feels current in today market. It really brings out the interior & outside lighting that was lacking. I purchased my LED's from a variety of manufactures on Amazon. Puddle, flood, map & reverse lights are installed with super bright white LEDs & the cargo/hatch & dome lights are ice blue LEDs. It's a nice look for my Nautical Blue T4R :D
 
We went with the set from HID Kit Pros based on the excellent install video by WanderLost. (One of the LEDs for the map/puddle light was defective, though.) WanderLost didn't show the puddle light install and when we saw how someone else did a big dissassemby of the mirror housing, we skipped it. Can anyone advise on the possibility of breaking the mirror or otherwise messing it up? Maybe there's a trick to it that makes it easier?
 
Last edited:
There is a way of just pulling the outer shell (front) of the mirror housing off that would be much easier. I saw it explained here somewhere. When I did mine I disassembled it from the mirror side according to some of the instructions here. I didn't have any problems, but popping the outside shell off would have been quicker and easier. If you go the way of disassembly from the mirror side, just take your time. The mirrors themselves just pop off. The rest is just screws and plastic retaining clips.
 
We went with the set from HID Kit Pros based on the excellent install video by WanderLost. (One of the LEDs for the map/puddle light was defective, though.) WanderLost didn't show the puddle light install and when we saw how someone else did a big dissassemby of the mirror housing, we skipped it. Can anyone advise on the possibility of breaking the mirror or otherwise messing it up? Maybe there's a trick to it that makes it easier?

Funny you should post this as I just did the drivers side last weekend. The video of the full mirror pull apart I used. Worked, however the risk when taking the mirror off for me was not breaking the mirror, it was the clips that hold it on. There are 4 contact points with 2 clips each. One of the 8 broke when I was taking mine out. Broke off and fell on the ground in front of me, I was like crap what the heck was that.

I was able to replace the puddle light and get it all assembled. The mirror is on now but who knows if it will stay on. I haven't yet looked on-line to see how much a mirror costs. I replaced my light with red which looks cool, but since I broke a clip on the mirror not sure it was worth it. I also think I may have actually bent the mirror a tad bit which makes the rear view a little skewed. I think it is slowly flattening again so I think I am good there.

I think you would be ok taking the mirror off, just go real easy and slow. First time is always the hardest.

Not cheap but this is what I used. You can probably find some other red ones cheaper but these are pretty good and bright.

https://www.amazon.com/gp/product/B018GYRGH6/ref=ppx_yo_dt_b_asin_title_o05__o00_s00?ie=UTF8&psc=1

The other red bulb I put in the door. Haven't done the passenger side yet. Debating if it is worth it. I think if you go from the yellowish incandescent to white LED it's probably not worth your time.
 
Last edited:
There is a way of just pulling the outer shell (front) of the mirror housing off that would be much easier. I saw it explained here somewhere. When I did mine I disassembled it from the mirror side according to some of the instructions here. I didn't have any problems, but popping the outside shell off would have been quicker and easier. If you go the way of disassembly from the mirror side, just take your time. The mirrors themselves just pop off. The rest is just screws and plastic retaining clips.

Correct, just pull on the lower inside of the back mirror housing & it will easily un-clip for you without damage. That will access two Phillips screws, the rest is self explanatory. No need to pull the "mirror" off. Also, like any plastic in colder weather... you'll risk breaking clips if you're working in freezing temps. Just a word of caution.
 
There is a way of just pulling the outer shell (front) of the mirror housing off that would be much easier. I saw it explained here somewhere. When I did mine I disassembled it from the mirror side according to some of the instructions here. I didn't have any problems, but popping the outside shell off would have been quicker and easier. If you go the way of disassembly from the mirror side, just take your time. The mirrors themselves just pop off. The rest is just screws and plastic retaining clips.

It's really not bad, if you pry off just the back shell you run the risk of breaking the clips that hold the shell in. I've seen others mention that. Honestly the mirrors take about 5 minutes, you pop off the mirror which is 4 clips then you can access the clips that hold the back shell piece on, then it's just a couple screws, very simple.

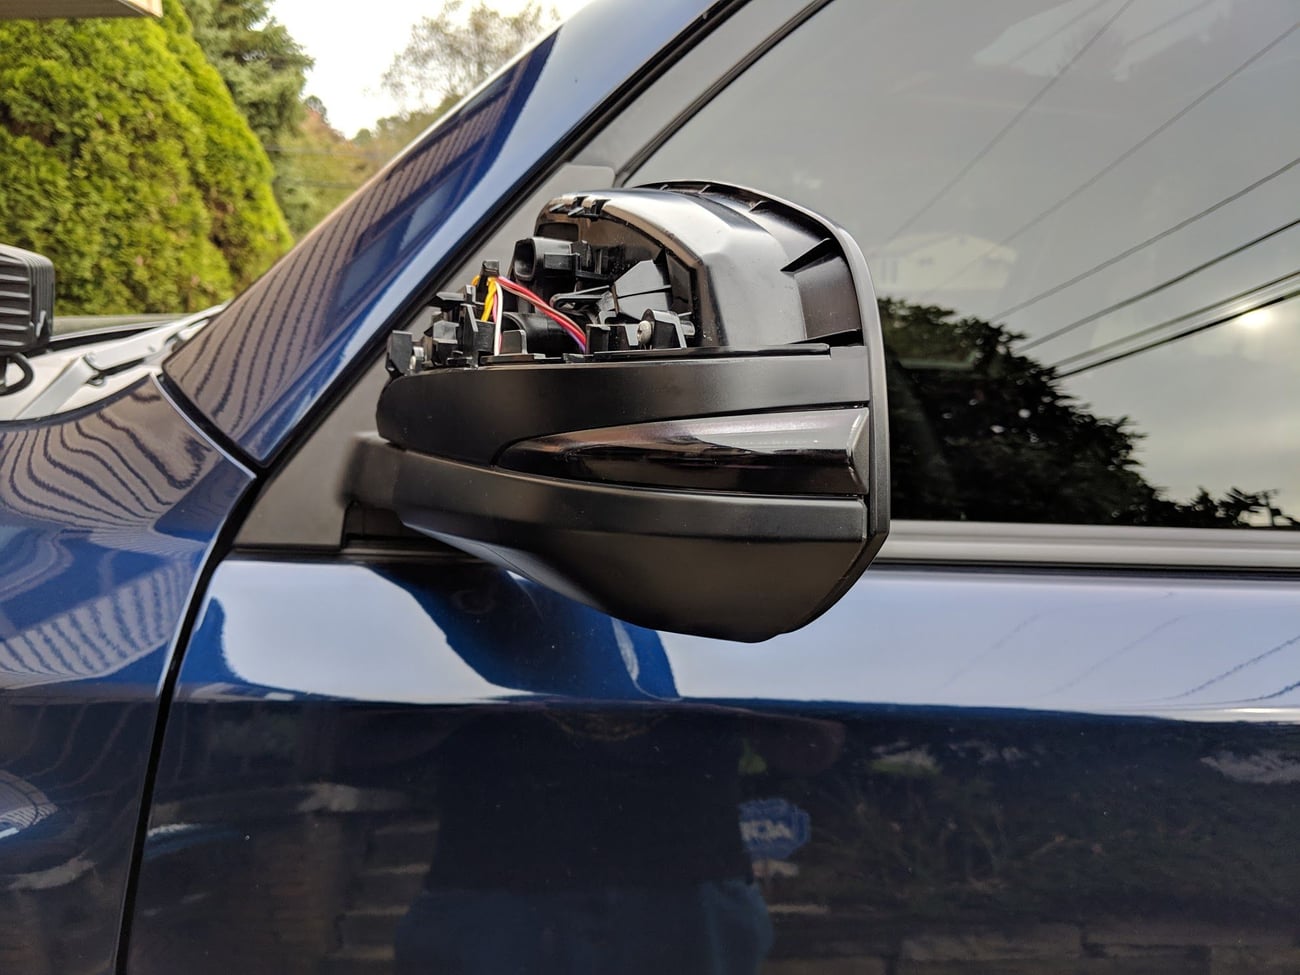
img_20181025_153501_d18078d4c7fa55370fb6784c28231a9809aa7110.jpg


Here's what it looks like inside

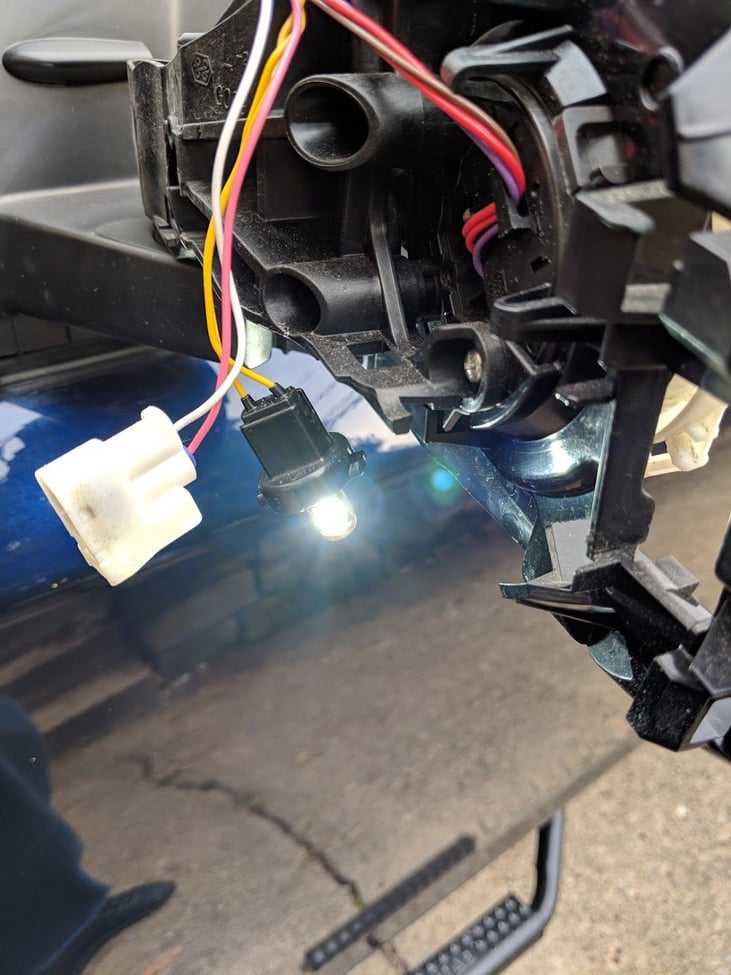
img_20181025_155329_4055f93a67a86547fa05db876d11d800a2a457e7.jpg


And here's where the bulb is

img_20181025_154717_e6b6b2625130bf8864a215dca242cbc35e093bb5.jpg


Having done this 2 or 3 times now I really recommend just removing the mirror glass and then popping the painted shell off. It really just makes it easier to access everything without breaking the clips. Like I said, 5 minutes tops, reassembly is also simple, the turn signal and trim pieces literally snap back into place, easy peasy
 
Yea, it was in the 40's when I pulled my mirror off so might have been a reason why one of my clips broke. But the mirror not being completely flat anymore, not sure about that. I still notice a slight deviation. Maybe it was there before and I just didn't notice it, but the passenger side is flat.
 
Thanks for the advice on puddle lights, the clip breakage warnings, the nice-to-see photos, and especially the encouragement. It never occurred to me to not do it in the cold weather despite the fact I heat plastic all the time to bend it for other projects. Makes sense to bring it in the garage and warm it up a bit first so it's less brittle.
 
Another option here would be arclightleds. He's a 4runner owner and custom built his interior LEDs that can switch between red and white. While they're expensive he does give you anywhere from 50 to 100+ LEDs on a panel vs others that give you around 10 at most. Plus they give back some functionality with the red LEDs as a bright white light firefly LED is almost useless and dangerous when driving at night.

JXXWN6Yl.jpg
 
I'm looking to order LEDs for the interior of my 2019 LE. So many choices here!

Few of questions here:

1) The HD Pro kit offers a choice between Pure, warm and bright whites. I'm tending towards warm for interior and pure for the tail gate but do you know the color temps of these and what have others bought?

2) While I would like really bright interior lights when parked I am concerned about them being used when driving (map light for example). Any solutions to this? What kind of brightness are these bulbs?

3) Do we need Canbus bulbs for the limited?
 
Last edited:
We went with the set from HID Kit Pros based on the excellent install video by WanderLost. (One of the LEDs for the map/puddle light was defective, though.) WanderLost didn't show the puddle light install and when we saw how someone else did a big dissassemby of the mirror housing, we skipped it.


I see the the HID Kit Pro kit and it’s a bit more expensive that some of the others. Doing it all except the license plate lights comes so $99 including shipping. Is it worth the extra money over other bulbs out there?

Also has anyone tried there CREE reversing lights?


Sent from my iPhone using Tapatalk
 
HID Kit interior lighting

I see the the HID Kit Pro kit and it’s a bit more expensive that some of the others. Doing it all except the license plate lights comes so $99 including shipping. Is it worth the extra money over other bulbs out there?

Also has anyone tried there CREE reversing lights?

We didn't shop around or try to compare LED types. I was disappointed that one was broken at the solder connection. I figured I could solder it back on but there was no way due to the minimalist construction approach. While putting them in I was worried about breaking them. So I'd guess they are no better than others, but don't know how good/bad others are.

These are definitely brighter than stock, but not to the point of interfering with driving, IMO. I went with the warm color for the interior and I like result so it was good choice for me. In my only other experience, I once replaced some camper lights with LEDs and the blue tint was awful so didn't want to risk "pure white" casting the bluish tint here.
 
How did you guys get the LED bulbs to fit the dome light receptacles?
Now, I tried this on a 4th gen, a 2007 SR5, but these flat wouldn't work even though the fitment chart shows they do. I looked at pictures of some of what you guys posted here, and the ends/contacts look the same, which results in an effective length too long, and a tip too blunt. my vehicle has in the receptacle contacts that have openings in them, and the OEM bulb has a spike on the tip each end that must be fitted in those holes/slot to secure the bulb. the LED did not have these, and the ends were blunt, rather than sharp-sloped like the OEM bulb - it would just pop right out

Anourney 6Pcs DE3175 DE3021 DE3022 C5W 31mm/1.25'' Festoon LED Bulb, 2
4 SMDs 3014 Chipset LED Replacement Bulbs for Internior Car Licese Plate
Dome Map Lights DC 12V with 12 Month Warranty

https://www.amazon.com/Anourney-Festoon-Replacement-Internior-Warranty/dp/B07L9NXXFH
 
Another option here would be arclightleds. He's a 4runner owner and custom built his interior LEDs that can switch between red and white. While they're expensive he does give you anywhere from 50 to 100+ LEDs on a panel vs others that give you around 10 at most. Plus they give back some functionality with the red LEDs as a bright white light firefly LED is almost useless and dangerous when driving at night.

JXXWN6Yl.jpg

I started with the map lights and then got the dome and tailgate lights, all of them switchable.
The instructions are very well written, and I love the ability to use the red lights at night.
Only downside is the price. But they are certainly well made.
 

Members online

Forum statistics

Threads
278,309
Messages
3,554,065
Members
248,016
Latest member
Advally Service

Trending content

Back
Top