HokieRunner
New member
I've seen many requests and questions for how to swap out the rear rotors so I snapped some pics when I did mine today.
I won't really delve into the pads because Joel @ Toyota120.com already did a good writeup. Replacing rear pads
Tools:
1. Jack up the truck (I used the rear axle housing as the jack point) and place 2 jack stands under the axle. Take off the wheels.
2. Using the 17mm socket, remove the brake calipers and hang them above the axle so you don't stress the brake lines. Using the same 17mm socket, unbolt the brake caliper bracket.

3. There are 2 holes in the rear rotors. Align the holes at 12 and 6 o'clock. Before trying to remove the rotors, you'll need to back off the parking brake shoes using the star adjuster nut. This is located at the 6 o'clock position - use a flashlight and make sure it's lined up correctly so you can fit the small screwdriver through the hole to the adjustment star. Adjust the star downward repeatedly until you're clear of the brake rotor.


4. Now you're ready to separate the rotor from the hub. There should be 2 threaded holes on the rotor. Add a little lubricant to the threads and insert the 2x 8mmx1.25 bolts. Tighten them down several turns working back and forth to pull off the rotor. I put a couple lug nuts on just so it wouldn't fly off when I gave it an extra whack or two with the hammer.

5. Spray down the entire assembly with brake cleaner. Clean up the hub a bit with a wire brush if it's beat up.
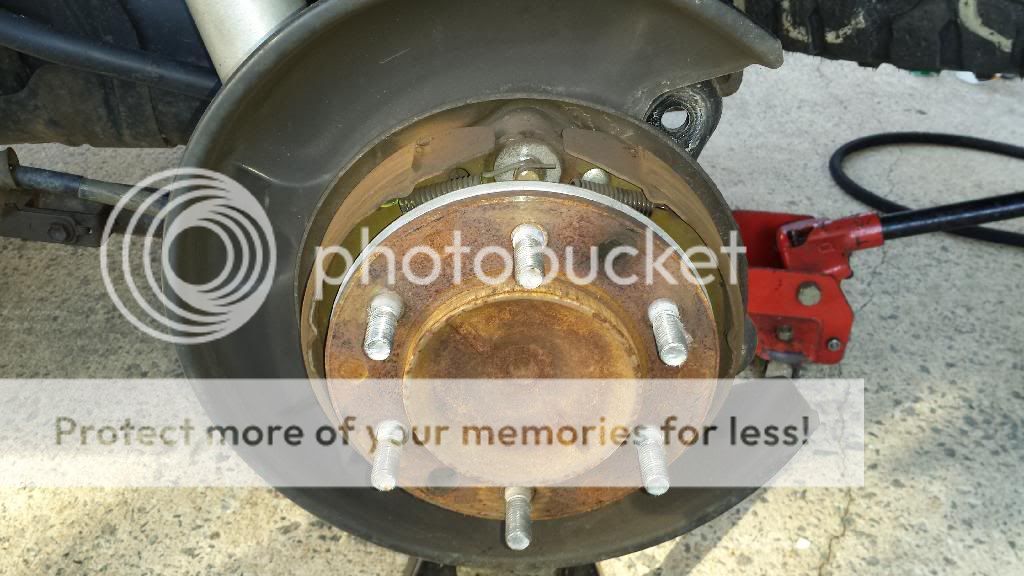
6. Slip the new rotor on. It may need a bit of encouragement using lug nuts and/or a rubber mallet.

7. Rebuild the caliper bracket with new pad guides and install the new pads. Don't forget the high temp grease on the back of the pads. Compress the caliper piston and bolt it back on the bracket. Re-grease the slide pins too.
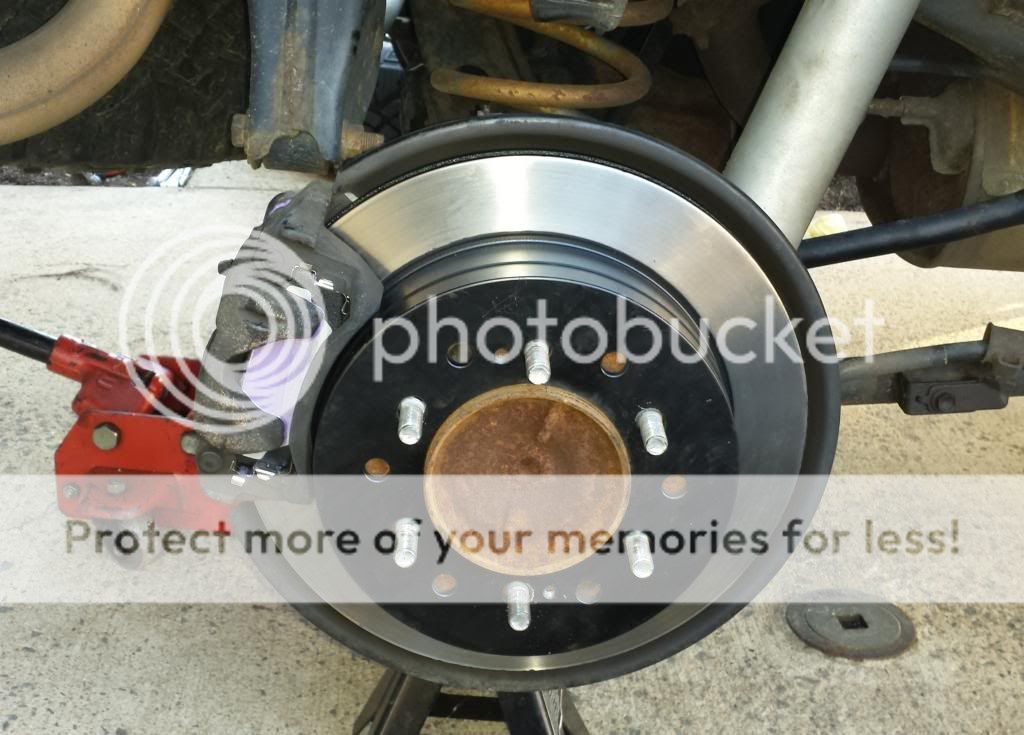
8. Torque the caliper brackets, 17mm bolts to 77 ft/lbs.
Torque the caliper slide pin, 17mm bolts to 65 ft/lbs.

9. Now it's time to re-adjust the parking brake. Same as before, align the hole at 6 o'clock and using the small screwdriver, adjust the star wheel UPWARD until it tightens down. Then back it off a turn or so.
10. Re-install the wheel, throw on the lugs, get it back on the ground and torque the lug nuts.
11. Now go break in the new pads and enjoy your silent and smooth brakes!
I won't really delve into the pads because Joel @ Toyota120.com already did a good writeup. Replacing rear pads
Tools:
- 17mm socket
- Small flat head screwdriver
- 2 8mmx1.25 bolts
- hammer
- torque wrench
- floor jack
- 2x jack stands
- brake cleaner
- brake grease
- bungee cord
1. Jack up the truck (I used the rear axle housing as the jack point) and place 2 jack stands under the axle. Take off the wheels.
2. Using the 17mm socket, remove the brake calipers and hang them above the axle so you don't stress the brake lines. Using the same 17mm socket, unbolt the brake caliper bracket.

3. There are 2 holes in the rear rotors. Align the holes at 12 and 6 o'clock. Before trying to remove the rotors, you'll need to back off the parking brake shoes using the star adjuster nut. This is located at the 6 o'clock position - use a flashlight and make sure it's lined up correctly so you can fit the small screwdriver through the hole to the adjustment star. Adjust the star downward repeatedly until you're clear of the brake rotor.


4. Now you're ready to separate the rotor from the hub. There should be 2 threaded holes on the rotor. Add a little lubricant to the threads and insert the 2x 8mmx1.25 bolts. Tighten them down several turns working back and forth to pull off the rotor. I put a couple lug nuts on just so it wouldn't fly off when I gave it an extra whack or two with the hammer.

5. Spray down the entire assembly with brake cleaner. Clean up the hub a bit with a wire brush if it's beat up.

6. Slip the new rotor on. It may need a bit of encouragement using lug nuts and/or a rubber mallet.

7. Rebuild the caliper bracket with new pad guides and install the new pads. Don't forget the high temp grease on the back of the pads. Compress the caliper piston and bolt it back on the bracket. Re-grease the slide pins too.

8. Torque the caliper brackets, 17mm bolts to 77 ft/lbs.
Torque the caliper slide pin, 17mm bolts to 65 ft/lbs.

9. Now it's time to re-adjust the parking brake. Same as before, align the hole at 6 o'clock and using the small screwdriver, adjust the star wheel UPWARD until it tightens down. Then back it off a turn or so.
10. Re-install the wheel, throw on the lugs, get it back on the ground and torque the lug nuts.
11. Now go break in the new pads and enjoy your silent and smooth brakes!