
'99 4Runner Build up - Post Tacoma

Not to clutter your build thread, which I am totally enjoying but, how do I get the ECT/rear window roll up/defrost buttons to light up? Meaning how do I replace or get to those bulbs?
I've seen threads/DIYs for the ones you replaced which are the Auto Air bulbs, but not the others. /hijack

No worries- I don't consider your question clutter. I did a quick google and didn't come up with any part #'s on how to replace the bulb. In the 63 times of taking the center section out of the Runner, I've never looked behind those buttons. If I see anything or find out any info, I'll let you know.

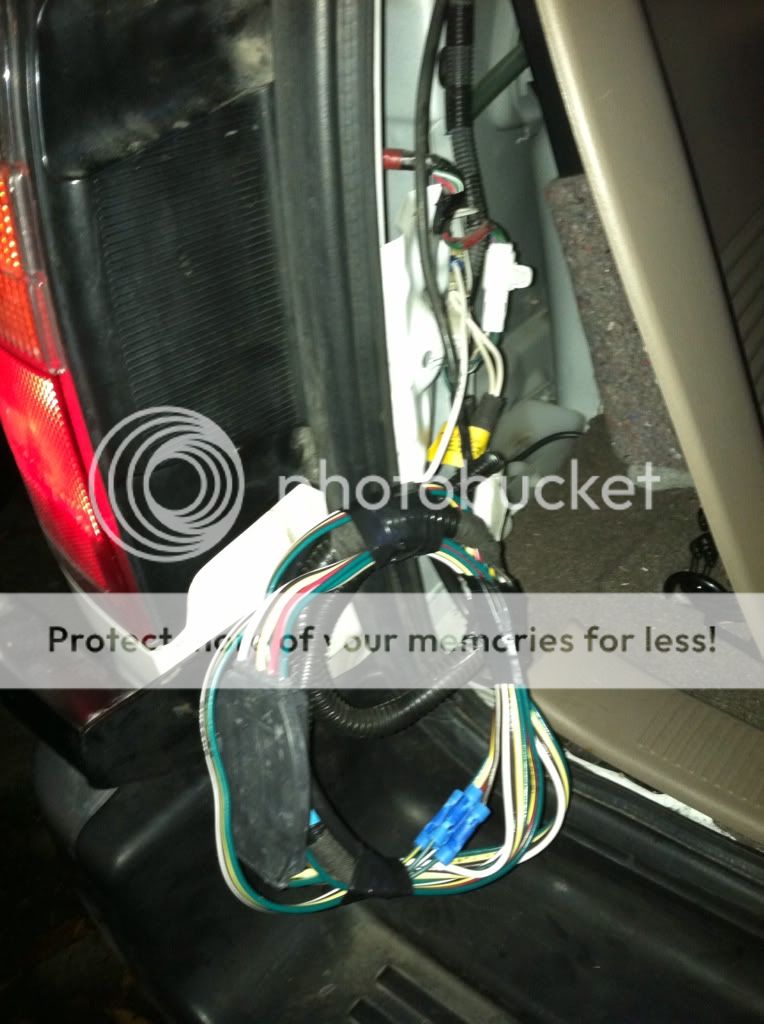
This summer I picked up my Brothers trailer, hooked up the wiring to the Toyota towing package connection on the hitch only to find that just the running lights worked. We suspected that the "Toyota 15 Amp Taillight Converter Auto Circuit Protection" box wired into the left rear taillight was faulty. Last night while with my Brother, we checked the wiring and all was connected properly and in good shape. He had a brand new aftermarket connector so we cut out the factory trailer connector and hooked up the replacement. Bada bing, bada boom- all works well now. Now we can finish other misc projects involving the trailer.


Dissassembly
922eaf4b.jpg~original


Stock "Toyota 15 Amp Taillight Converter Auto Circuit Protection"
2132362f.jpg~original


d0d74777.jpg~original


d11dd89b.jpg~original


All connected - in retrospect, should have probably cut the wires down a bit!
a6b4def9.jpg~original


Trailer LEDs are illuminated
1a9c26c4.jpg~original


And since we all like decals- I placed my Toyota Trail Teams decal (from a Tellico, TN run with the Toyota Trail teams just before I moved from NC to WA) on the lower portion of windshield.
365d6dc1.jpg~original
 
My New Years resolution is to minimize taking pictures for forum posting purposes. Pictures below taken in Leavenworth, WA with Nikon D80. Future pics will be taken with my Canon 40D.

Rainbow Trail - Ice climbing route
DSC_9359.jpg~original


DSC_9358.jpg~original


DSC_9348.jpg~original


DSC_9298.jpg~original


DSC_9292.jpg~original


DSC_9295.jpg~original
 
Last edited:
It's all about the pictures baby!!!! Also lovin' the Decal work :reddance:


PS: In the words of Eddie Murphy, "Merry New Year!!!"
 
It's all about the pictures baby!!!! Also lovin' the Decal work :reddance:


PS: In the words of Eddie Murphy, "Merry New Year!!!"

Thank you Sir. Question, do the snow pictures show up for anyone? If not, I'll alter the settings in Picasa or I'll switch back to photobucket.
 
I learned that changing a flat tire on a lifted 4Runner can be a challenge for the stock bottle jack! I made it but barely. I'm so used to just Hi-Lifting the sliders.
 
Missing Ignition 1 fuse & cargo box

Update:

The bulbs I purchased from Toyota for the climate control have all burned out! I'll fix this in time, but before I replace the bulbs, does anyone have any idea what may have caused these to be prematurely failed?

My tabs were due for renewal this year, and in WA every two years (if your vehicle qualifies) you're required to pay $15 for an emissions test. If you fail after the first attempt, you have one additional attempt to pass. If you fail to pass upon the second attempt, then the WA State Dept. of Ecology requires that the owner pay a minimum of $150.00 to have the vehicle diagnosed for waiver and if able even corrected, and return paying an additional $15 or a re-test.
So prior to my second attempt I plugged into OBD2 reader into the port and no code came up, I tested the battery, starter and alternator, and all were in proper/sufficient working condition. I thought the fail was a fluke, so prior to my second attempt I heat the vehicle up by driving 50 miles, take it in and sure enough I get my second fail.

I took my 4Runner to Toyota and after one hour of labor, the customer service rep comes out and says, we think something is wrong with your computer, and we'll need one more additional hour to diagnose. He advised me that we were close to $150, but still were unable to diagnose. So I reasoned that since I couldn't pass the test for the 3rd time without at the very minimum a diagnosis waiver, if I wanted to pass I'd need one more hour to pick up the $150 minimum. He assured me it would not be more than one hour as the tech was almost complete with the testing.

45 minutes later, the customer service rep returns with my paper work and says to me that my CPU was great and that the 4Runner will definitely pass the next test. He then tells me, an 'ignition 1' fuse was missing underneath the hood fuse box. This fuse sends the remaining data; catalyst, evaporative system, oxygen sensor and oxygen system heater data to the CPU.

After paying $237.62 at Toyota and $30 dollars at the Emissions testing station, my 4Runner passed!

Just thought I'd share in case anyone else runs into this issue!


------
After the flat tire and the bottle jack incident just after Christmas and the expensive emissions test I am back to modding!

My Brother and I picked up where we left off with the cargo box. We wanted to make sure the cargo box could be easily disassembled so we used 1/4" 3-Prong Tee Nuts. Takes a bit more time, but will be well worth it in the end.
Pictures below, and will post more next weekend.
8f79c81a.jpg~original

8b0cd793.jpg~original

5cde7d76.jpg~original


It is great to have my old Hi-Lift with me for the first time in 3.5 years. Once I have my the knock out 4x Innovations sliders, changing flats will be a breeze.

Thanks for checking!
 
Glad you got that emissions test sorted out but, I find it strange that your ignition 1 fuse be missing unless it was intentionally removed in the first place but anyhow...

Are you gonna finish up your cargo box by putting a cover on it? I take it that's a 36" high lift you got seeing as you're able to lay it down flat in that position.
 
Glad you got that emissions test sorted out but, I find it strange that your ignition 1 fuse be missing unless it was intentionally removed in the first place but anyhow...

Are you gonna finish up your cargo box by putting a cover on it? I take it that's a 36" high lift you got seeing as you're able to lay it down flat in that position.

I too cannot think of why the previous owner would have had the fuse removed. Maybe the used car lot did to hide the check engine light, but I think this is highly doubtful since the light did not come on once the fuse was replaced.

I am going to put a cover on the cargo box, with multiple access points via the three prong tree nuts, so if the drawers get stuck, I can easily remove the top. The Hi-Lift is actually a 48" model with the top spun down 180 degrees and 4" cut off of the jack. Fits perfectly.
 
Glad you got that emissions test sorted out but, I find it strange that your ignition 1 fuse be missing unless it was intentionally removed in the first place but anyhow...

Are you gonna finish up your cargo box by putting a cover on it? I take it that's a 36" high lift you got seeing as you're able to lay it down flat in that position.

I too cannot think of why the previous owner would have had the fuse removed. Maybe the used car lot did to hide the check engine light, but I think this is highly doubtful since the light did not come on once the fuse was replaced.

I am going to put a cover on the cargo box, with multiple access points via the three prong tree nuts, so if the drawers get stuck, I can easily remove the top. The Hi-Lift is actually a 48" model with the top spun down 180 degrees and 4" cut off of the jack. Fits perfectly.
 
Hey all, still around and here is an update.

The cargo box has changed. It will no longer house my Hi-Lift. Instead I met up with a local YotaTech member here in Seattle and purchased first gen roll bar from him.

I brought it home, peeled off the decals, padding and black duct tape and spent a few hours sanding. After multiple coats of primer, metallic grey paint and clear coat, in went the roll bar back into the 4Runner.

My T4R next to the sellers
5b500bca.jpg~original


painted
4c04e7d9.jpg~original


Since I found the roll bar, I took the hi-lift section out of the box and the same day found someone on craigslist giving away free drawers. I found two drawers the right size, picked them up and painted.

Installed w/ Shovel (not pictured in mounted position), re-finished hi-lift, 4d MagLite, fire extinguisher and new drawers. (all of which are mounted with bolts, hi-lift has two knobs for ease of use)
4565e55e.jpg~original


Re-finished Hi-Lift. Ditched the original black and red color scheme
d9189b11.jpg~original


While I was altering the back I also decided to install my two Infinity tweeters for a full surround sound experience!
f17157fd.jpg~original


More to come with the actual cargo box - stay tuned!
 
Last edited:
Roll bar looks right at home in there!

Thank you Sir! If I could just finish the top, mount the drawer guides, add the hinged compartments, sub compartment and new cargo cover to fit around the bar, I would feel a lot better about it. :ybrick:

Next weekend is the Solstice parade, the following weekend is another snow scramble, followed by a weekend down in Long Beach. Oh well- it will finish sometime! In the meantime I will enjoy progress! :thumb3:
 
Another update: Sorry but all are iPhone photos.

Turns out a 4Runner can easily carry 3 kegs of beer in the cargo area! If you're familiar with Georgetown Brewing- these are Manny's kegs!:cheers:
74a43514.jpg~original

bda33235.jpg~original


I was browsing craigslist a few weeks ago and stumbled on a like new K&N FIPKit for sale at a VERY good price. I posted it for the Seattle users and no one bought it. Then the intake was reposted so I offered him a little less and finally we settled on a very good price. I bought it more to clean up the engine bay (cosmetics). If it helps great. I have done the deckplate mod before and I wanted to try something new. While I installed the intake I also cleaned the Mass Airflow Sensor (MAF) and cleaned up the throttle body since its last cleaning a few months ago.

3ec48aee.jpg~original

1d60e114.jpg~original

761c1e0b.jpg~original

22766c5d.jpg~original


All washed/waxed:
1ec7de3c.jpg~original


Lemme know what you think!
 
Just happened across your thread while searching for a tail light converter part number. Cool build up and looks like one helluva party in this last post. I hope you're still rockin this 3rd gen.
 
I remember seeing this build a couple years ago, it feels like it was yesterday though. Weird how quickly time passes. Hope the 3rd gen is mildly built by now!
 
Hey guys - sadly not much has changed! Good news, I still have it! Other than carpeting the cargo box and replacing the starter it looks very similar.

Keeping this build simple, but still a ways to go!

Still want to add sliders, wheel spacers, swap out the CV's, and replacing the front suspension with a Toytec 600lb coil over.
 

Members online

Forum statistics

Threads
278,312
Messages
3,554,083
Members
248,016
Latest member
Advally Service

Trending content

Back
Top